Woodworker's Journal 1993-17-4, страница 37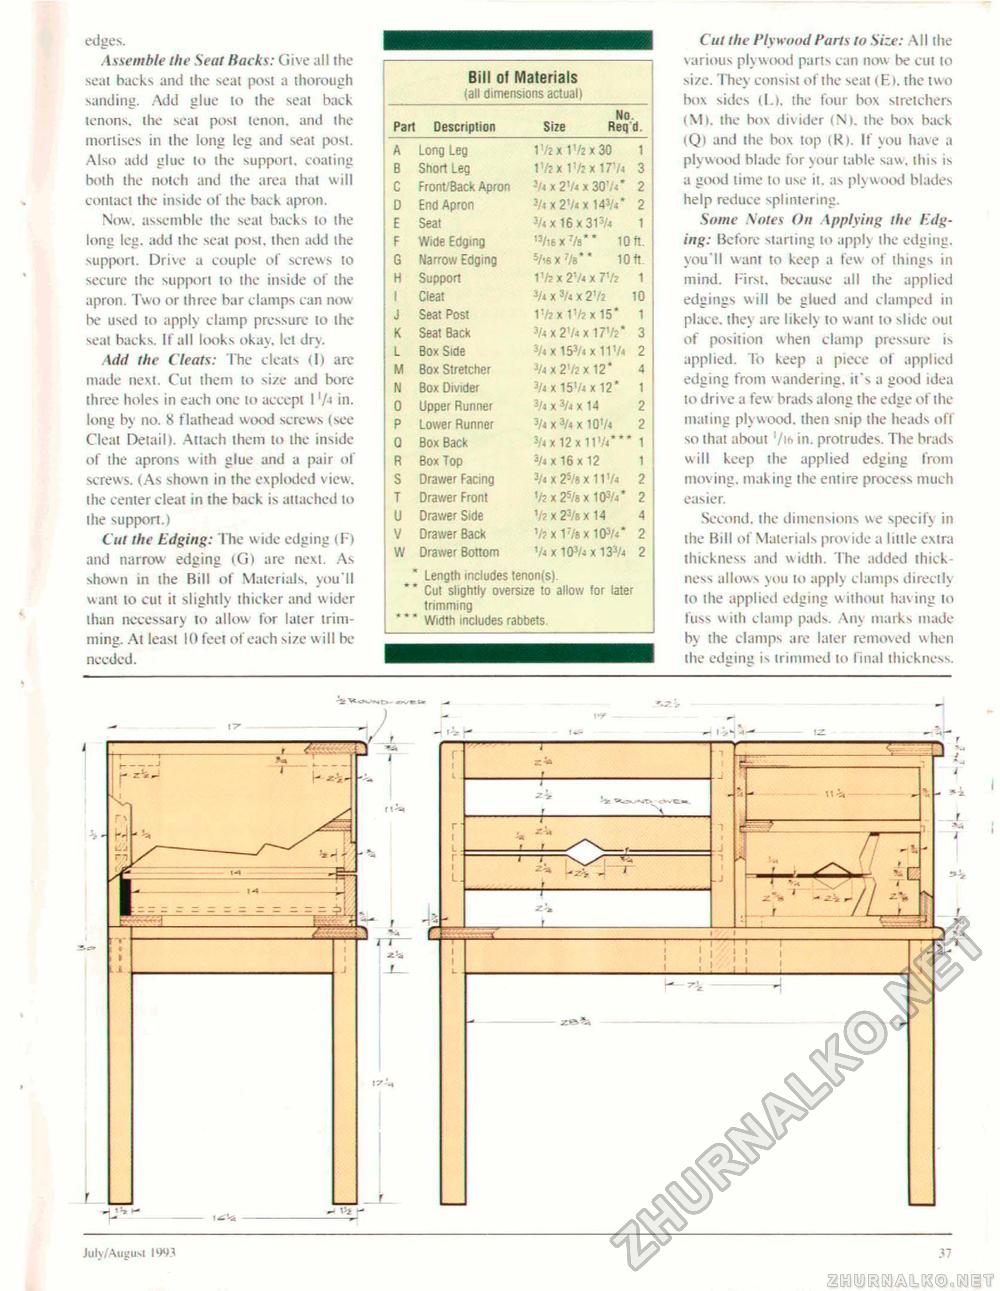
edges. Assemble the Seat Hacks: Give ail the seal backs and the seal posl a thorough sanding. Add glue to ihe seat back tenons, the seal post tenon, and ihe mortises in the long leg and seat post. Also add glue to the support, coating both the notch and the area that will contact the inside of the back apron, Now. assemble the seal backs to the long leg. add ihe seal post, then add the support. Drive a couple of screws 10 secure the support lo the inside of the apron. Two or three bar clamps can now be used to apply clamp pressure to the seat backs. If all looks okay, let dry. Add the Cleats: The deals (1) are made next. Cut them to size and bore three holes in each one to accept I lh in. long by no. 8 flathead wood screws (see Cfeai Detail). Attach them lo the inside of the aprons w ith glue and a pair of screws. (As shown in the exploded view, the center cleat in the back is attached to the suppon.) Cut the Edging: I he w ide edging 11 » and narrow edging (G) are next. As shown in the Bill of Materials, you'll want to cut it slightly thicker and wider than necessary 10 allow for later trimming. At least 10 feet of each size w ill be needed. Bill of Materials (all dimensions actual) Bill of Materials (all dimensions actual)
Length includes tenon(s). ** Cut slightly oversize lo allow for later trimming * * * Width includes rabbets. Cut the Plywood Parts to Size: All the various plywood parts can now be cut lo size. They consist of the seat (E). the two box sides (I.), the four box stretchers (Ml. the box divider (Ni. the box back (Q) and the box top <R). if you have a plywood blade for y our table saw, this is a g(H>d time to use it. as plywood blades help reduce splintering. Some Notes On Applying the Edging: Before starting to apply the edging, you'll want to keep a few of things in mind, first, because all the applied edgings will be glued and clamped in place, they are likely to want to slide out of position when clamp pressure is applied. To keep a piece of applied edging from wandering, it's a good idea to drive a few brads along the edge of the mating plywood, then snip the heads off so that about in. protrudes. The brads will keep the applied edging from moving, making the entire process much easier. Second, the dimensions we specify in the Bill of Materials provide a little extra thickness and width. The added thickness allows you to apply clamps directly lo ihe applied edging without having to fuss with clamp pads. Any marks made by the clamps are later removed when ihe edging is trimmed to final thickness. |
||||||||||||||||||||||||||||||||||||||||||||||||||||||||||||||||||||||||||||||||||||||||||||||||


