Woodworker's Journal 1993-17-5, страница 30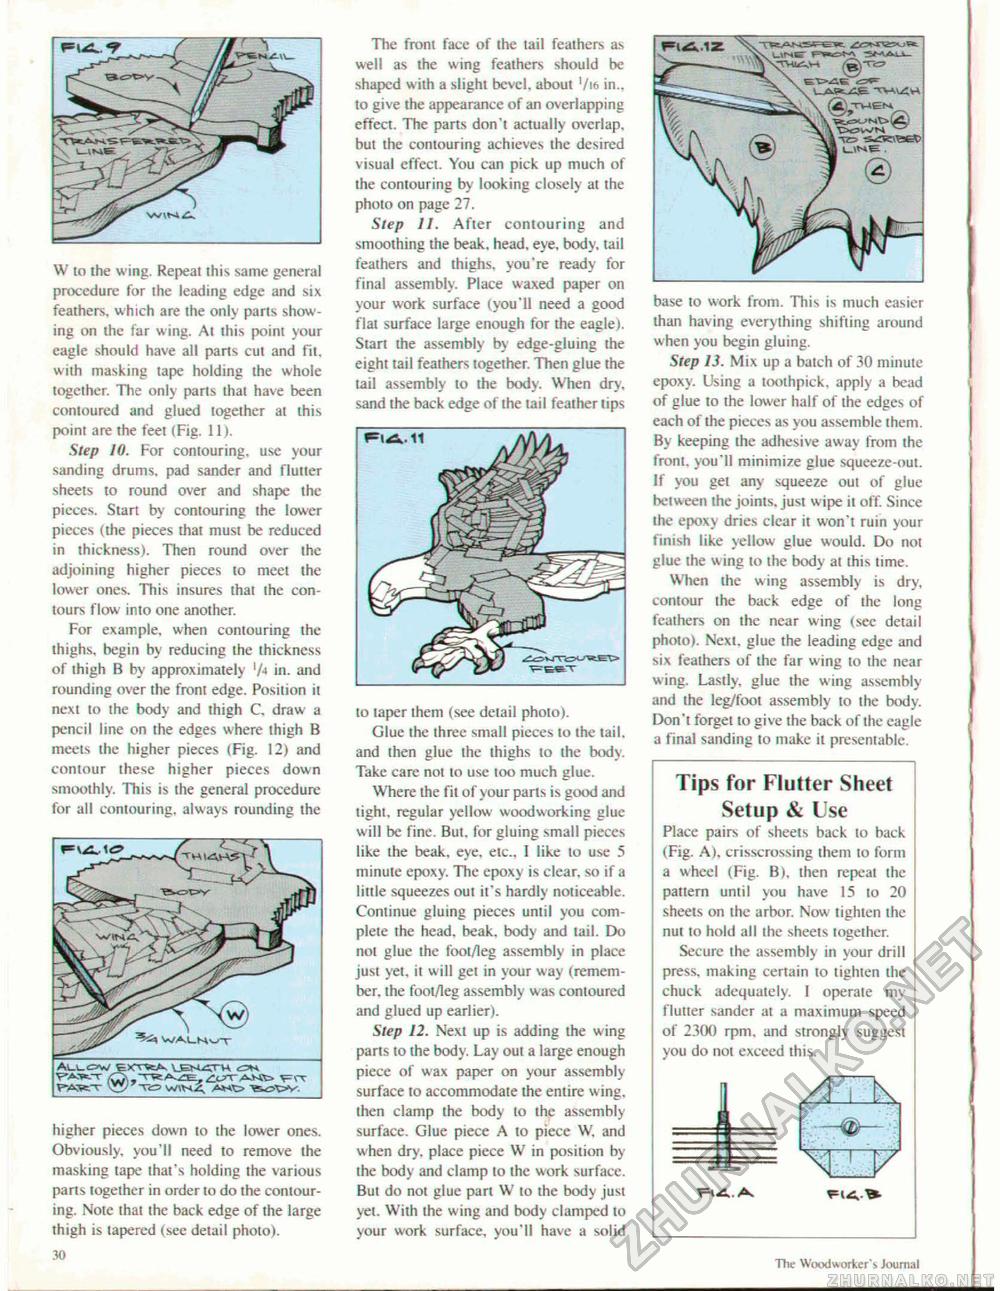
W to the wing. Repeat this same general procedure for the leading edge and six feathers, which are the only parts showing on the far wing. At this point your eagle should have al! parts cut and fit. with masking tape holding the whole together. The only parts that have been contoured and glued together at this point are the feet (Fig. 11). Step 10. For contouring, use your sanding drums, pad sander and flutter sheets to round over and shape the pieces. Start by contouring the lower pieces (the pieces that must be reduced in thickness). Then round over the adjoining higher pieces to meet the lower ones. This insures that the contours flow into one another. For example, when contouring the thighs, begin by reducing the thickness of thigh B by approximately in. and rounding over the front edge. Position it next to the body and thigh C, draw a pencil line on the edges where thigh B meets the higher pieces (Fig. 12) and contour these higher pieces down smoothly, This is the general procedure for all contouring, always rounding the higher pieces down to the lower ones. Obviously, you'll need to remove the masking tape that's holding the various parts together in order to do the contouring. Note that the back edge of the large thigh is tapered (see detail photo). 30 The front face of the tail feathers as well as the wing feathers should be shaped with a slight bevel, about '/te in., to give the appearance of an overlapping effect. The parts don't actually overlap, but the contouring achieves the desired visual effect. You can pick up much of the contouring by looking closely at the photo on page 27. Step II. After contouring and smoothing the beak, head, eye, body, tail feathers and thighs, you're ready for final assembly. Place waxed paper on your work surface (you'll need a good flat surface large enough for the eagle). Start the assembly by edge-gluing the eight tail feathers together. Then glue the tail assembly to the body. When dry, sand the back edge of the tail feather tips to taper them (see detail photo). Glue the three small pieces to the tail, and then glue the thighs to the body. Take care not to use loo much glue. Where the fit of your parts is good and tight, regular yellow woodworking glue will be fine. But. for gluing small pieces like the beak, eye, etc.. I like to use 5 minute epoxy. The epoxy is clear, so if a little squeezes out it's hardly noticeable. Continue gluing pieces until you complete the head. beak, body and tail. Do not glue the foot/leg assembly in place just yet, it will get in your w ay (remember, the foot/leg assembly was contoured and glued up earlier). Step 12. Next up is adding the wing parts to the body. Lay out a large enough piece of wax paper on your assembly surface to accommodate the entire wing, then clamp the body to the assembly surface. Glue piece A to piece W. and when dry. place piece W in position by the body and clamp to the work surface. But do not glue part W to the body just yet. With the wing and body clamped to your work surface, you'll have a solid base to work from. This is much easier than having everything shifting around when you begin gluing. Step 13. Mix up a batch of 30 minute epoxy. Using a toothpick, apply a bead of glue to the lower half of the edges of each of the pieces as you assemble them. By keeping the adhesive away from the front, you'll minimize glue squeeze-out. If you get any squeeze out of glue between the joints, just wipe it off. Since the epoxy dries clear it won't ruin your finish like yellow glue would. Do not glue the wing to the body at this time. When the wing assembly is dry, contour the back edge of the long feathers on the near wing (see detail photo). Next, glue the leading edge and six feathers of the far wing to the near wing. Lastly, glue the wing assembly and the leg/foot assembly to the body. Don't forget to give the back of the eagle a final sanding to make it presentable. Tips for Flutter Sheet Setup & Use Place pairs of sheets back to back (Fig. A), crisscrossing them to form a wheel (Fig. B>, then repeat the pattern until you have 15 to 20 sheets on the arbor. Now tighten the nut to hold all the sheets together. Secure the assembly in your drill press, making certain to tighten the chuck adequately. I operate my flutter sander at a maximum speed of 2300 rpm, and strongly suggest you do not exceed this.
A. 30 The Woodw orker'5 Journal WALMVT FlA. 11 |
|||||||||


