Woodworker's Journal 1993-17-5, страница 28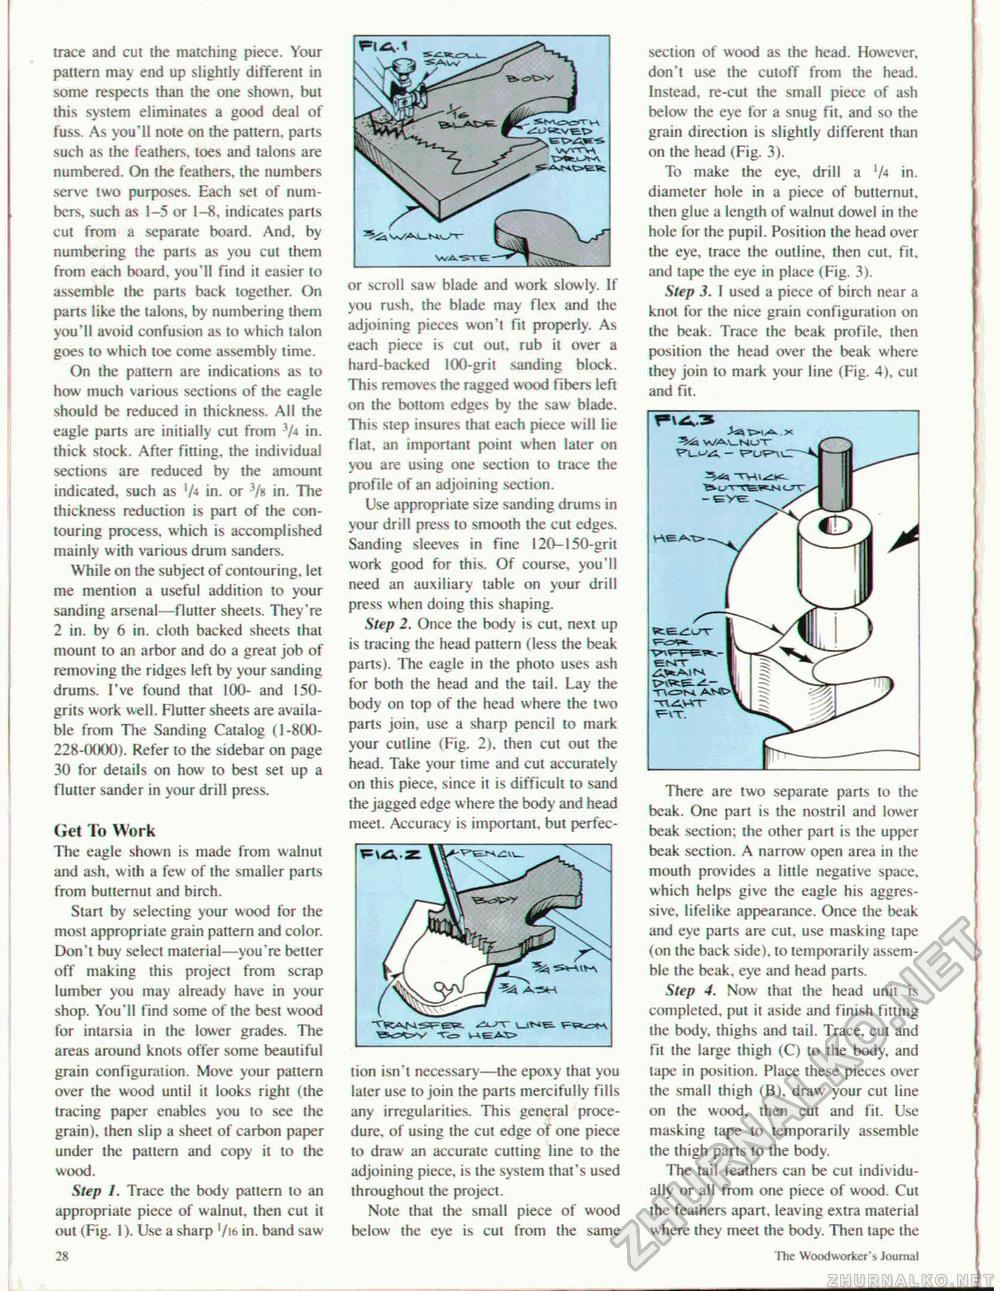
trace and cut the matching piece. Your pattern may end up slightly different in some respects than the one shown, but this system eliminates a good deal of fuss. As you'll note on the pattern, parts such as the feathers, toes and talons are numbered. On the feathers, the numbers serve two purposes. Each set of numbers, such as 1-5 or 1-8, indicates parts cut from a separate board. And. by numbering the parts as you cut them from each board, you'll find it easier to assemble the parts back together. On parts like the talons, by numbering them you'll avoid confusion as to which talon goes to which toe come assembly time. On the pattern are indications as to how much various sections of the eagle should be reduced in thickness. All the eagle parts are initially cut from 3/4 in. thick stock. After fining, the individual sections are reduced by the amount indicated, such as 'A in. or 3/» in. The thickness reduction is part of the contouring process, which is accomplished mainly with various drum sanders. While on the subject of contouring, let me mention a useful addition to your sanding arsenal—flutter sheets. They're 2 in. by 6 in. cloth backed sheets that mount to an arbor and do a great job of removing the ridges left by your sanding drums. I've found that 100- and 150-grits work well. Flutter sheets are available from The Sanding Catalog (1-800-228-0000). Refer to the sidebar on page 30 for details on how to best set up a flutter sander in your drill press. Get To Work The eagle shown is made from walnut and ash. with a few of the smaller parts from butternut and birch. Start by selecting your wood for the most appropriate grain pattern and color. Don't buy select material—you're better off making this project from scrap lumber you may already have in your shop. You'll find some of the best wood for intarsia in the lower grades. The areas around knots offer some beautiful grain configuration. Move your pattern over the wood until it looks right (the tracing paper enables you lo see the grain), then slip a sheet of carbon paper under the pattern and copy it to the wood. Step 1. Trace the body pattern lo an appropriate piece of walnut, then cut il out (Fig. 1). Use a sharp */i«> in. band saw 28 or scroll saw blade and work slowly. If you rush, the blade may flex and the adjoining pieces won't fit properly. As each piece is cut out. rub it over a hard-backed 100-grit sanding block. This removes the ragged wood fibers left on the bottom edges by the saw blade. This step insures that each piece will lie flat, an important point when later on you are using one section to trace the profile of an adjoining section. Use appropriate size sanding drums in your drill press to smooth the cut edges. Sanding sleeves in fine 120—150-grit work good for this. Of course, you'll need an auxiliary table on your drill press when doing this shaping. Step 2. Once the body is cut, next up is tracing the head pattern (less the beak parts). The eagle in the photo uses ash for both the head and the tail. Lay the body on top of the head where the two parts join, use a sharp pencil to mark your cutline (Fig. 2). then cut out the head. Take your time and cut accurately on this piece, since it is difficult to sand the jagged edge where the body and head meet. Accuracy is important, but perfec tion isn't necessary—the epoxy that you later use to join the parts mercifully fills any irregularities. This general procedure. of using the cut edge of one piece to draw an accurate cutting line to the adjoining piece, is the system that's used throughout the project. Note that the small piece of wood below the eye is cut from the same section of wood as the head. However, don't use the cutoff from the head. Instead, re-cut the small piece of ash below the eye for a snug fit. and so the grain direction is slightly different than on the head (Fig. 3). To make the eye, drill a 'A in. diameter hole in a piece of butternut, then glue a length of walnut dowel in the hole for the pupil. Position the head over the eye, trace the outline, then cut. fit, and tape the eye in place (Fig. 3). Step .?. I used a piece of birch near a knot for the nice grain configuration on the beak. Trace the beak profile, then position the head over the beak where they join to mark your line (Fig. 4), cut and fit. There are two separate parts to the beak. One part is the nostril and lower beak section; the other part is the upper beak section. A narrow open area in the mouth provides a little negative space, which helps give the eagle his aggressive, lifelike appearance. Once the beak and eye parts are cut. use masking tape (on the back side), to temporarily assemble the beak, eye and head parts. Step 4. Now that the head unit is completed, put it aside and finish fitting the body, thighs and tail. Trace, cut and fit the large thigh (C) to the body, and tape in position. Place these pieces over the small thigh (B), draw your cut line on the wood, then cut and fit. Use masking tape to temporarily assemble the thigh parts to the body. The tail feathers can be cut individually or ail from one piece of wood. Cut the feathers apart, leaving extra material where they meet the body. Then tape the The Woodw orker'5 Journal |


