Woodworker's Journal 1993-17-5, страница 46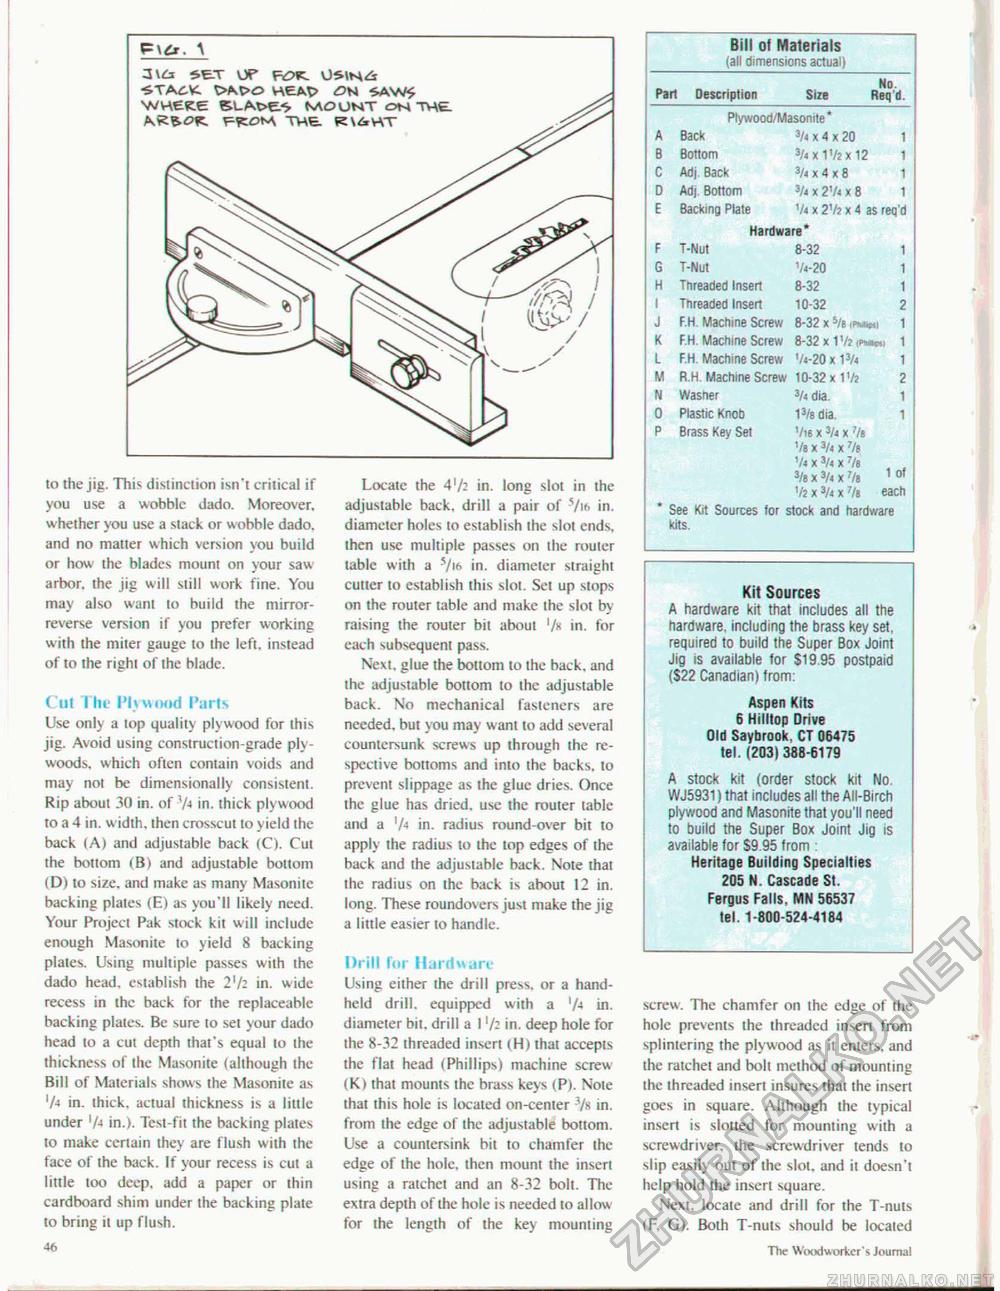
to the jig. This distinction isn't critical it" you use a wobble dado. Moreover, whether you use a stack or w obble dado, and no matter which version you build or how the blades mount on your saw arbor, the jig will still work fine. You may also want to build the mirror-reverse version if you prefer working w ith the miter gauge to the left, instead of to the right of the blade. Cot The Plywood Parts Use only a top quality plywood for this jig. Avoid using construction-grade plywoods, which often contain voids and may not be dimensionally consistent. Rip about 30 in. of 7» in. thick plywood to a 4 in. width, then crosscut to yield the back (A) and adjustable back <C). Cut the bottom <Bt and adjustable bottom (D) to size, and make as many Masonite backing plates (E) as you'll likely need. Your Project Pak stock kit will include enough Masonite lo yield 8 backing plates. Using multiple passes with ihe dado head, estahlish the 2'/; in. wide recess in the back for the replaceable backing plaies. Be sure to set your dado head to a cut depth that's equal to the thickness of the Masonite (although the Bill of Materials shows the Masonite as 'A in. thick, actual thickness is a little under 'A in.). Test-fit the backing plates to make certain they are flush with the face of the back. If your recess is cut a little too deep, add a paper or thin cardboard shim under the backing plate to bring il up flush. 4ft Locate the 4'/2 in. long slot in the adjustable back, drill a pair of -7k> in. diameter holes to establish the slol ends, then use multiple passes on the router table with a 5/i<> in. diameter straight cutter to establish this slol. Set up slops on the router table and make the slot by raising the router bit about in. for each subsequent pass. Next, glue the bottom to the back, and the adjustable bottom lo the adjustable back. No mechanical fasteners are needed, but you may want to add several countersunk screws up through ihe respective bottoms and into the backs, lo prevent slippage as the glue dries. Once the glue has dried, use the router table and a 'A in. radius round-over bit to apply the radius to the top edges of the hack and the adjustable back. Note that the radius on ihe back is about 12 in. long. These roundovers just make the jig a little easier lo handle. Drill for Hardware Using either the drill press, or a handheld drill, equipped with a 'A in. diameter bit. drill a 1in. deep hole for ihe 8-32 threaded insert (H) thai accepts the flat head (Phillips) machine screw (K) thai mounts ihe brass keys (P). Note lhat this hole is located on-cenier 7s in. from ihe edge of ihe adjustable bottom. Use a countersink bit to chamfer ihe edge of the hole, then mount the insert using a ratchet and an 8-32 bolt. The extra depth of ihe hole is needed to allow for ihe length of the key mourning Bill of Materials (all dimensions actual) Pan Description Size Req'd. Plywood/Masonite* Pan Description Size Req'd. Plywood/Masonite*
* See Kit Sources for stock and hardware kits. * See Kit Sources for stock and hardware kits. Kit Sources A hardware kit that includes all the hardware, including the brass key set. required to build the Super Box Joint Jig is available for Si 9 95 postpaid (S22 Canadian) Irom: Aspen Kits 6 Hilltop Drive Old Saybrook, CT 06475 tel. 1203)388-6179 A stock kit (order stock kit No. WJ5931) that includes all the All-Birch plywood and Masonite that you'll need to build the Super Box Joint Jig is available for S9.95 from : Heritage Building Specialties 205 N. Cascade St. Fergus Falls, MN 56537 lei. 1-800-524-4184 screw. The chamfer on the edge of the hole prevents the threaded insert from splintering the plywood as it enters, and the ratchet and bolt method of mounting the threaded insert insures that the insert goes in square. Although the typical insert is slotted for mounting with a screwdriver, the screwdriver tends to slip easily out of the slot, and it doesn't help hold the insert square. Next, locale and drill for the T-nuts (F, G). Both T-nuls should be located 46 The Woodw orker'5 Journal |
|||||||||||||||||||||||||||||||||||||||||||||||||||||||||||||||||||||||||||||||||||


