Woodworker's Journal 1993-17-6, страница 57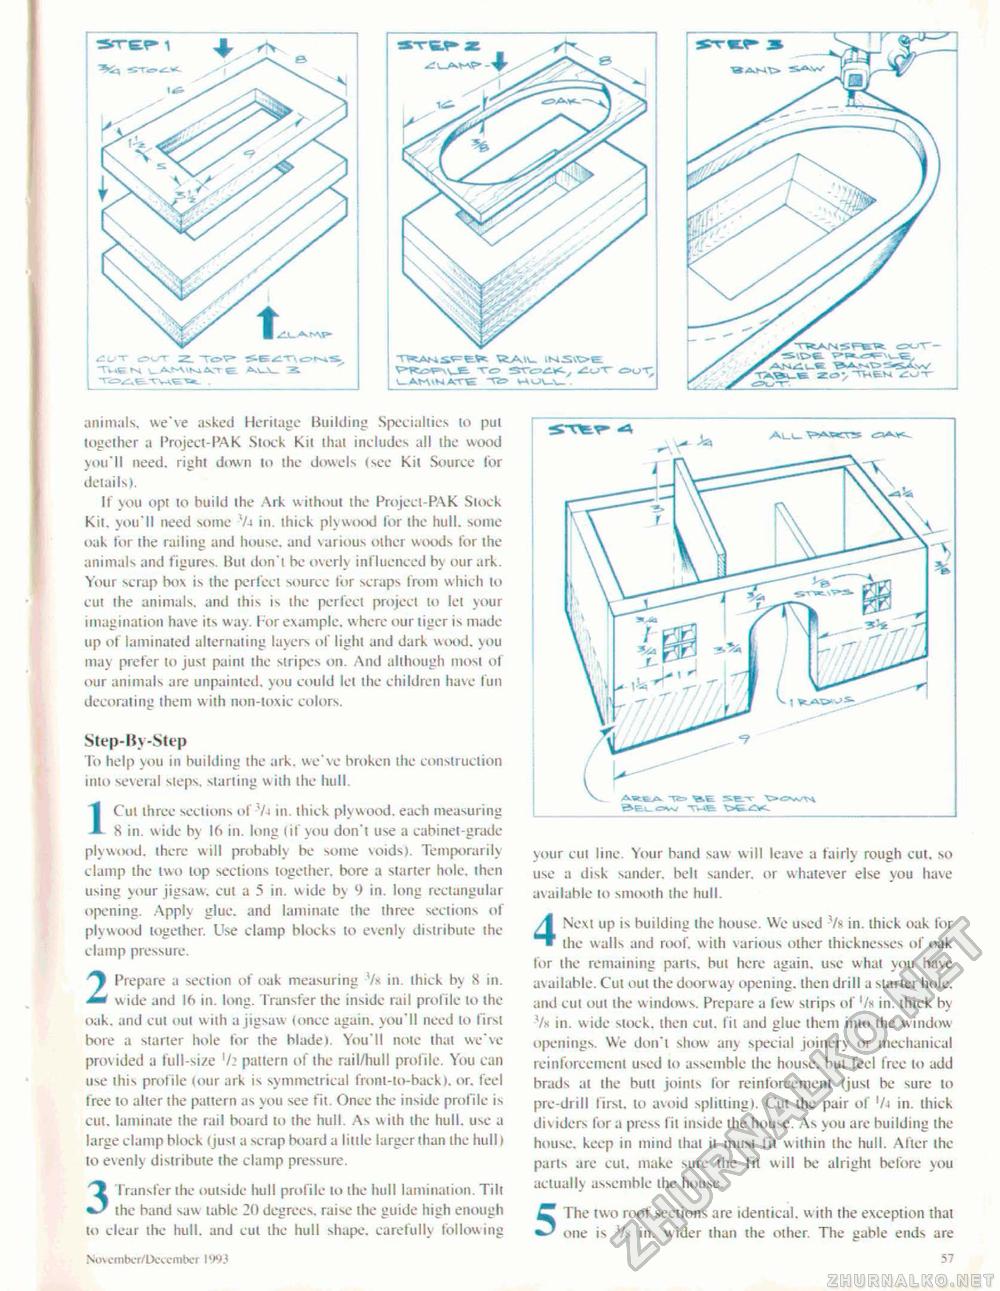
•Srrcp- 1 TWCN v^Avi^AvKuA^rr e ^ animals, we've asked Heritage Building Specialties to put together a Project-PAK Stock Kit that includes all the wood you'll need, right down to the dowels (see Kit Source for details). If you opt to build the Ark without the Project-PAK Slock Kit. you'll need some V-i in. thick plywood for the hull, some oak for ihe railing and house, and various other woods for the animals and figures. Hut don't be overly influenced by our ark. Your scrap bo\ is the perfect source for scraps from which to cut the animals, and this is the perfect project to let your imagination have its way. for example, w here our tiger is made up of laminated alternating layers of light and dark wood, you may prefer to just paint ihe siripes on. And although most of our animals are unpainted, you could let the children have fun decorating them w ith non-toxic colors. Step-By-Step To help you in building the ark. we've broken the construction into several steps, starting wiih ihe hull. ICut three sections of Vt in. thick plywood, each measuring 8 in. wide by 16 in. long (if you don't use a cabinet-grade plywood, there will probably be some voids). Temporarily clamp the two top sections together, bore a starter hole, then using your jigsaw, cul a 5 in. wide by 9 in. long rectangular opening. Apply glue, and laminate the three sections of plywood together. Use clamp blocks to evenly distribute the clamp pressure. 2 Prepare a section of oak measuring Vx in. thick by 8 in. wide and 16 in. long. Transfer the inside rail profile to the oak. and cut out with a jigsaw (once again, you'll need lo lirsl bore a starter hole for the blade). You'll note thai we've provided a full-size pattern of the rail/hull profile. You can use this profile (our ark is sy mmetrical fronl-lo-hack). or. feel tree to alter the pattern as you see fit. Once the inside profile is cut. laminate the rail board to ihe hull. As wiih the hull, use a large clamp block (jusl a scrap board a little larger lhan the hull) to evenly distribute the clamp pressure. 3 Transfer the outside hull profile to the hull lamination. Till the band saw table 20 degrees, raise the guide high enough to clear the hull, and cul the hull shape, carefully following your cut line. Your band saw will leave a fairly rough cut. so use a disk sander. belt sander. or whatever else you have available lo sriuvoth Ihe hull. 4 Next up is building the house. We used V« in. thick, oak for the walls and roof, wiih various other thicknesses of oak for the remaining parts, but here again, use what you have available. Cut out the doorw ay opening, then drill a starter hole, and cut out the w indows. Prepare a few sirips of '/k in. thick by Vk in. wide stock, then cul. fil and glue them into the window openings. We don't show any special joinery or mechanical reinforcement used lo assemble the house, but feel free lo add brads at the butt joints for reinforcement (just be sure lo prc-drill lirsl. to avoid splitting). Cul ihe pair of '/a in. thick div iders lor a press fil inside Ihe house. As you arc building the house, keep in mind thai it must lit within the hull. After the parts are cut. make sure ihe fit will be alright before you actually assemble the house. 5 The two roof sections are identical, with the exception that one is Vx in. wider than the other. The gable ends are Nt>\vmber/Dct:cmtx.'r IW.' 57 |


