Woodworker's Journal 1993-17-6, страница 69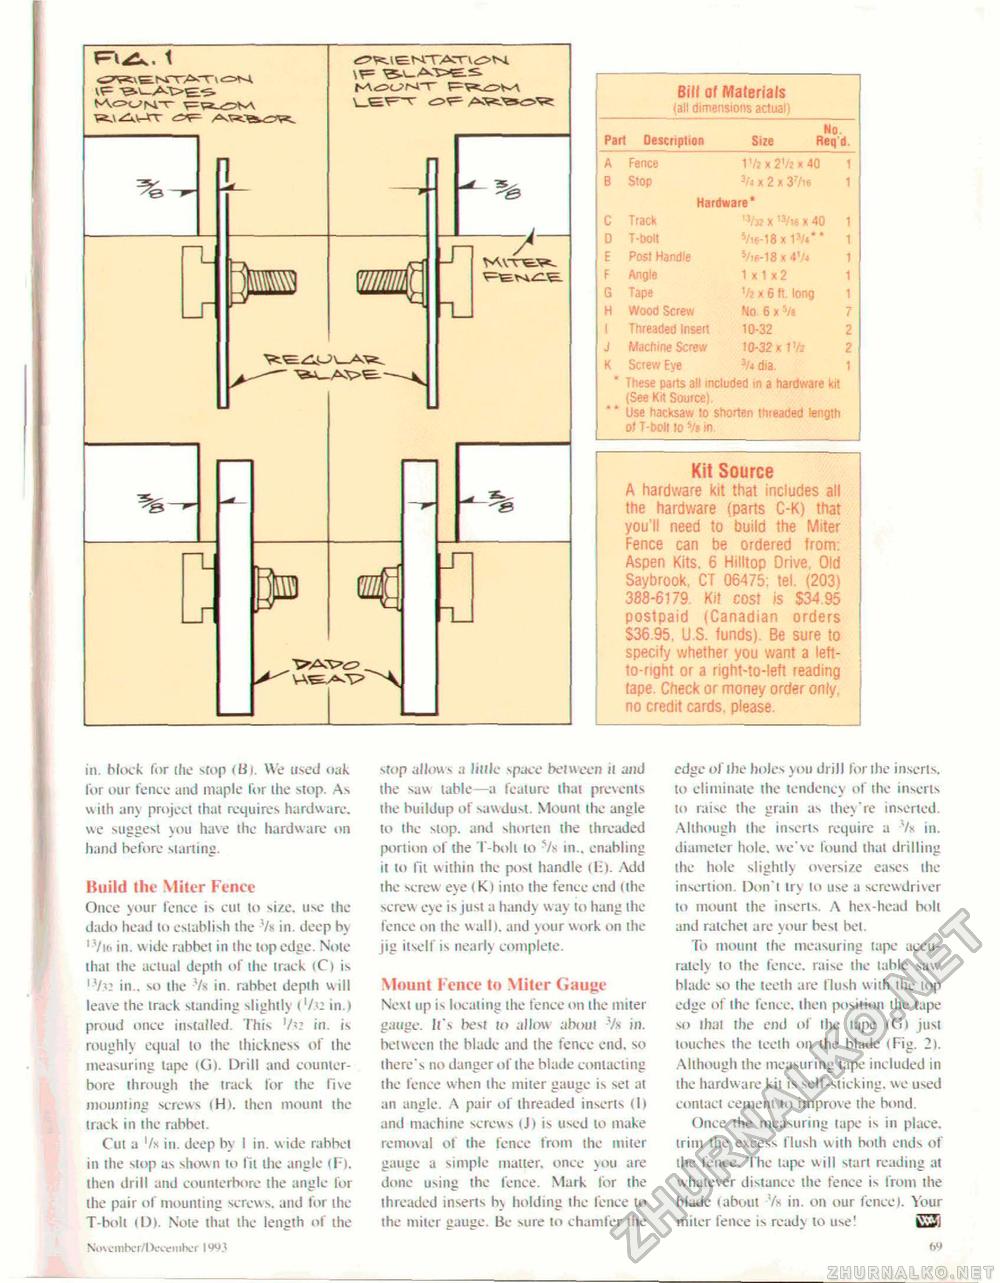
(S^ieNTAT^K jsa Bill of Materials {all dimensions actual) Pari Description Size No. Req d. Fence 1Vs x 2V? x 40 1 Slop 3/4 x 2 x 37is 1 Hardware* Track "/a x T3/ie > 40 1 T-bolt Vw-lSxtV* l Post handle 5/ib-18x A\u 1 Angle 1x1x2 1 Tape 'ft x 6 It. long 1 Wood Screw No 6 x Vb 7 Threaded Insert 10-32 2 Machine Screw 10-32 xtVz 2 Screw Eye dia. 1 These parts alt included in a hardware kit (Sea Kit Source). Use hacksaw to shorten threaded length oi T-boll to 5/e in Kit Source A hardware kit that includes all the hardware (parts C-K) that you II need to build the Miter Fence can be ordered from: Aspen Kits. 6 Hilltop Drive, Old Saybrook. CT 06475: tel. (203) 388-6179. Kit cost is $34.95 postpaid (Canadian orders S36.95. U.S. funds). Be sure to specify whether you want a left-to-nght or a rigtit-to-left reading lape. Check or money order only, no credit cards, please. in. block for the stop <Bi, We used oak for our fence and maple lor the stop. As with any project that requires hardware, we suggest you have the hardware on hand before starting. Build the \liler Fence Once your fence is cut to size, use the dado head to establish the Vs in. deep by ' Vk. in. wide rabbet in the top edge. Note that the actual depth of the track tC) is in., so the Vs in. rabbet depth will leave the track standing slightly i '/.'* in.) proud once installed. This '/*z in. is roughly equal to the thickness of the measuring tape <G). Drill and counter-bore through the track for the five mounting screws (Hi. then mount the track in the rabbet. Cut a '/x in. deep by 1 in. wide rabbet in the stop as shown to fit the angle (F). then drill and counterbore the angle for the pair of mounting screws, and for the T-bolt i Dl. Note that the length of the NiiMjmlvr/lVcenibor IW stop allows a little space between it and the saw table—a feature that prevents the buildup of sawdust. Mount the angle to the slop, and shorten the threaded portion of the T-holi lo Vs in., enabling it to fit within the post handle (F). Add the screw eye (K) into the fence end tthe screw eye is just a handy w ay to hang the fence on the wall), and your work on the jig itself is nearly complete. Mount Fence to Miter Gauge Next up is locating the fence on ihe miter gauge. It's best k> allow about Vs in. between the blade and the fence end. so there's no danger of the blade contacting the fence when the miter gauge is set at an angle. A pair of threaded inserts (II and machine screws (J> is used lo make removal of the fence from the miter gauge a simple matter, once >ou are done using the fence. Mark for the threaded inserts b\ holding the fence to the miter gauge. Be sure to chamfer the edge of ihe holes you drill for the inserts, to eliminate the tendency of the inserts to raise the grain as they're inserted. Although the inserts require a Vk in. diameter hole, we've found that drilling the hole slightly oversize eases the insertion. Don't try to use a screwdriver lo mount the inserts, A hex-head bolt and ratchet are your be si bet. To mount the measuring tape accurately to Ihe fence, raise tlte table saw blade so the teeth are flush with the top edge of ihe fence, then position the tape so ihai the end of the tape IG) just touches the teeth on the blade (Fig. 2). Although the measuring tape included in the hardware kit is self-sticking, we used contact cement to improve the bond. Once the measuring tape is in place, trim the excess flush with both ends of ihe fence. The tape will start reading at whatever distance the fence is from the blade (about h in. on our fence). Your miler fence is reads lo use! 623i 6<i |


