Woodworker's Journal 1994-18-1, страница 43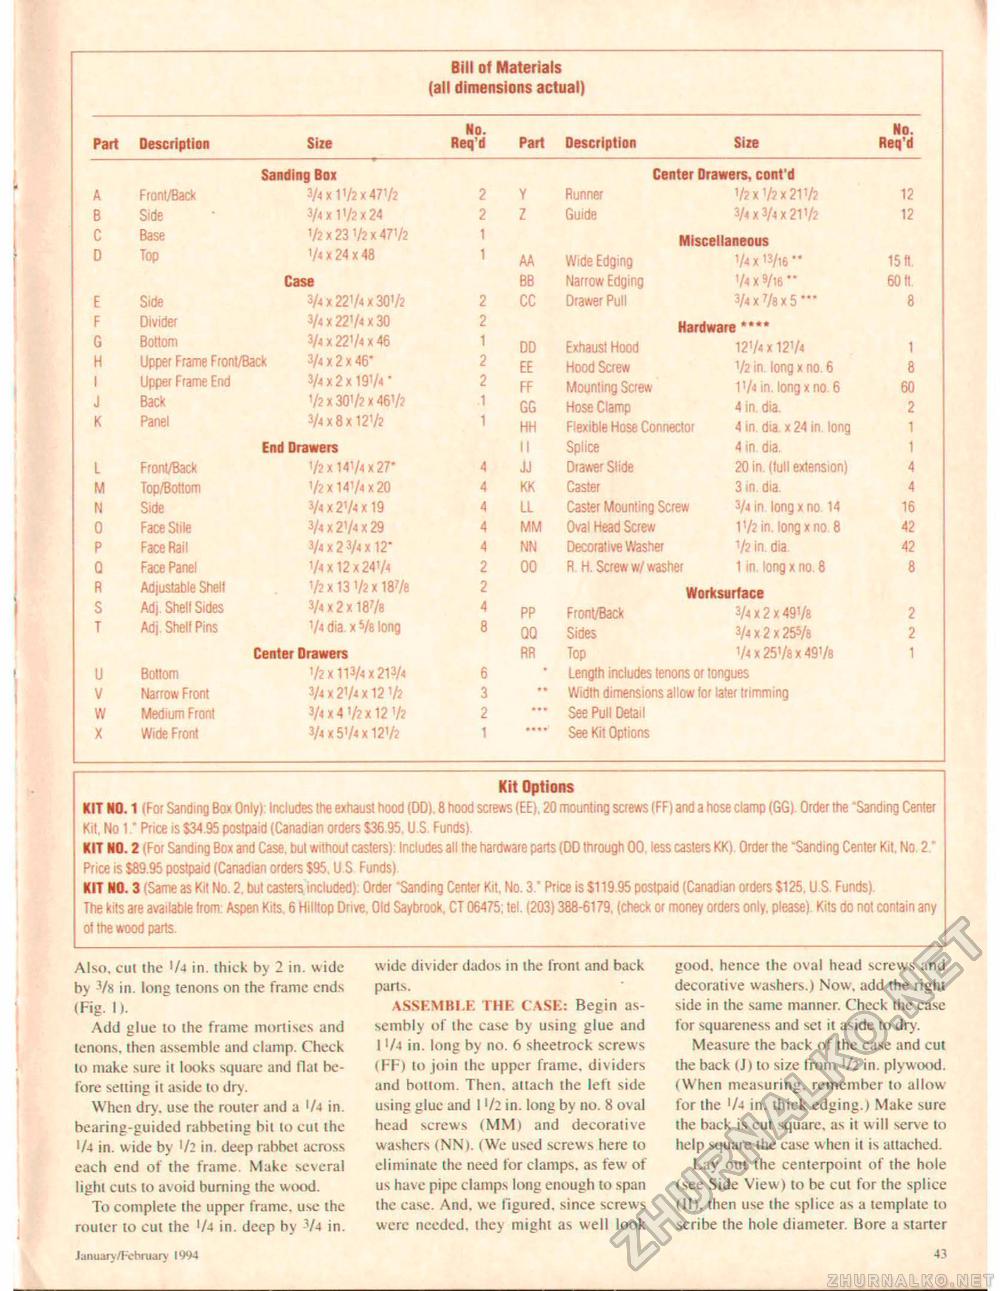
Kit Options KIT NO. 1 (For Sanding Bo* Only): Includes the exhaust hood (DD). 8 hood screws (EE), 20 mounting screws (FF) and a hose clamp (GG). Order the "Sanding Center Kit, No !Price is $34.95 postpaid (Canadian orders $36.95, U.S. Funds). KIT NO. 2 (For Sanding Box and Case, but without casters): Includes all the hardware parts (DD through 00. less casters KK). Order the "Sanding Center Kit. No 2" Price is $89.95 postpaid (Canadian orders $95. U S Funds) KIT NO. 3 (Same as Kit No. 2, but casters included) Order 'Sanding Center Kit, No. 3." Price is $119.95 postpaid (Canadian orders $125, U S Funds) The kits are available irom Aspen Kits. 6 Hilltop Drive. Old Saybrook, CT 06475; tel. (203) 388-6179, (check or money orders only, please) Kits do not contain any ol the wood parts. Also, cut the '/j in. thick by 2 in. wide by Vk in. long tenons on the frame ends (Fig. I). Add glue to the frame mortises and tenons, then assemble and clamp. Check lo make sure it looks square and flat before setting it aside to dry . When dry. use the router and a Ua in. bearing-guided rabbeting bit lo cut the l/4 in. wide by '/: in. deep rabbet across each end of the frame Make several light cuts to avoid burning the wood. To complete the upper frame, use the router to cut the '/■! in. deep by -V4 in. wide divider dados in the front and back parts. ASSEMBLE! THE CASE: Begin assembly of the case by using glue and I 'A in. long by no. 6 sheetrock screws (FF) to join the upper frame, dividers and bottom. Then, attach the left side using glue and 1 in. long by no. 8 oval head screws (MM) and decorative washers (NN). (We used screws here to eliminate the need for clamps, as few of us have pipe clamps long enough to span the case. And. we figured, since screws were needed, they might as well look good, hence the oval head screws and decorative washers.) Now, add the right side in the same manner. Check the case for squareness and set it aside to dry. Measure the back of the case and cut the back (J) to size from 1 /2 in. plywood. (When measuring, remember to allow for the '/4 in. thick edging.) Make sure the back is cut square, as it will serve to help square the case when it is attached. Lay out the centerpoint of the hole (see Side View) to be cut for the splice (11). then use the splicc as a template to scribe the hole diameter. Bore a starter January/February IW4 43 |
||||||||||||||||||||||||||||||||||||||||||||||||||||||||||||||||||||||||||||||||||||||||||||||||||||||||||||||||||||||||||||||||||||||||||||||||||||||||||||||||||||||||||||||||||||||||||||||||||||||||||||||||||||||||||||||||||||||||||||||||||||||||||||||||


