Woodworker's Journal 1994-18-1, страница 40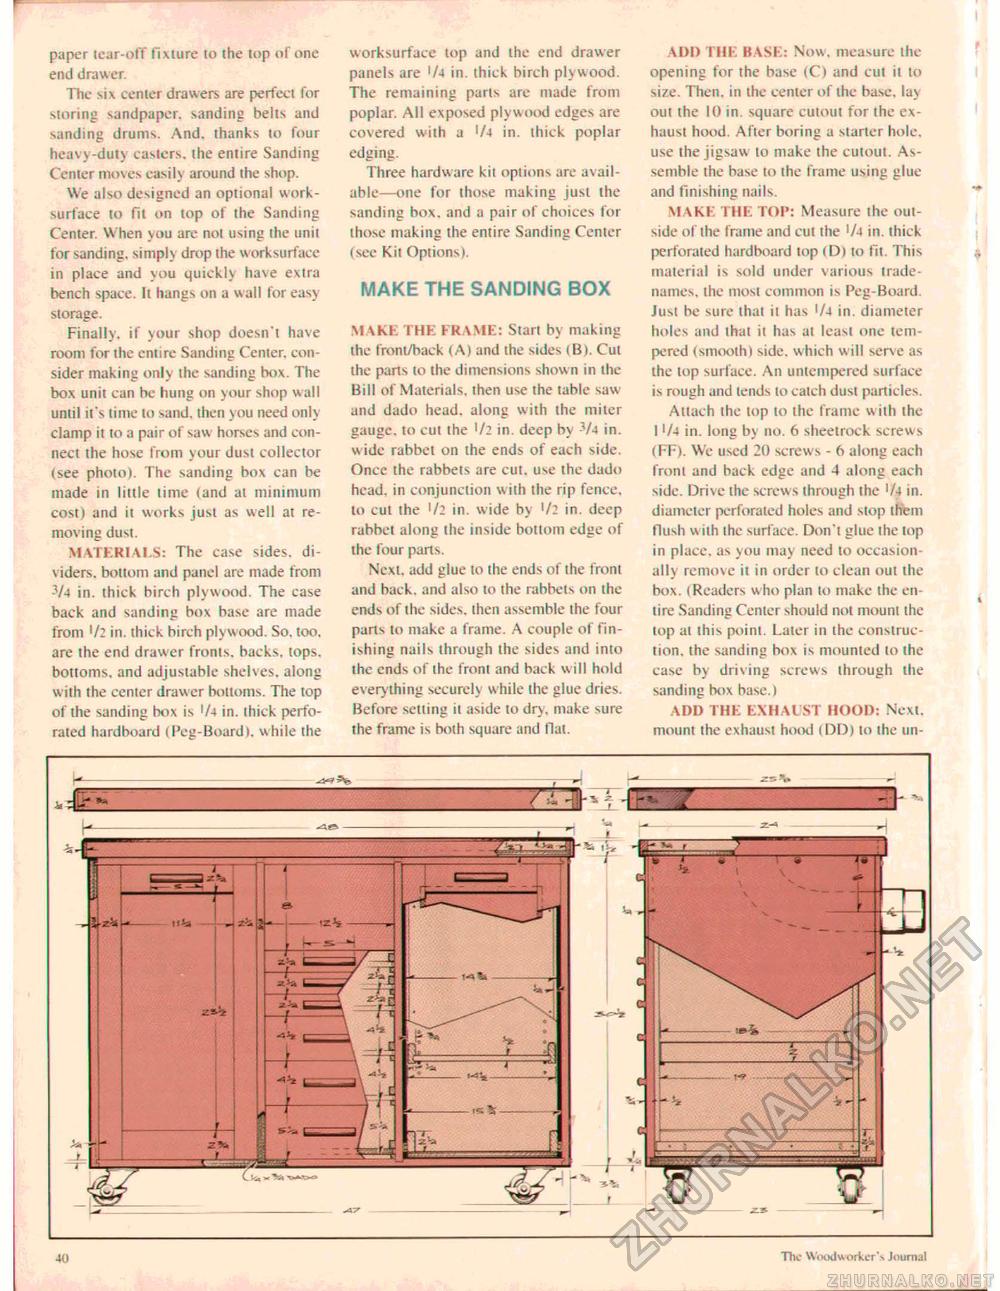
paper tear-off fixture to the top of one end drawer. The six center drawers are perfect for storing sandpaper, sanding belts and sanding drums. And. thanks to four heavy -duty casters, the entire Sanding Center moves easily around the shop. We also designed an optional work-surface to fit on top of the Sanding Center. When you are not using the unit for sanding, simply drop the worksurface in place and you quickly have extra bench space. It hangs on a wall for easy storage. Finally, if your shop doesn't have room for the entire Sanding Center, consider making only the sanding box. The box unit can be hung on your shop wall until it's time lo sand, then you need only clamp it to a pair of saw horses and connect the hose from your dust collector (see photo). The sanding box can be made in little time (and at minimum cost) and it works just as well at removing dust. MATERIALS: The case sides, dividers. bottom and panel are made from -V-t in. thick birch plywood. The case back and sanding box base are made from '/2 in. thick hirch plywood. So. too. are the end drawer fronts, backs, lops, bottoms, and adjustable shelves, along with the center drawer bottoms. The top of the sanding box is '/4 in. thick perforated hardboard (Peg-Board), while the worksurface top and the end drawer panels are '/j in. thick birch plywood. The remaining parts are made from poplar. All exposed plywood edges are covered with a '/4 in. thick poplar edging. Three hardware kii options are available—one for those making jusl the sanding box. and a pair of choices for those making the entire Sanding Center (see Kit Options), MAKE THE SANDING BOX MAKE I HE FRAME: Start by making the Iront/back (A) and the sides tBI. Cul ihe parts to the dimensions show n in the Bill of Materials, then use the table saw and dado head, along with the miler gauge, to cul the >/2 in. deep by 3/4 in. w ide rabbet on the ends of each side. Once the rabbets are cut. use ihe dado head, in conjunction with the rip fence, to cut the l/2 in. wide by '/2 in. deep rabbet along the inside bottom edge of ihe four parts. Next add glue to the ends of the front and back, and also to the rabbets on the ends of ihe sides, then assemble the four paris to make a frame. A couple of finishing nails through the sides and into the ends of the front and back will hold everything securely w hile the glue dries. Before selling it aside to dry. make sure the frame is both square and Hat. ADD THE BASE: Now, measure the opening for the base (C) and cul il to size. Then, in the center of ihe base, lay out the 10 in. square cutout for the exhaust hood. After boring a starter hole, use ihe jigsaw to make the cutout. Assemble the base to the frame using glue and finishing nails. MAKE THE TOP: Measure the outside ol the frame and cut the '/4 in. thick perforated hardboard top (Dlto fit. This material is sold under various tradenames, the most common is Peg-Board. Just be sure lhal it has Ui in. diameter holes and that it has ai least one tempered (smooth) side, which will serve as the top surface. An untempered surface is rough and tends lo catch dusl particles. Attach the lop lo the frame with the 1 >/4 in. long by no. 6 sheetrock screws (FF). We used 20 screws - 6 along each front and back edge and -4 along each side. Drive the screws through the '/4 in. diameter perforated holes and slop ihem Hush w ilh the surface. Don't glue the lop in place, as you may need to occasionally remove it in order lo clean out ihe box. (Readers who plan lo make the en-lire Sanding Center should not mount ihe lop at this point. Later in the construction, the sanding box is mounted lo ihe case by driving screws through ihe sanding box base.) ADD THE EXHAUST HOOD: Next, mount (he exhaust hood (DD) lo ihe un- .">8 The Woodworker's Journal |


