Woodworker's Journal 1994-18-3, страница 44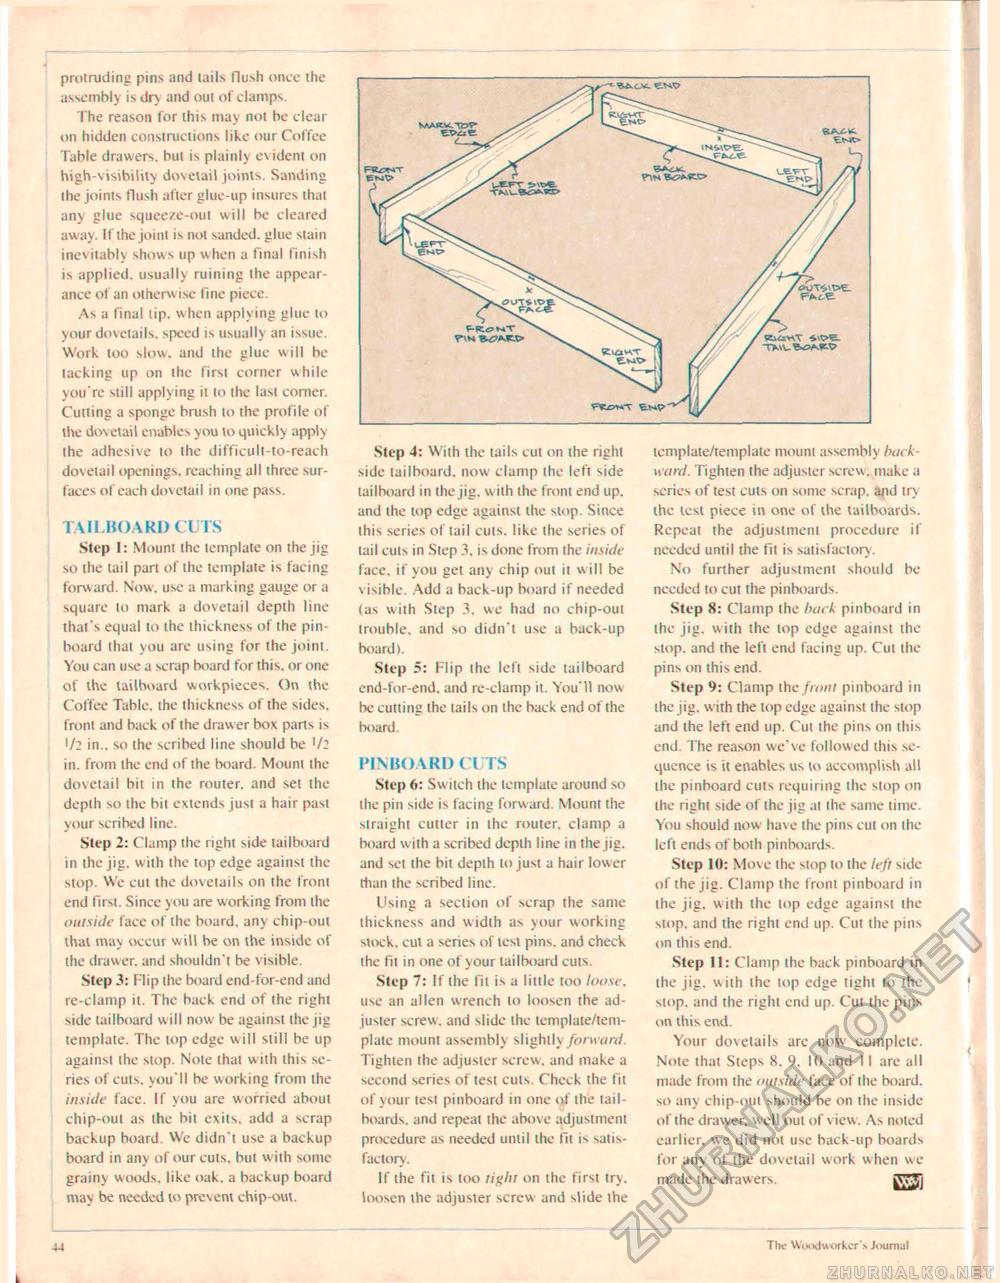
protruding pins and tails flush once the assembly is dry and out of clamps. The reason for this may not be clear on hidden constructions like our Coffee Table drawers, but is plainly evident on high-visibility dovetail joints. Sanding the joints flush after glue-up insures that any glue squeeze-out will be cleared away. If the joint is not sanded, glue stain inevitably shows up when a final finish is applied, usually ruining the appearance of an otherwise fine piece. As a final tip. when applying glue to your dovetails, speed is usually an issue. Work too slow, and the glue will be tacking up on the first corner while you're still applying it to the last corner. Cutting a sponge brush to the profile of the dovetail enables you to quickly apply the adhesive to the difficult-to-reach dov etail openings, reaching all three surfaces of each dov etail in one pass. TAILBOARD CUTS Step 1: Mount the template on the jig so the tail part of the template is facing forward. Now. use a marking gauge or a square lo mark a dovetail depth line thai"s equal to ihe thickness of the pinboard thai you are using for the joint. You can use a scrap board for this, or one of the tailboard workpieces. On the Coffee Table, ihe thickness of the sides, front and back of the drawer box parts is 1/2 in., so the scribed line should be '/: in. from the end of the board. Mount the dovetail bit in the router, and set the depth so the bit extends just a hair past your scribed line. Step 2: Clamp the right side tailboard in the jig. w ith the top edge against the stop. We cut the dovetails on the front end first. Since you are w orking from the outside face of the board, any chip-out thai may occur will be on ihe inside of the drawer, and shouldn't be visible. Step 3: Flip the board end-for-end and re-clamp it. The back end of the right side tailboard w ill now be against the jig template. The top edge will still be up against the slop. Note lhat w ith this series of cuts, you'll be working from the inside face. If you are worried about chip-oul as the bit exits, add a scrap backup board. We didn't use a backup board in any of our cuts, but with some grainy woods, like oak. a backup board may be needed 10 prevent chip-out. Step 4: With the lails cut on the right side tailboard, now clamp the left side tailboard in the jig. with the front end up. and the top edge agatnsi the slop. Since ihis series of tail cuts, like the series of tail cuts in Step 3. is done from the inside face, if you get any chip out it will be visible. Add a back-up board if needed (as with Step 3. we had no chip-out trouble, and so didn't use a back-up board). Step 5: Flip ihe left side tailboard end-for-end. and re-clamp it. You'll now be cutting the tails on the back end of the board. PINBOARD CUTS Step 6: Switch the template around so ihe pin side is facing forward. Mount the straight culler in ihe router, clamp a board w ith a scribed depth line in the jig. and set the bit depth to just a hair lower than the scribed line. Using a section of scrap the same thickness and width as your working stock, cut a series of test pins, and check ihe fit in one of your tailboard cuts. Step 7: If the Hi is a little too loose, use an alien wrench to loosen the adjuster screw, and slide the template/template mount assembly slightly forw ard. Tighten the adjuster screw, and make a second series of tesi culs. Check the fit of your test pinboard in one of the tailboards. and repeat the above adjustment procedure as needed uniil ihe fit i^ satisfactory. If the fit is loo tight on the first try. loosen the adjuster screw and slide the template/template mount assembly backward. Tighten the adjuster screw, make a series of test cuts on some scrap, and try the lesi piece in one of the tailboards. Repeat the adjustment procedure if needed until the fit is satisfactory. No further adjustment should be needed to cut the pinboards. Step 8: Clamp the hack pinboard in the jig, with ihe lop edge against the stop, and the left end facing up. Cut the pins on this end. Step 9: Clamp the from pinboard in the jig. with the top edge against the stop and ihe left end up. Cut the pins on this end. I he reason we've followed this sequence is it enables us to accomplish all the pinboard culs requiring the stop on ihe right side of the jig at the same lime. You should now have the pins cut on the left ends of both pinboards. Step 10: Move the stop to the left side of the jig. Clamp the front pinboard in the jig. with the lop edge against the slop, and the right end up. Cut the pins on this end. Step 11: Clamp ihe back pinboard in the jig. with ihe lop edge tight lo the stop, and the right end up. Cut the pins on this end. Your dovetails arc now complete. Note that Steps 8. 9. 10 and 11 are all made from the outside face of the board, so any chip-out should be on the inside of the draw er, well out of \ iew. As noted earlier, we did not use back-up boards for any of the dovetail work when we made the drawers. gTJ] 44 |


