Woodworker's Journal 1994-18-3, страница 48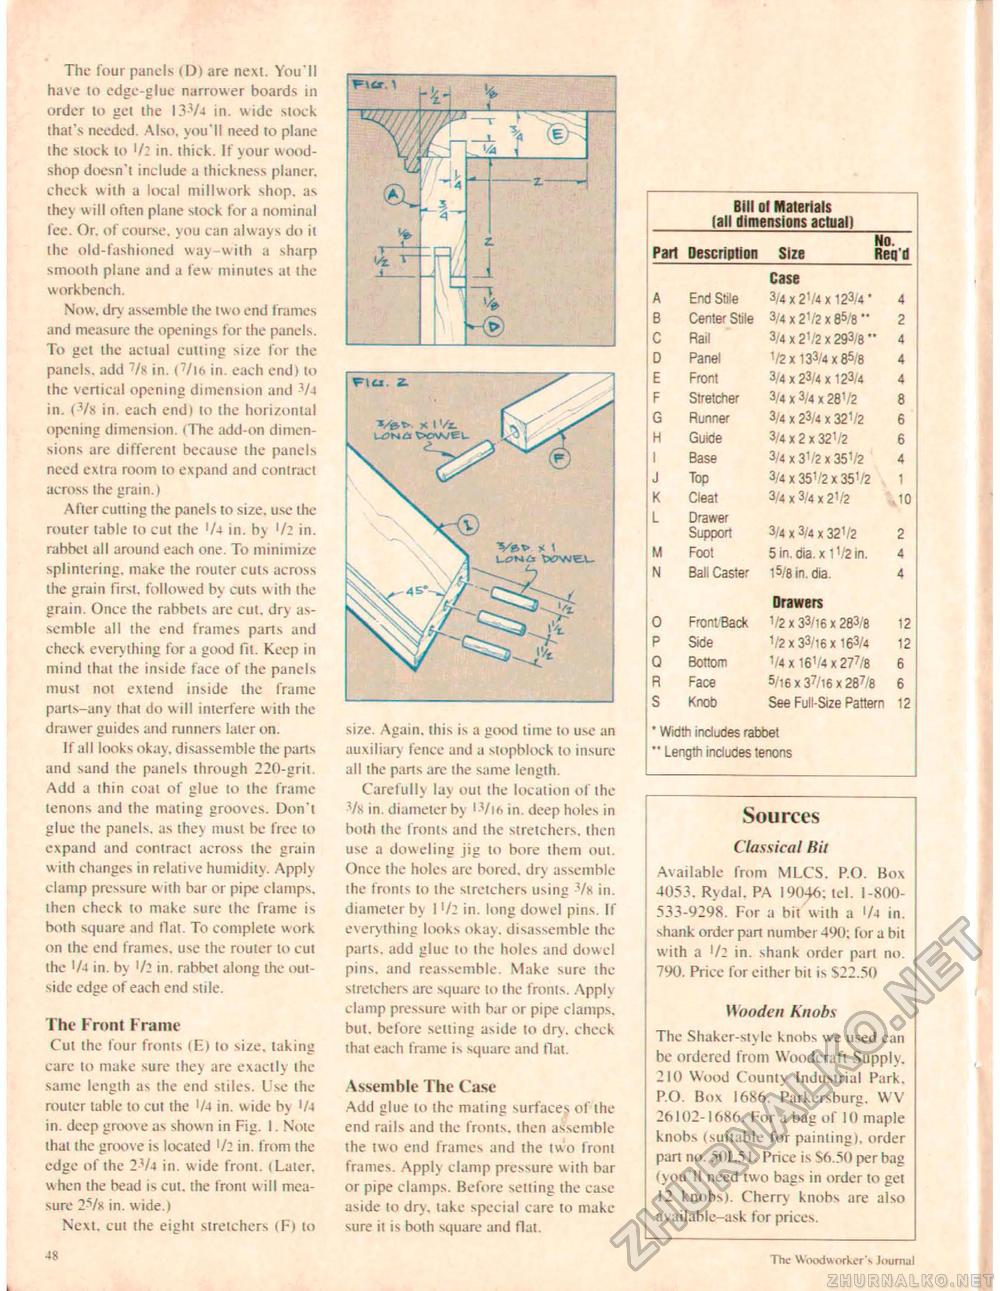
The four panels (D) are next. You'll have lo edge-glue narrower boards in order to get the 13-74 in. wide slock that's needed. Also, you'll need to plane the slock to Itl in. thick. If your wood-shop doesn'i include a thickness planer, check with a local millwork shop, as the> will often plane stock for a nominal fee. Or. of course, you can always do it the old-fashioned wa> with a sharp smooth plane and a few minutes at ihe workbench. Now. dry assemble ihe two end frames and measure the openings for the panels. To get the actual cutting size for ihe panels, add 7/s in. (7/l6 in. each end) to the vertical opening dimension and -74 in. (7s in. each end) to ihe horizontal opening dimension. (The add-on dimensions are different because the panels need extra room lo expand and contract across the grain.) After cutting the panels to size, use the router table to cut the 'A in. by '/2 in. rabbel alt around each one. To minimize splintering, make the router cuts across the grain first, followed b\ cuts wiih ihe grain. Once ihe rabbets are cut, dry assemble all the end frames parts and check everything for a good fit. Keep in mind that the inside face of the panels must nol extend inside the frame parts-any thai do w ill interfere with the drawer guides and runners later on. II all looks okay, disassemble the paris and sand ihe panels through 220-grit. Add a thin coat of glue lo ihe frame lenons and the mating grooves. Don't glue ihe panels, as they must be free to expand and contract across ihe grain with changes in relative humidity. Apply clamp pressure w ith bar or pipe clamps, then check 10 make sure the frame is both square and Hat. To complete work on the end frames, use the router to cut the 1/4 in. by Ul in. rabbet along the outside edge of each end stile. The Front Frame Cut the four fronts (E) to size, taking care to make sure (hey are exactly the same length as the end stiles. Use the router table to cut the !/4 in. wide by '/4 in. deep groove as shown in Fig. I. Note thai the groove is located '/2 in. from the edge of ihe 2-74 in. w ide front. I Later, when the bead is cut. the front will measure 2-Vh in. wide.) Next, eul the eighi stretchers (F» to 23 size. Again, this is a good time to use an auxiliary fence and a stopblock lo insure all ihe parts are the same length. Carefully lay oul the location of the 7h in. diameter by '7lf> in. deep holes in both (he fronts and the stretchers, then use a doweling jig to bore them out. Once the holes are bored, dry assemble the fronts to the stretchers using -7k in. diameter b\ 1'/; in, long dowel pins. If everything looks okay, disassemble the parts, add glue to the holes and dowel pins, and reassemble. Make sure ihe stretchers are square to the fronts. Applv clamp pressure w ith bar or pipe clamps, but. before selling aside lo dry. check that each frame is square and Hat. Assemble The Case Add glue to the mating surfaces of ihe end rails and the fronts, ihen assemble the two end frames and ihe iwo froni frames. Apply clamp pressure with bar or pipe clamps. Before selling ihe case aside lo dry. lake special care to make sure it is both square and flat. Bill ol Materials (all dimensions actual!
" Width includes rabbet " Length includes lenons Sources Classical Hit Available from MLCS, P.O. Box 4053. R>dal. PA 190-16: tel. 1-800533-9298. For a bit with a </4 in. shank order part number 490: for a bit with a '/: in. shank order pari no. 790. Price for cither bit is S22.50 Wooden Knobs The Shaker-style knobs we used can be ordered from Woodcraft Supply. 210 Wood Counly Industrial Park. P.O. Box 1686. Parkersburg. WV 26102-1686. For a bag of 10 maple knobs (suitable for painting), order pan no. 50L51. Price is S6.50 per bag (you'll need two bags in order to gel 12 knobs). Cherry knobs are also a\ailable-ask for prices. The Woodw orker's Journal |
||||||||||||||||||||||||||||||||||||||||||||||||||||||||||||||||||||||||||||||||||||||||||||


