Woodworker's Journal 2001-25-1, страница 36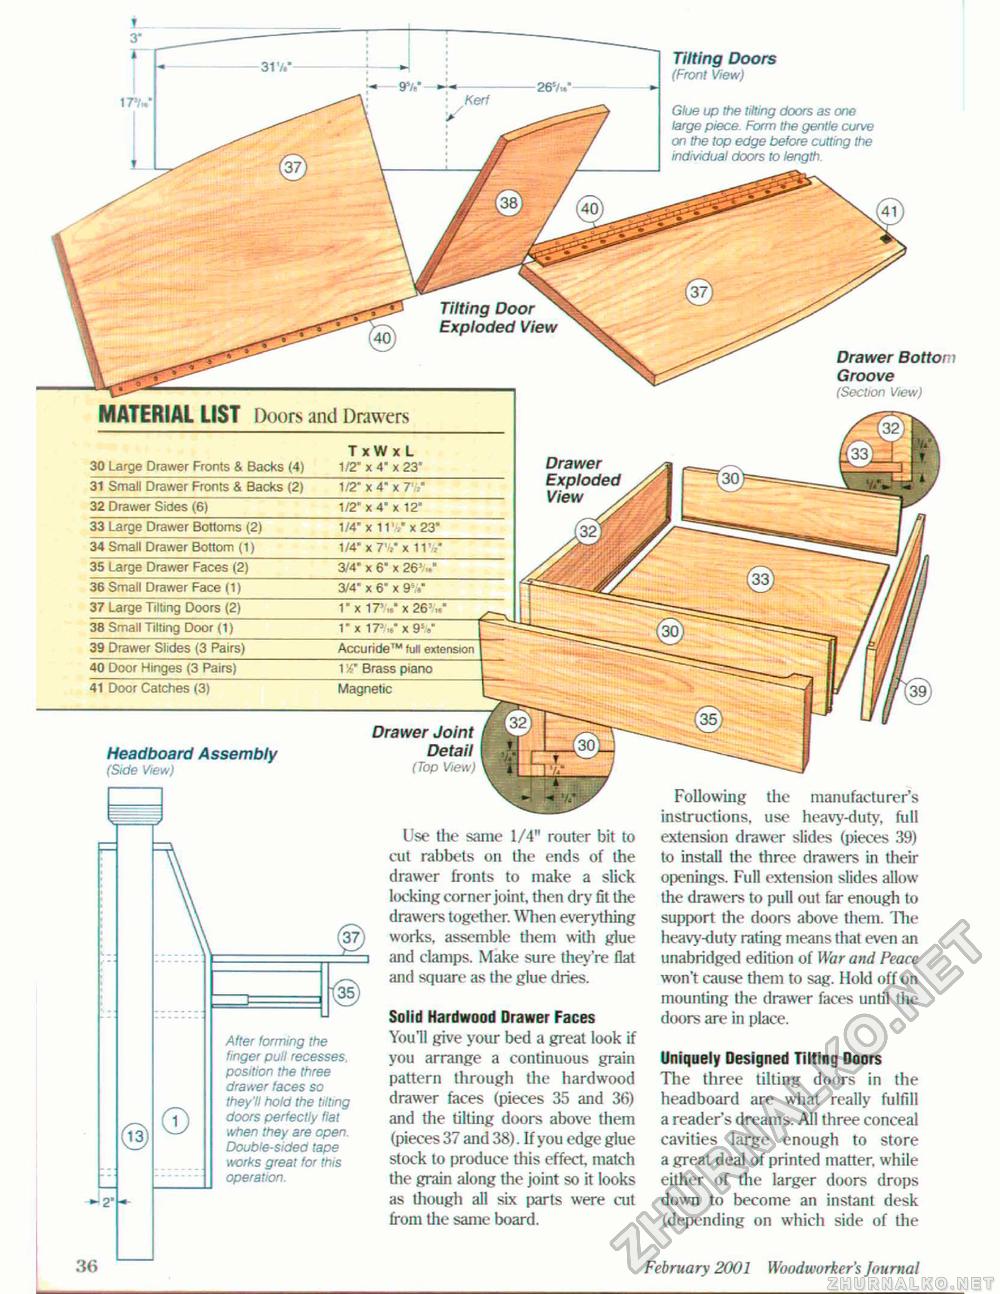
Tilting Doors (Front View) Glue up the tilting doors as one large piece. Form the gentle curve on the top edge before cutting the individual doors to length. 36 February 2001 Wood wo rker's Jo u mat IM MATERIAL LIST Doors and Drawers Drawer Botton Groove (Section View) 33 Large Drawer Bottoms (2) 1/4* x 111 / x 23" 34 Small Drawer Bottom (1) 1/4' * 7V x 1V .* 35 Large Drawer Faces (2) 314' x 6" * 26J 36 Small Drawer Face (1) 3/4* x 6" x 9s»' 37 Large Tilting Doors (2) 1" x 1T V x 26: „" 38 Small Tilting Door (1) rx17ii,*9!." 39 Drawer Slides (3 Pairs) Accuride™ full extension 40 Door Hinges (3 Pairs) 1 Brass piano 41 Door Catches (3) Magnetic Following the manufacturer's instructions, use heavy-duty, full extension drawer slides (pieces 39) to install the three drawers in their openings. Full extension slides allow the drawers to pull out far enough to support the doors above them. Hie heavy-duty rating means that even an unabridged edition of War and Peace won't cause them to sag. Hold off on mounting the drawer faces until the doors are in place. Uniquely Designed Tilting Doors The three tilting doors in the headboard are what really fulfill a reader's dreams. All three conceal cavities large enough to store a great deal of printed matter, while either of the larger doors drops down to become an instant desk (depending on which side of the TxWxL 30 Large Drawer Fronts & Backs (4) 1/2" x 4" x 23" 31 Small Drawer Fronts & Backs (2) 1/2* x 4" x T ' 32 Drawer Sides (6) 1/2" x 4" x 12" Drawer Exploded View Drawer Joint Headboard Assembly Detail (Side View) (Top View) 26V,.* - Use the same 1/4" router bit to cut rabbets on die ends of the drawer fronts to make a siick locking corner joint, then dry fit the drawers together. When everything works, assemble diem wid) glue and clamps. Make sure they're flat and square as the glue dries. Solid Hardwood Drawer Faces You II give your bed a great look if you arrange a continuous grain pattern through the hardwood drawer faces (pieces 35 and 36) and the tilting doors above them (pieces 37 and 38). If you edge glue stock to produce this effect, match the grain along die joint so it looks as though all six parts were cut from the same board. Alter forming the finger pull recesses position the three drawer faces so they'll hold the tilting doors perfectly flat when they are open. Double-sided tape works great for this operation. |


