Woodworker's Journal 2001-25-1, страница 42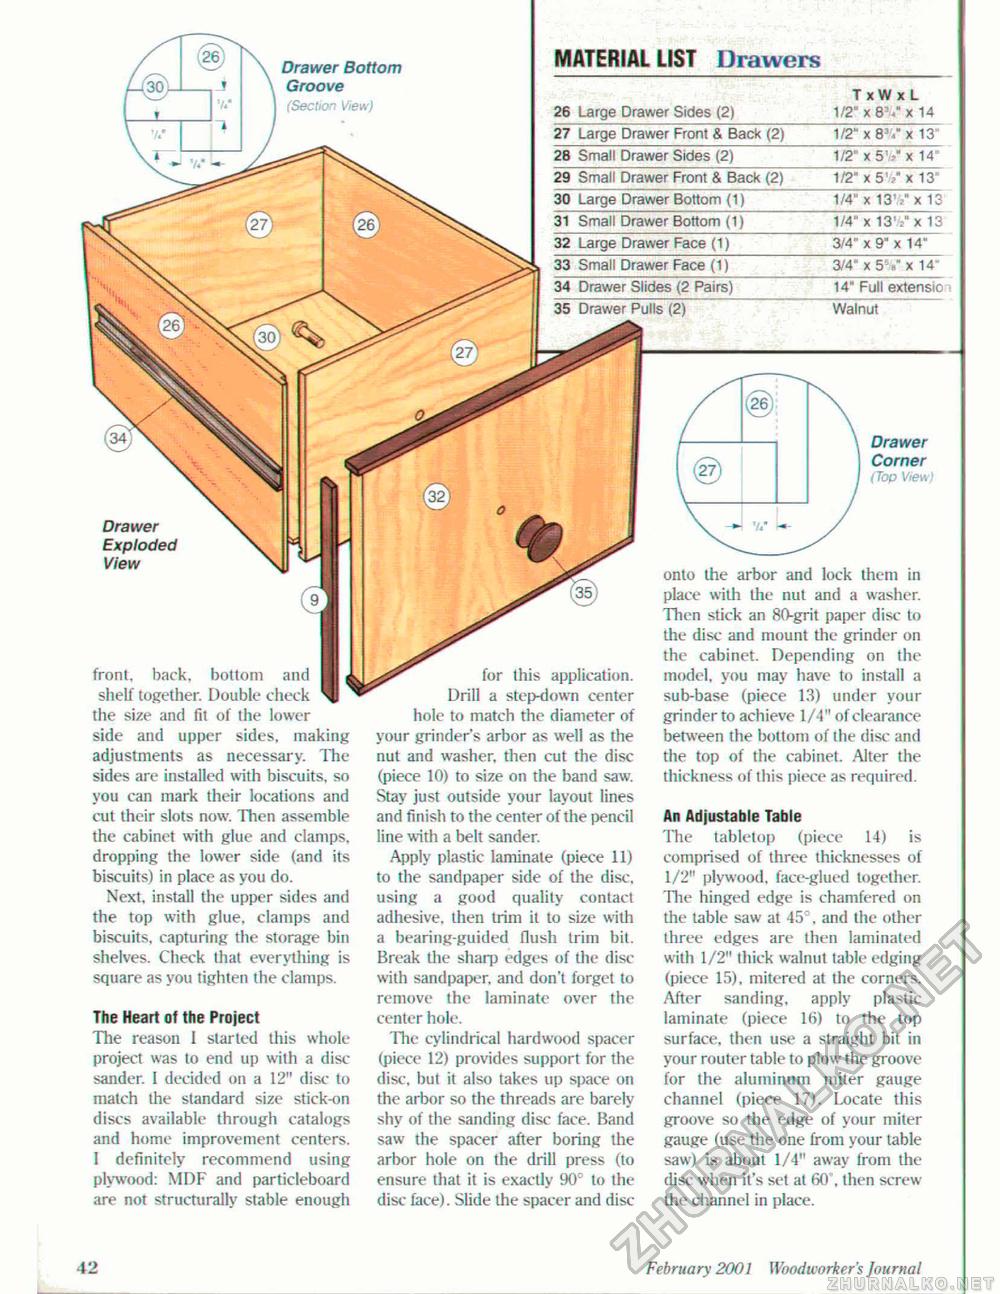
MATERIAL LIST Drawers_ TxWxL 26 Urge Drawer Sides (2)_1/2"x8Vx14 27 Large Drawer Front & Back (2) 1/2" x 8V x 13 28 Small Drawer Sides (2) 1/2"x5Vx 14" 29 Small Drawer Front & Back (2) 1/2" x 5 V x 13" 30 Large Drawer Bottom (1) 1/4" x 13 V x 13 31 Small Drawer Bottom (1) 1/4" x 13 V x 13 32 Large Drawer Face (1) 3/4" x 9" x 14" 33 Small Drawer Face (1) 3/4" x55.,x14' 34 Drawer Slides (2 Pairs) 14" Full extensio 35 Drawer Pulls (2) Walnut Drawer Exploded View Drawer Corner (Top View) onto the arbor and lock them in place with the nut and a washer. Then stick an 80-grit paper disc to the disc and mount the grinder on the cabinet. Depending on the model, you may have to install a sub-base (piece 13) under your grinder to achieve 1/4" of clearance between the bottom of the disc and die top of the cabinet. Alter the thickness of this piece as required. An Adjustable Table The tabletop (piece 14) is comprised of three thicknesses of 1/2" plywood, face-glued together. The hinged edge is chamfered on the table saw at 45c, and the other three edges are then laminated with 1/2" thick walnut table edging (piece 15), mitered at the corners. After sanding, apply plastic laminate (piece 16) to the top surface, then use a straight bit in your router table to plow the groove for the aluminum miter gauge channel (piece 17). Locate this groove so the edge of your miter gauge (use the one from your table saw) is about 1/4" away from the disc when it's set at 60 , then screw the channel in place. Drawer Bottom Groove (Section View) for this application. Drill a step-down center hole to match the diameter of your grinder's arbor as well as the nut and washer, then cut the disc (piece 10) to size on the band saw. Stay just outside your layout lines and finish to the center of the pencil line with a belt sander. Apply plastic laminate (piece 11) to the sandpaper side of the disc, using a good quality contact adhesive, then trim it to size with a bearing-guided flush Irim bit. Break the sharp edges of the disc with sandpaper, and don't forget to remove the laminate over the center hole. The cylindrical hardwood spacer (piece 12) provides support for the disc, but it also takes up space on the arbor so the threads are barely shy of the sanding disc face. Band saw tiie spacer after boring the arbor hole on the drill press (to ensure that it is exactly 90' to the disc face). Slide the spacer and disc front, back, bottom and shelf together. Double check the size and fit of the lower side and upper sides, making adjustments as necessary. The sides are installed with biscuits, so you can mark their locations and cut their slots now. Then assemble the cabinet with glue and clamps, dropping the lower side (and its biscuits) in place as you do. Next, install the upper sides and the top with glue, clamps and biscuits, capturing the storage bin shelves. Check that everything is square as you tighten the damps. The Heart of the Project The reason 1 started this whole project was to end up with a disc sander. I decided on a 12" disc to match the standard size stick-on discs available through catalogs and home improvement centers. 1 definitely recommend using plywood: MDF and particleboard are not structurally stable enough 42 February 2001 Wood wo rker's Jo u mat |


