Woodworker's Journal 2001-25-1, страница 45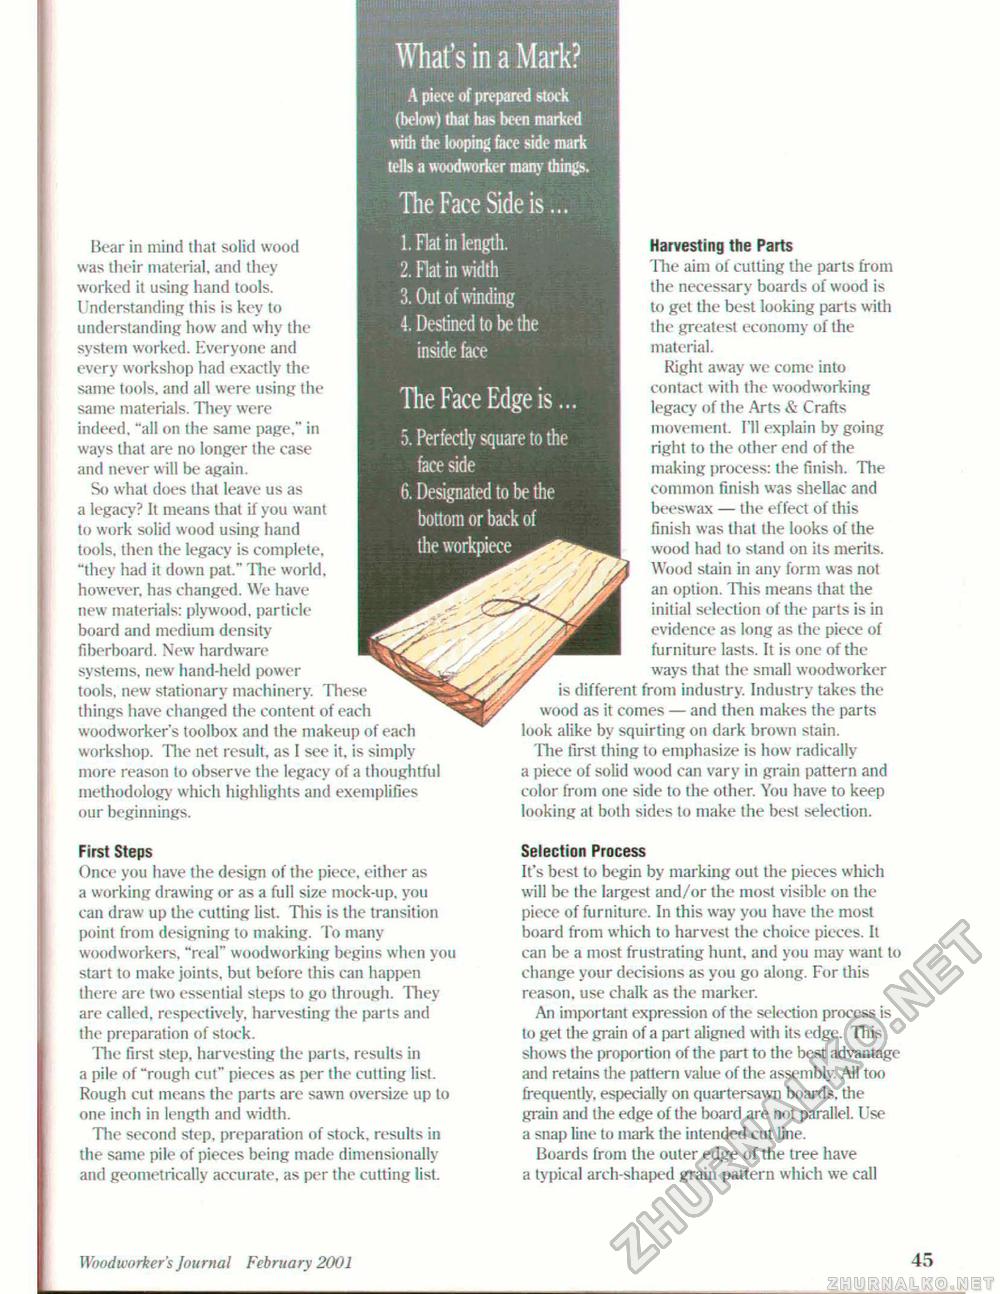
What's in a Mark? A piece of prepared stock (below) that has been marked with the looping face side mark tells a woodworker many things, The Face Side is... Bear in mind that solid wood was their material, and they worked it using hand tools. Understanding this is key to understanding how and why the system worked. Everyone and every workshop had exactly the same tools, and all were using the same materials. They were indeed, "all on the same page," in ways that are no longer the case and never will be again. So what does that leave us as a legacy? It means that if you want lo work solid wood using hand tools, then the legacy is complete, "they had it down pat." The world, however, has changed. We have new materials: plywood, particle board and medium density fiberboard. New hardware systems, new hand-held power tools, new stationary machinery. These things have changed the content of each woodworker's toolbox and the makeup of each workshop. Hie net result, as I see it, is simply more reason to observe the legacy of a thoughtful methodology which highlights and exemplifies our beginnings. First Steps Once you have the design of the piece, either as a working drawing or as a full size mock-up. you can draw up the cutting list. This is the transition point from designing lo making. To many woodworkers, "real" woodworking begins when you start to make joints, but before this can happen there are two essential steps to go through. They are called, respectively, harvesting the parts and the preparation of slock. Tlie first step, harvesting the parts, results in a pile of "rough cut" pieces as per the cutting list. Rough cut means the parts are sawn oversize up to one inch in length and width. The second step, preparation of stock, results in the same pile of pieces being made dimensionally and geometrically accurate, as per the cutting list. 1. Flat in length. 2. Flat in width 3. Out of winding 4. Destined to be the inside face The Face Edge is.. 5. Perfectly square to the face side 6. Designated to be the bottom or back of the workpiece Harvesting the Parts The aim of cutting the parts from the necessary boards of wood is to get the best looking parts with the greatest economy of the material. Right away we come into contact with the woodworking legacy of the Arts & Crafts movement. I'll explain by going right to the other end of the making process: the finish. The common finish was shellac and beeswax — the effect of this finish was thai the looks of the wood had to stand on its merits. Wood stain in any form was not an option. This means that the initial selection of the parts is in evidence as long as Ihe piece of furniture lasts. It is one of the ways that the small woodworker is different from industry. Industry takes the wood as it comes — and then makes the parts look alike by squirting on dark brown stain. The first thing to emphasize is how radically a piece of solid wood can vary in grain pattern and color from one side to the other. You have to keep looking at bolh sides to make Ihe best selection. Selection Process It's best to begin by marking out the pieces which will be the largest and/or Ihe most visible on the piece of furniture. In this way you have the mosl board from which to harvest the choice pieces. It can be a most frustrating lninl, and you may want to change your decisions as you go along. For this reason, use chalk as the marker. An important expression of the selection process is to get the grain of a part aligned with its edge. This shows the proportion of die part to the best advantage and retains the pattern value of the assembly. All too frequently, especially on quartersawn boards, the grain and l he edge of the board are not parallel. Use a snap line to mark the intended cut line. Hoards from the outer edge of ihe tree have a typical arch-shaped grain pattern which we call Woodworker's Journal February 2001 45 |


