Woodworker's Journal 2001-25-2, страница 47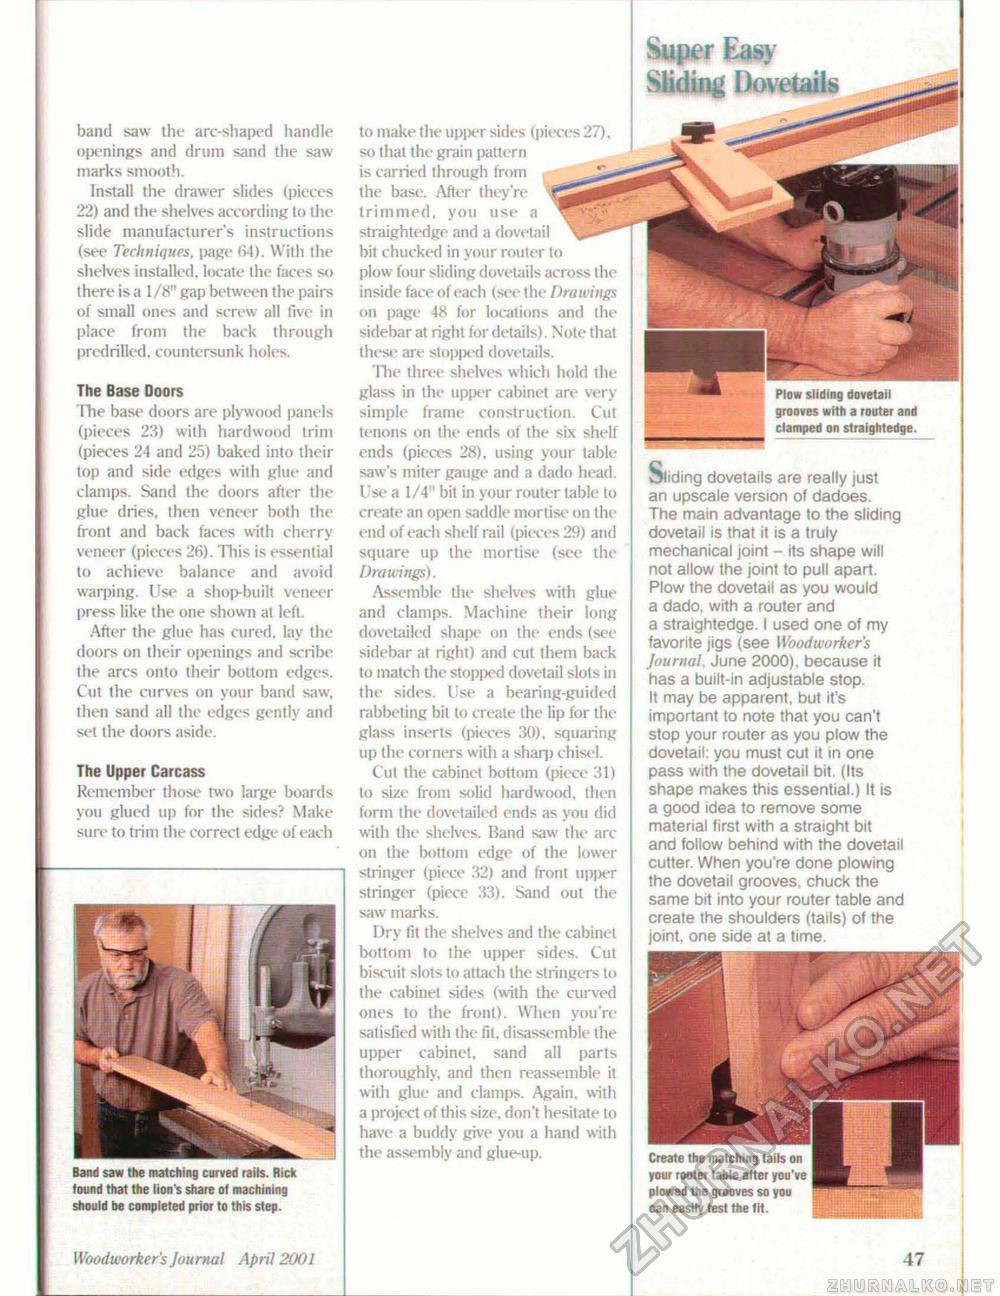
band saw the arc-shaped handle openings and drum sand the saw marks smooth. Install the drawer slides (pieces 22) and the shelves according to the slide manufacturer's instructions (see Techniques, page 64). With the shelves installed, locate the faces so there is a 1/8" gap between the pairs of small ones and screw all five in place from the back through predrilled, countersunk holes. The Base Doors The base doors are plywood panels (pieces 23) with hardwood trim (pieces 24 and 25) baked into their top and side edges with glue and clamps. Sand the doors after the glue dries, then veneer both the front and back faces with cherry veneer (pieces 26). This is essential to achieve balance and avoid warping. Use a shop-built veneer press like the one shown at left. After the glue has cured, lay the doors on their openings and scribe the arcs onto their bottom edges. Cut the curves on your band saw, then sand all the edges gently and set the doors aside. The Upper Carcass Remember those two large boards you glued up for the sides? Make sure tf» trim the correct edge of each Band saw the matching curved raits. Rick found that the lion's share of machining should be completed prior to this step. Woodworker's Journal April 2001 _ Super Easy Sliding Dovetails to make the upper sides (pieces 27) so that the grain pattern is carried through from the base. After they're trimmed, you use a straightedge and a dovetail bit chucked in your router to plow four sliding dovetails across the inside face of each (see the Drawings on page 48 for locations and the sidebar at right for details). Note that these are stopped dovetails. The three shelves which hold the glass in the upper cabinet an1 very simple frame construction. Cut tenons on the ends of the six shelf ends (pieces 28). using your table saw's miter gauge and a dado head. Use a 1/4" bit in your router table to create an open saddle mortise on the end of each shelf rail (pieces 29) and square up the mortise (see the Drawings). Assemble the shelves with glue and clamps. Machine their long dovetailed shape on the ends (see sidebar at right) and cut them back to match the stopped dovetail slots in the sides. Use a bearing-guided rabbeting bit to create the lip for the glass inserts (pieces 30), squaring up the corners with a sharp chisel. Cut the cabinet bottom (piece 31) to size from solid hardwood, then form the dovetailed ends as you did with the shelves. Band saw the arc on the bottom edge of the lower stringer (piece 32) and front upper stringer (piece 33). Sand out the saw marks. Dry fit the shelves and the cabinet bottom to the upper sides. Cut biscuit slots to attach the stringers to the cabinet sides (with the curved ones to the front). When you're satisfied with the fit. disassemble the upper cabinet, sand all parts thoroughly, and then reassemble it with glue and clamps. Again, with a project of tliis size, don't hesitate to have a buddy give you a hand with the assembly and glue-up. Plow sliding dovetail grooves with a router and damped on straightedge. Sliding dovetails are really just an upscale version of dadoes. The main advantage to the sliding dovetail is that it is a truly mechanical joint - its shape will not allow the joint to pull apart. Plow the dovetail as you would a dado, with a router and a straightedge. I used one of my favorite jigs (see Woodworker's Journal, June 2000), because it has a built-in adjustable stop. It may be apparent, but it's important to note that you can't stop your router as you plow the dovetail: you must cut it in one pass with the dovetail bit. (Its shape makes this essential.) It is a good idea to remove some material first with a straight bit and follow behind with the dovetail cutter. When you're done plowing the dovetail grooves, chuck the same bit into your router table and create the shoulders (tails) of the joint, one side at a time. Create the matching tails on your router table after you've plowed the grooves so you can easily test the fit. |


