Woodworker's Journal 2001-25-2, страница 44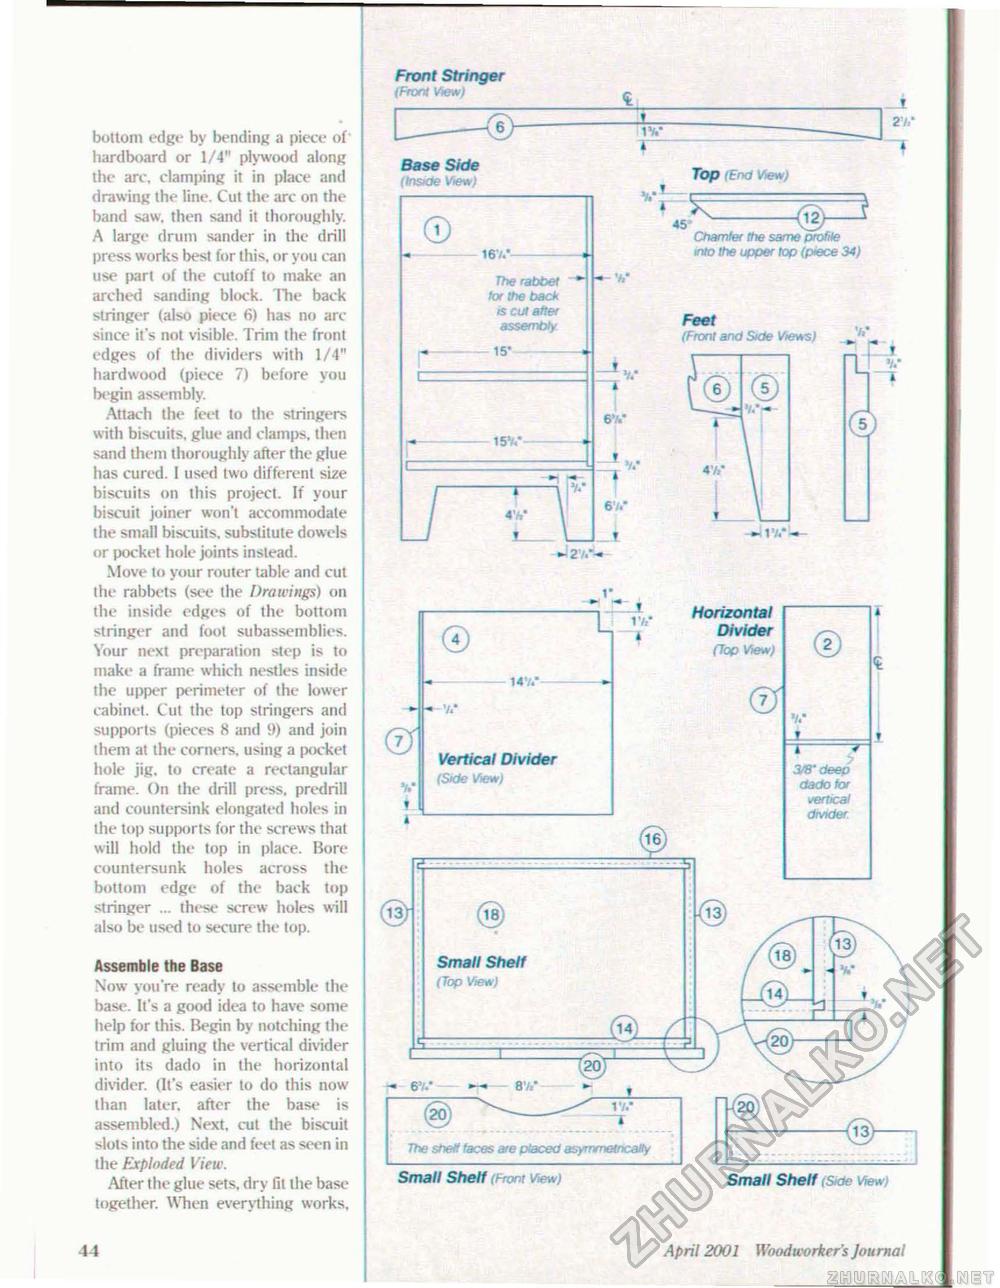
bottom edge by bending a piece of hardboard or 1/4" plywood along the arc, clamping it in place and drawing the line. Cut the arc on the band saw, then sand it thoroughly. A large drum sander in the drill press works best for this, or you can use part of the cutoff to make an arched sanding block. I"he back stringer (also piece 6) has no arc since it's not visible. Trim the front edges of the dividers with 1/4" hardwood (piece 7) before you begin assembly. Attach the feet to the stringers with biscuits, glue and clamps, then sand them thoroughly after the glue has cured. 1 used two different size biscuits on this project. If your biscuit joiner won't accommodate the small biscuits, substitute dowels or pocket hole joints instead. Move to your router table and cut the rabbets (see the Drawings) (in the inside edges of the bottom stringer and foot subassemblies. Your next preparation step is to make a frame which nestles inside the upper perimeter of the lower cabinet. Cut the top stringers and supports (pieces H and 9) and join them at the corners, using a pocket hole jig. to create a rectangular frame. On the drill press, predrill and countersink elongated holes in the top supports for the screws that will hold the top in place. Bore countersunk holes across the bottom edge of the back top stringer ... these screw holes will also be used to secure the top. Assemble the Base Now you're ready to assemble the base. It's a good idea to have some help for this. Begin by notching the trim and gluing the vertical divider into its dado in the horizontal divider. (It's easier to do this now than later, after the base is assembled.) Next, cut the biscuit slots into the side and feet as seen in the Exploded View. After the glue sets, dry fit the base together. When everything works, 44 Front Stringer Front Stringer
Top (End View) Base Side (Inside View) © u 167.*- The rabbet tot the back ts cut after assembly 15* 15 V- ■y 4V ,P Top (End View) r ^ 6V.* 67.' _ I V J 27.-- 45 Chamfer the same profile mto the upper top (piece 34) Feet (Front and Side Views) 17.*—- V X R. —f © t* © © 147.* Vertical Divider (Side View) IV Horizontal Divider (Top View) W deep dado tor vertical divider The sbet! faces are placed asymmetrically Small Shelf (Front View) Small Shelf (Side Viewi April 2001 Woodworker 's Journal |


