Woodworker's Journal 2002-26-3, страница 25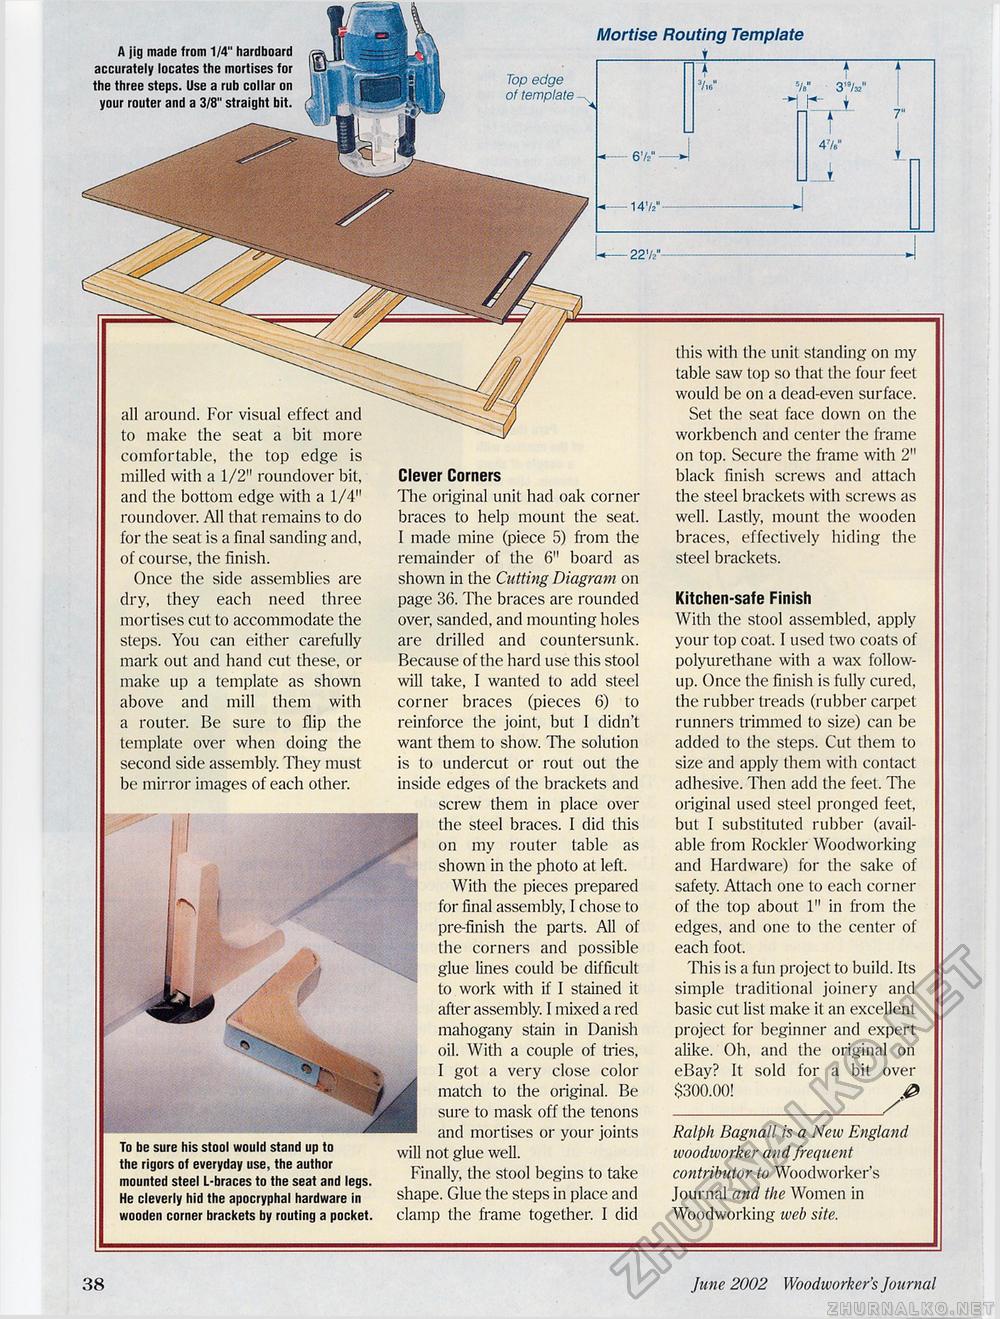
this with the unit standing on my table saw top so that the four feet would be 011 a dead-even surface. Set the seat face down on the workbench and center the frame on top. Secure the frame with 2" black finish screws and attach the steel brackets with screws as well. lastly, mount the wooden braces, effectively hiding the steel brackets. Kitchen-safe Finish With the stool assembled, apply your top coat. I used two coats of polyurethane with a wax follow-up. Once the finish is fully cured, the rubber treads (rubber carpet runners trimmed to size) can be added to the steps. Cut them to size and apply them with contact adhesive. Then add the feet. The original used steel pronged feet, but I substituted rubber (available from Rockier Woodworking and Hardware) for the sake of safety. Attach one to each corner of the top about 1" in from the edges, and one to the center of each foot. This is a fun project to build. Its simple traditional joinery and basic cut list make it an excellent project for beginner and expert alike. Oh, and the original on eBay? It sold for a bit over $300.00! Ralph Bagnall is a Neiv England woodworker and frequent contributor to Woodworker's Journal and the Women in Woodworking web site. A jig made from 1/4" hardboard accurately locates the mortises for the three steps. Use a rub collar on your router and a 3/8" straight bit. all around. For visual effect and to make the seat a bit more comfortable, the top edge is milled with a 1/2" roundover bit, and the bottom edge with a 1/4" roundover. All that remains to do for the seat is a final sanding and, of course, the finish. Once the side assemblies are dry, they each need three mortises cut to accommodate the steps. You can either carefully mark out and hand cut these, or make up a template as shown above and mill them with a router. Be sure to flip the template over when doing the second side assembly. They must be mirror images of each other. To be sure his stool would stand up to the rigors of everyday use, the author mounted steel L-braces to the seat and legs. He cleverly hid the apocryphal hardware in wooden corner brackets by routing a pocket. Clever Corners The original unit had oak corner braces to help mount the seal. I made mine (piece 5) from the remainder of the 6" board as shown in the Cutting Diagram on page 36. The braces are rounded over, sanded, and mounting holes are drilled and countersunk. Because of the hard use this stool will take, I wanted to add steel corner braces (pieces 6) to reinforce the joint, but I didn't want them to show. The solution is to undercut or rout out the inside edges of the brackets and screw them in place over the steel braces. I did this on my router table as shown in the photo at left. With the pieces prepared for final assembly, I chose to pre-fmish the parts. All of the corners and possible glue lines could be difficult to work with if I stained it after assembly. I mixed a red mahogany stain in Danish oil. With a couple of tries, I got a very close color match to the original. Be sure to mask off the tenons and mortises or your joints will not glue well. Finally, the stool begins to take shape. Glue the steps in place and clamp the frame together. I did Mortise Routing Template i_ Top edge of template - 147/- 38 June 2002 Woodworker's Journal |


