Woodworker's Journal 2002-26-3, страница 35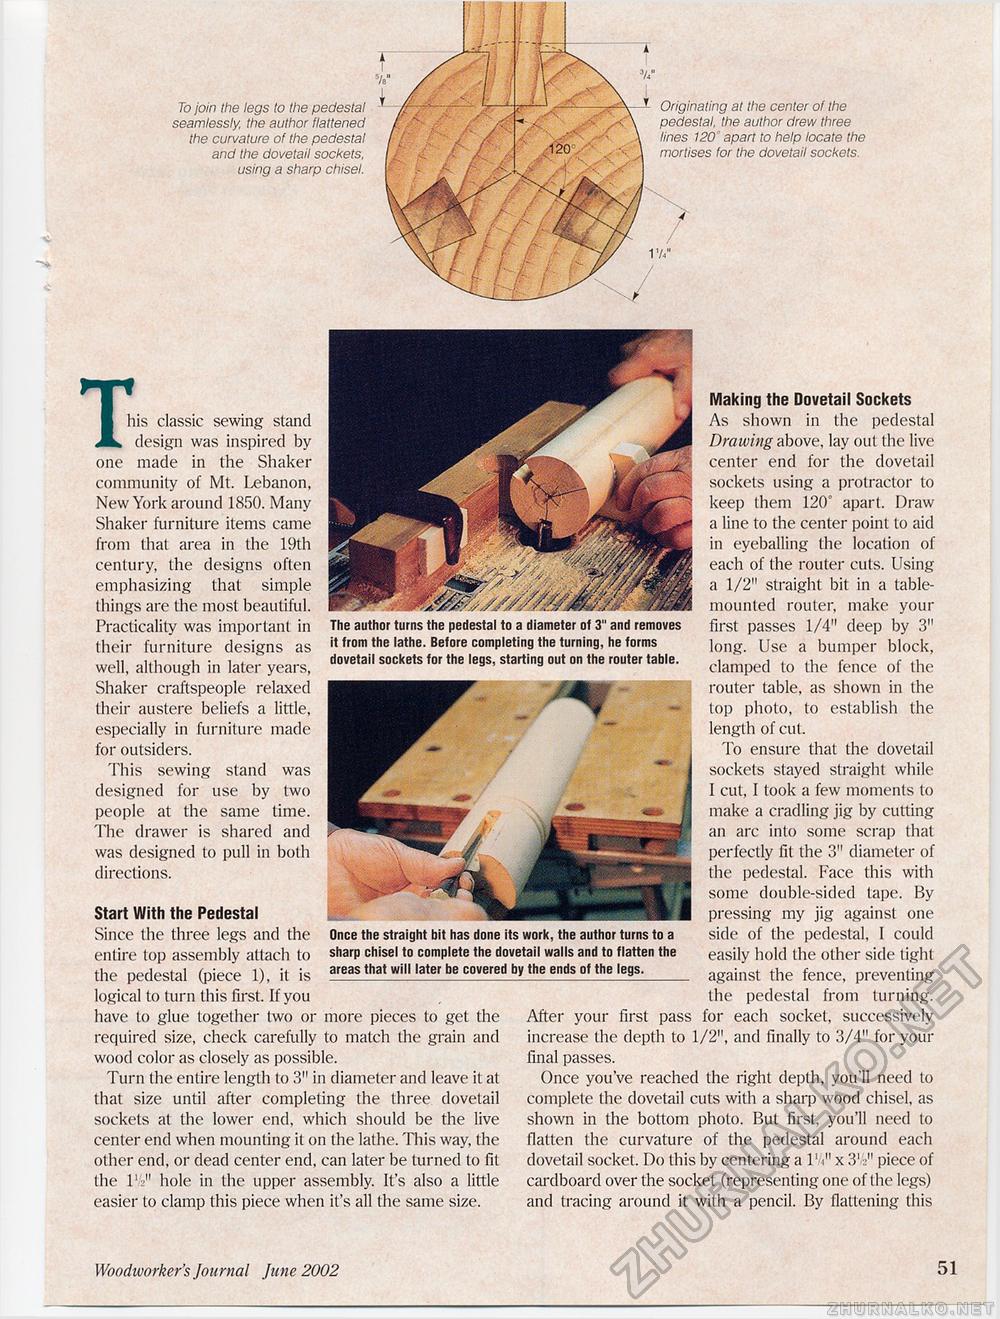
To join the legs lo the pedestal seamlessly, the author flattened the curvature of the pedestal and the dovetail sockets, using a sharp chisel. Originating at the center of the pedestal, the author drew three lines 120 apart to help locate the mortises for the dovetail sockets. T ■ his classic sewing stand JL design was inspired by one made in the Shaker community of Mt. Lebanon, New York around 1850. Many Shaker furniture items came from that area in the 19th century, the designs often emphasizing that simple things are the most beautiful. Practicality was important in their furniture designs as well, although in later years, Shaker craftspeople relaxed their austere beliefs a little, especially in furniture made for outsiders. This sewing stand was designed for use by two people at the same time. The drawer is shared and was designed to pull in both directions. Start With the Pedestal Since the three legs and the entire top assembly attach to the pedestal (piece 1), it is logical to turn this first. If you have to glue together two or more pieces to get the required size, check carefully to match the grain and wood color as closely as possible. Turn the entire length to 3" in diameter and leave it at that size until after completing the three dovetail sockets at the lower end, which should be the live center end when mounting it on the lathe. This way, the other end, or dead center end, can later be turned lo fit the l'.y hole in the upper assembly. It's also a little easier to clamp this piece when it's all the same size. The author turns the pedestal to a diameter of 3" and removes it from the lathe. Before completing the turning, he forms dovetail sockets for the legs, starting out on the router table. Once the straight bit has done its work, the author turns to a sharp chisel to complete the dovetail walls and to flatten the areas that will later be covered by the ends of the legs. Making the Dovetail Sockets As shown in the pedestal Drawing above, lay out the live center end for the dovetail sockets using a protractor to keep them 120° apart. Draw a line to the center point to aid in eyeballing the location of each of the router cuts. Using a 1/2" straight bit in a table-mounted router, make your first passes 1/4" deep by 3" long. Use a bumper block, clamped to the fence of the router table, as shown in the top photo, to establish the length of cut. To ensure that the dovetail sockets stayed straight while I cut, I took a few moments to make a cradling jig by cutting an arc into some sera]) that perfectly fit the 3" diameter of the pedestal. Face this with some double-sided tape. By pressing my jig against one side of the pedestal, I could easily hold the other side light against the fence, preventing the pedestal from turning. After your first pass for each socket, successively increase the depth to 1/2", and finally to 3/4" for your final passes. Once you've reached the right depth, you'll need to complete the dovetail cuts with a sharp wood chisel, as shown in the bottom photo. But first, you'll need to flatten the curvature of the pedestal around each dovetail socket. Do this by centering a l'V x piece of cardboard over the socket (representing one of (he legs) and tracing around it with a pencil. By flattening this Woodworker's Journal June 2002 51 |


