Woodworker's Journal 2004-Winter, страница 76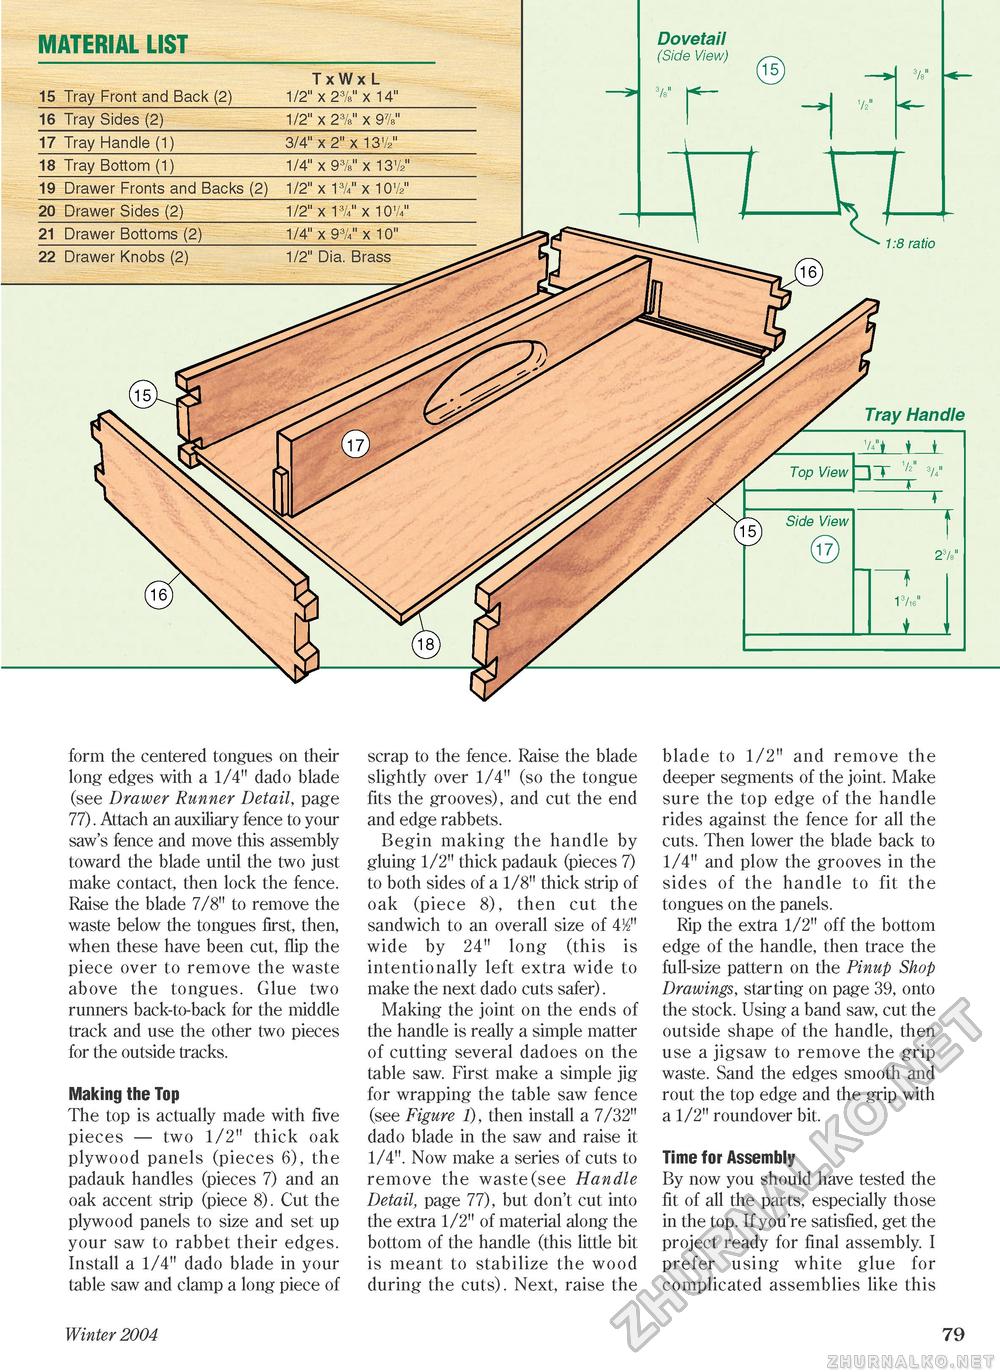
MATERIAL LIST
Dovetail (Side View) form the centered tongues on their long edges with a 1/4" dado blade (see Drawer Runner Detail, page 77). Attach an auxiliary fence to your saw's fence and move this assembly toward the blade until the two just make contact, then lock the fence. Raise the blade 7/8" to remove the waste below the tongues first, then, when these have been cut, flip the piece over to remove the waste above the tongues. Glue two runners back-to-back for the middle track and use the other two pieces for the outside tracks. Making the Top The top is actually made with five pieces — two 1/2" thick oak plywood panels (pieces 6), the padauk handles (pieces 7) and an oak accent strip (piece 8). Cut the plywood panels to size and set up your saw to rabbet their edges. Install a 1/4" dado blade in your table saw and clamp a long piece of Winter 2004 scrap to the fence. Raise the blade slightly over 1/4" (so the tongue fits the grooves), and cut the end and edge rabbets. Begin making the handle by gluing 1/2" thick padauk (pieces 7) to both sides of a 1/8" thick strip of oak (piece 8), then cut the sandwich to an overall size of 432" wide by 24" long (this is intentionally left extra wide to make the next dado cuts safer). Making the joint on the ends of the handle is really a simple matter of cutting several dadoes on the table saw. First make a simple jig for wrapping the table saw fence (see Figure 1), then install a 7/32" dado blade in the saw and raise it 1/4". Now make a series of cuts to remove the waste (see Handle Detail, page 77), but don't cut into the extra 1/2" of material along the bottom of the handle (this little bit is meant to stabilize the wood during the cuts). Next, raise the blade to 1/2" and remove the deeper segments of the joint. Make sure the top edge of the handle rides against the fence for all the cuts. Then lower the blade back to 1/4" and plow the grooves in the sides of the handle to fit the tongues on the panels. Rip the extra 1/2" off the bottom edge of the handle, then trace the full-size pattern on the Pinup Shop Drawings, starting on page 39, onto the stock. Using a band saw, cut the outside shape of the handle, then use a jigsaw to remove the grip waste. Sand the edges smooth and rout the top edge and the grip with a 1/2" roundover bit. Time for Assembly By now you should have tested the fit of all the parts, especially those in the top. If you're satisfied, get the project ready for final assembly. I prefer using white glue for complicated assemblies like this 79 |
|||||||||||||||||||||||||||


