Woodworker's Journal 2006-30-Winter, страница 58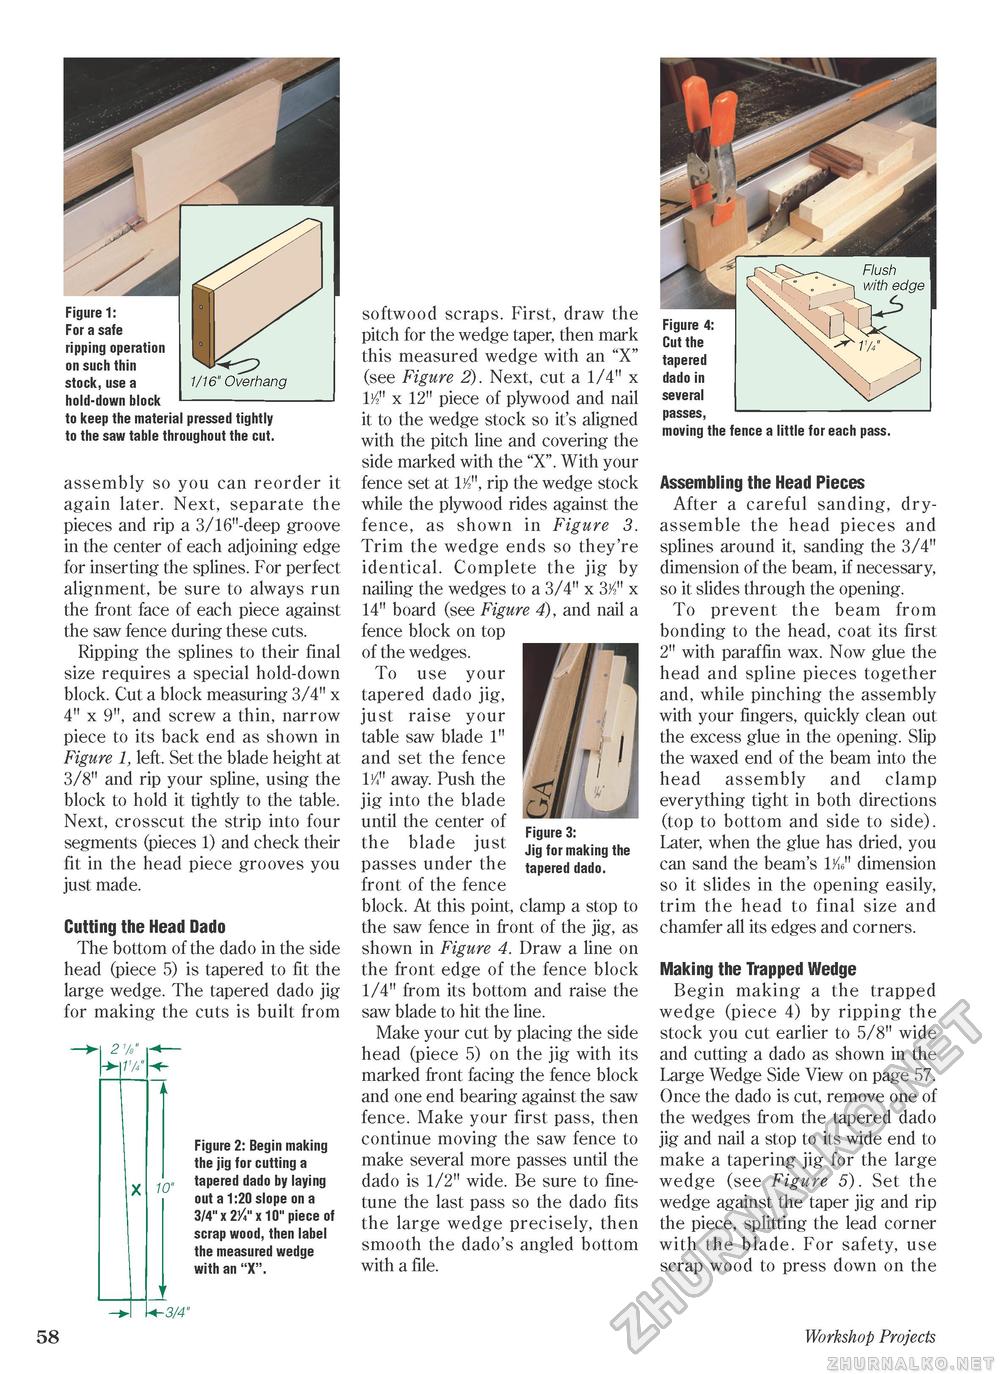
Figure 1: For a safe ripping operation on such thin stock, use a hold-down block to keep the material pressed tightly to the saw table throughout the cut. assembly so you can reorder it again later. Next, separate the pieces and rip a 3/16"-deep groove in the center of each adjoining edge for inserting the splines. For perfect alignment, be sure to always run the front face of each piece against the saw fence during these cuts. Ripping the splines to their final size requires a special hold-down block. Cut a block measuring 3/4" x 4" x 9", and screw a thin, narrow piece to its back end as shown in Figure 1, left. Set the blade height at 3/8" and rip your spline, using the block to hold it tightly to the table. Next, crosscut the strip into four segments (pieces 1) and check their fit in the head piece grooves you just made. Cutting the Head Dado The bottom of the dado in the side head (piece 5) is tapered to fit the large wedge. The tapered dado jig for making the cuts is built from 10" Figure 2: Begin making the jig for cutting a tapered dado by laying out a 1:20 slope on a 3/4" x 2/4" x 10" piece of scrap wood, then label the measured wedge with an "X". softwood scraps. First, draw the pitch for the wedge taper, then mark this measured wedge with an "X" (see Figure 2). Next, cut a 1/4" x W x 12" piece of plywood and nail it to the wedge stock so it's aligned with the pitch line and covering the side marked with the "X". With your fence set at 1)2", rip the wedge stock while the plywood rides against the fence, as shown in Figure 3. Trim the wedge ends so they're identical. Complete the jig by nailing the wedges to a 3/4" x 312" x 14" board (see Figure 4), and nail a fence block on top of the wedges. To use your tapered dado jig, just raise your table saw blade 1" and set the fence 1/4" away. Push the jig into the blade until the center of the blade just passes under the front of the fence block. At this point, clamp a stop to the saw fence in front of the jig, as shown in Figure 4. Draw a line on the front edge of the fence block 1/4" from its bottom and raise the saw blade to hit the line. Make your cut by placing the side head (piece 5) on the jig with its marked front facing the fence block and one end bearing against the saw fence. Make your first pass, then continue moving the saw fence to make several more passes until the dado is 1/2" wide. Be sure to fine-tune the last pass so the dado fits the large wedge precisely, then smooth the dado's angled bottom with a file. Figure 3: Jig for making the tapered dado. Figure 4: Cut the tapered dado in several passes, moving the fence a little for each pass. Assembling the Head Pieces After a careful sanding, dry-assemble the head pieces and splines around it, sanding the 3/4" dimension of the beam, if necessary, so it slides through the opening. To prevent the beam from bonding to the head, coat its first 2" with paraffin wax. Now glue the head and spline pieces together and, while pinching the assembly with your fingers, quickly clean out the excess glue in the opening. Slip the waxed end of the beam into the head assembly and clamp everything tight in both directions (top to bottom and side to side). Later, when the glue has dried, you can sand the beam's 1Ke" dimension so it slides in the opening easily, trim the head to final size and chamfer all its edges and corners. Making the Trapped Wedge Begin making a the trapped wedge (piece 4) by ripping the stock you cut earlier to 5/8" wide and cutting a dado as shown in the Large Wedge Side View on page 57. Once the dado is cut, remove one of the wedges from the tapered dado jig and nail a stop to its wide end to make a tapering jig for the large wedge (see Figure 5). Set the wedge against the taper jig and rip the piece, splitting the lead corner with the blade. For safety, use scrap wood to press down on the -3/4" 21/e" 58 Workshop Projects |


