Woodworker's Journal 2008-32-5, страница 46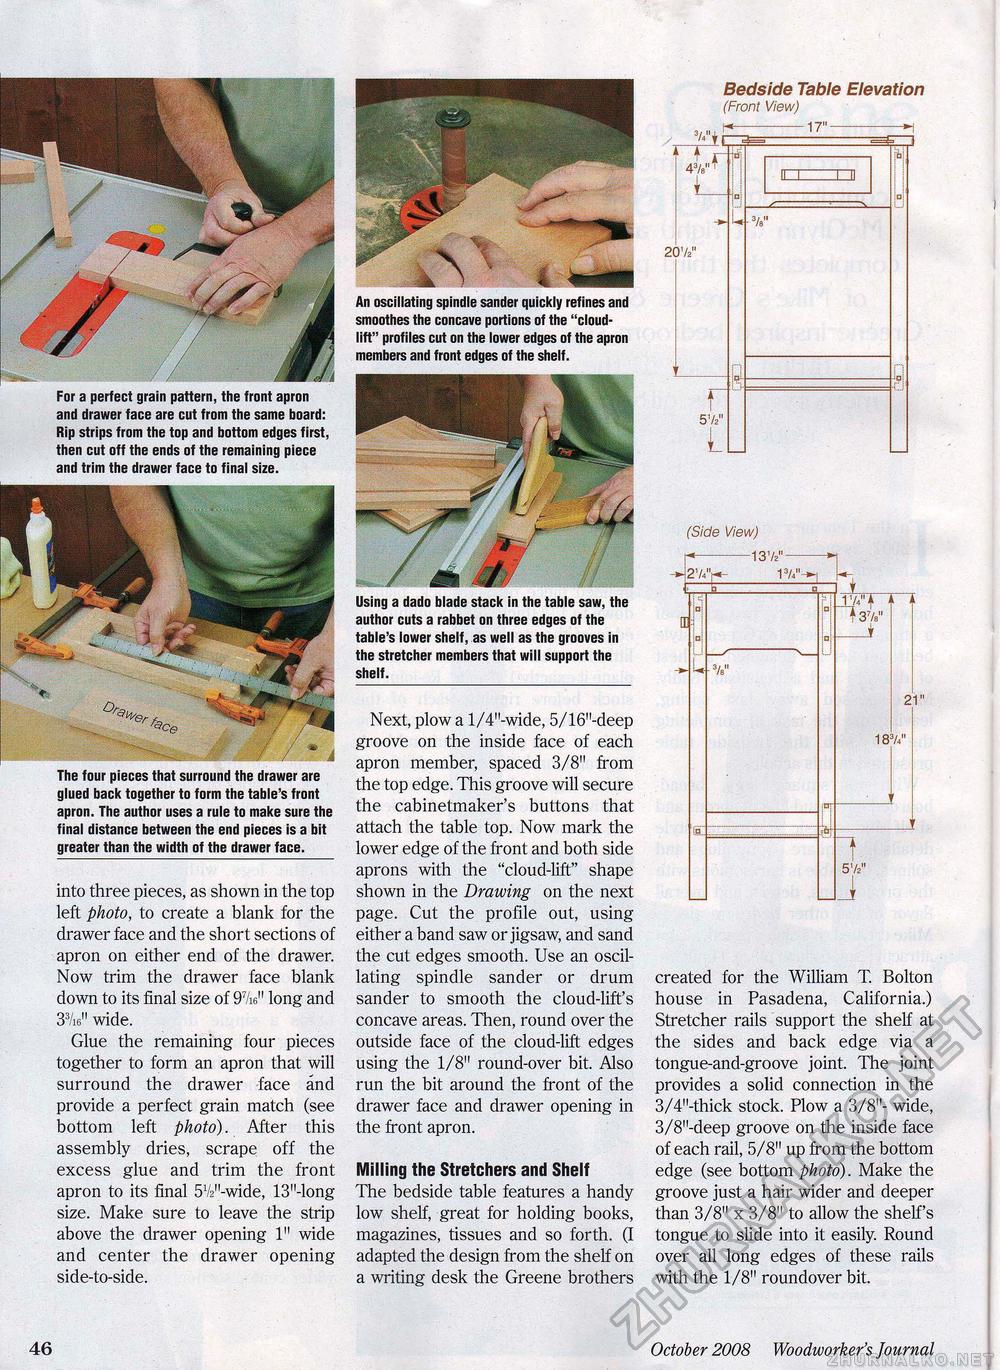
The four pieces that surround the drawer are glued back together to form the table's front apron. The author uses a rule to make sure the final distance between the end pieces is a bit greater than the width of the drawer face. For a perfect grain pattern, the front apron and drawer face are cut from the same board: Rip strips from the top and bottom edges first, then cut off the ends of the remaining piece and trim the drawer face to final size. An oscillating spindle sander quickly refines and smoothes the concave portions of the "cloud-lift" profiles cut on the lower edges of the apron members and front edges of the shelf. into three pieces, as shown in the top left photo, to create a blank for the drawer face and the short sections of apron on either end of the drawer. Now trim the drawer face blank down to its final size of 97/i6M long and 33/i6M wide. Glue the remaining four pieces together to form an apron that will surround the drawer face and provide a perfect grain match (see bottom left photo). After this assembly dries, scrape off the excess glue and trim the front apron to its final 5V2M-wide, 13"-long size. Make sure to leave the strip above the drawer opening 1" wide and center the drawer opening side-to-side. Using a dado blade stack in the table saw, the author cuts a rabbet on three edges of the table's lower shelf, as well as the grooves in the stretcher members that will support the shelf. Next, plow a l/4"-wide, 5/16"-deep groove on the inside face of each apron member, spaced 3/8" from the top edge. This groove will secure the cabinetmaker's buttons that attach the table top. Now mark the lower edge of the front and both side aprons with the "cloud-lift" shape shown in the Drawing on the next page. Cut the profile out, using either a band saw or jigsaw, and sand the cut edges smooth. Use an oscillating spindle sander or drum sander to smooth the cloud-lift's concave areas. Then, round over the outside face of the cloud-lift edges using the 1/8" round-over bit. Also run the bit around the front of the drawer face and drawer opening in the front apron. Milling the Stretchers and Shelf The bedside table features a handy low shelf, great for holding books, magazines, tissues and so forth. (I adapted the design from the shelf on a writing desk the Greene brothers Bedside Table Elevation (Front View) -17"-1 4%' ,r 20V2" n 5V2" L (Side View) <r*-137?" • -N; 13/4"^ h-j i-, - . ' vwr r 37/s" _* 21" 18V 572" J created for the William T. Bolton house in Pasadena, California.) Stretcher rails support the shelf at the sides and back edge via a tongue-and-groove joint. The joint provides a solid connection in the 3/4"-thick stock. Plow a 3/8"- wide, 3/8"-deep groove on the inside face of each rail, 5/8" up from the bottom edge (see bottom photo). Make the groove just a hair wider and deeper than 3/8" x 3/8" to allow the shelf's tongue to slide into it easily. Round over all long edges of these rails with the 1/8" roundover bit. 46 October 2008 Woodworker's Journal |


