Woodworker's Journal 2008-32-5, страница 49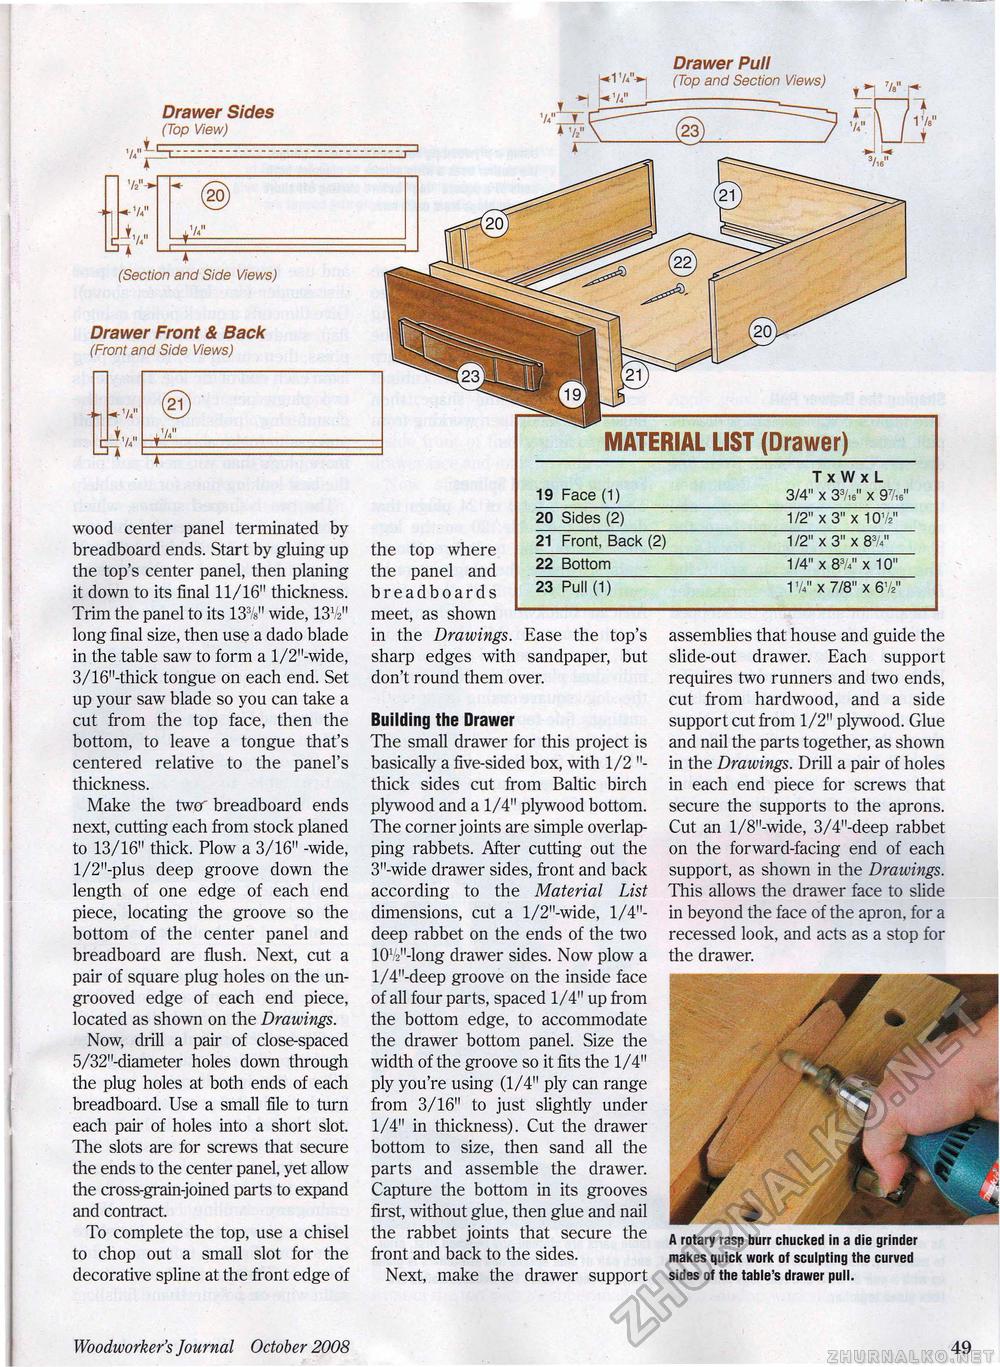
Drawer Pull i-*1 Vi'Vi (jOD anrf Section Views) Drawer Sides (Top View) wood center panel terminated by breadboard ends. Start by gluing up the top's center panel, then planing it down to its final 11/16" thickness. Trim the panel to its 13%" wide, 13^" long final size, then use a dado blade in the table saw to form a l/2"-wide, 3/16"-thick tongue on each end. Set up your saw blade so you can take a cut from the top face, then the bottom, to leave a tongue that's centered relative to the panel's thickness. Make the twcr breadboard ends next, cutting each from stock planed to 13/16" thick. Plow a 3/16" -wide, l/2"-plus deep groove down the length of one edge of each end piece, locating the groove so the bottom of the center panel and breadboard are flush. Next, cut a pair of square plug holes on the un-grooved edge of each end piece, located as shown on the Drawings. Now, drill a pair of close-spaced 5/32"-diameter holes down through the plug holes at both ends of each breadboard. Use a small file to turn each pair of holes into a short slot. The slots are for screws that secure the ends to the center panel, yet allow the cross-grain-joined parts to expand and contract. To complete the top, use a chisel to chop out a small slot for the decorative spline at the front edge of MATERIAL LIST (Drawer) the top where the panel and breadboards meet, as shown in the Drawings. Ease the top's sharp edges with sandpaper, but don't round them over. Building the Drawer The small drawer for this project is basically a five-sided box, with 1/2 "thick sides cut from Baltic birch plywood and a 1/4" plywood bottom. The corner joints are simple overlapping rabbets. After cutting out the 3"-wide drawer sides, front and back according to the Material List dimensions, cut a l/2"-wide, 1/4"-deep rabbet on the ends of the two 10l/2M-long drawer sides. Now plow a l/4"-deep groove on the inside face of all four parts, spaced 1/4" up from the bottom edge, to accommodate the drawer bottom panel. Size the width of the groove so it fits the 1/4" ply you're using (1/4" ply can range from 3/16" to just slightly under 1/4" in thickness). Cut the drawer bottom to size, then sand all the parts and assemble the drawer. Capture the bottom in its grooves first, without glue, then glue and nail the rabbet joints that secure the front and back to the sides. Next, make the drawer support
assemblies that house and guide the slide-out drawer. Each support requires two runners and two ends, cut from hardwood, and a side support cut from 1/2" plywood. Glue and nail the parts together, as shown in the Drawings. Drill a pair of holes in each end piece for screws that secure the supports to the aprons. Cut an l/8"-wide, 3/4"-deep rabbet on the forward-facing end of each support, as shown in the Drawings. This allows the drawer face to slide in beyond the face of the apron, for a recessed look, and acts as a stop for the drawer. A rotary rasp burr chucked in a die grinder makes quick work of sculpting the curved sides of the table's drawer pull. Woodworker's Journal October 2008 49 |


