Woodworker's Journal 2008-32-5, страница 53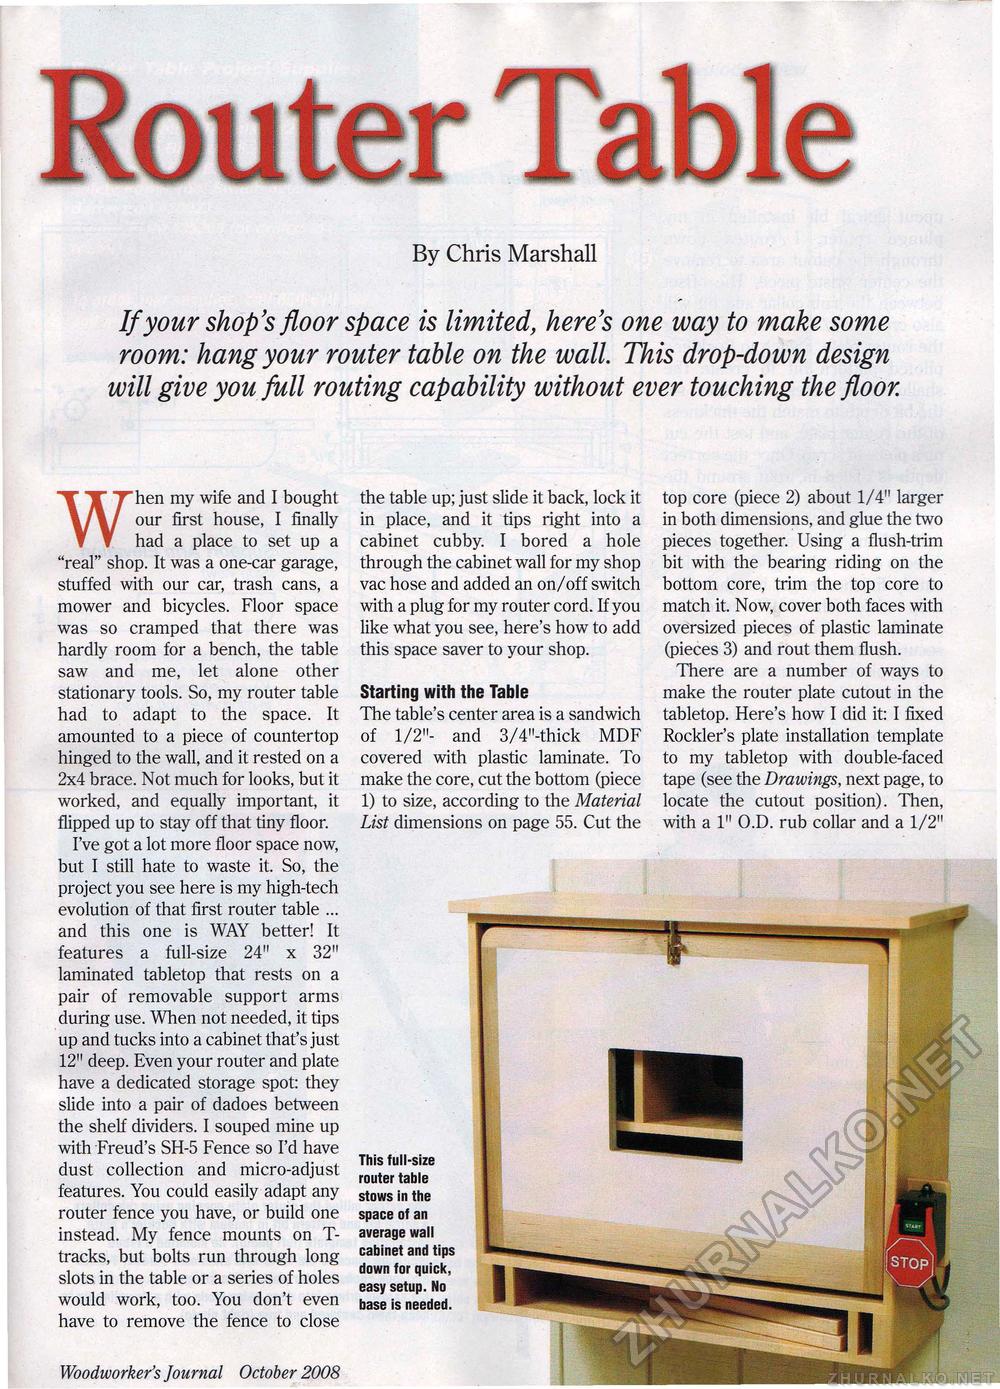
Router TableBy Chris Marshall If your shop's floor space is limited, here's one way to make some room: hang your router table on the wall. This drop-down design will give you full routing capability without ever touching the floor. When my wife and I bought our first house, I finally had a place to set up a "real" shop. It was a one-car garage, stuffed with our car, trash cans, a mower and bicycles. Floor space was so cramped that there was hardly room for a bench, the table saw and me, let alone other stationary tools. So, my router table had to adapt to the space. It amounted to a piece of countertop hinged to the wall, and it rested on a 2x4 brace. Not much for looks, but it worked, and equally important, it flipped up to stay off that tiny floor. I've got a lot more floor space now, but I still hate to waste it. So, the project you see here is my high-tech evolution of that first router table ... and this one is WAY better! It features a full-size 24" x 32" laminated tabletop that rests on a pair of removable support arms during use. When not needed, it tips up and tucks into a cabinet that's just 12" deep. Even your router and plate have a dedicated storage spot: they slide into a pair of dadoes between the shelf dividers. I souped mine up with Freud's SH-5 Fence so I'd have dust collection and micro-adjust features. You could easily adapt any router fence you have, or build one instead. My fence mounts on T-tracks, but bolts run through long slots in the table or a series of holes would work, too. You don't even have to remove the fence to close Woodworker's Journal October 2008 53 the table up; just slide it back, lock it in place, and it tips right into a cabinet cubby. I bored a hole through the cabinet wall for my shop vac hose and added an on/off switch with a plug for my router cord. If you like what you see, here's how to add this space saver to your shop. Starting with the Table The table's center area is a sandwich of 1/2"- and 3/4"-thick MDF covered with plastic laminate. To make the core, cut the bottom (piece 1) to size, according to the Material List dimensions on page 55. Cut the top core (piece 2) about 1/4" larger in both dimensions, and glue the two pieces together. Using a flush-trim bit with the bearing riding on the bottom core, trim the top core to match it. Now, cover both faces with oversized pieces of plastic laminate (pieces 3) and rout them flush. There are a number of ways to make the router plate cutout in the tabletop. Here's how I did it: I fixed Rockler's plate installation template to my tabletop with double-faced tape (see the Drawings, next page, to locate the cutout position). Then, with a 1" O.D. rub collar and a 1/2" This full-size router table stows in the space of an average wall cabinet and tips down for quick, easy setup. No base is needed. |


