Woodworker's Journal 2008-32-5, страница 55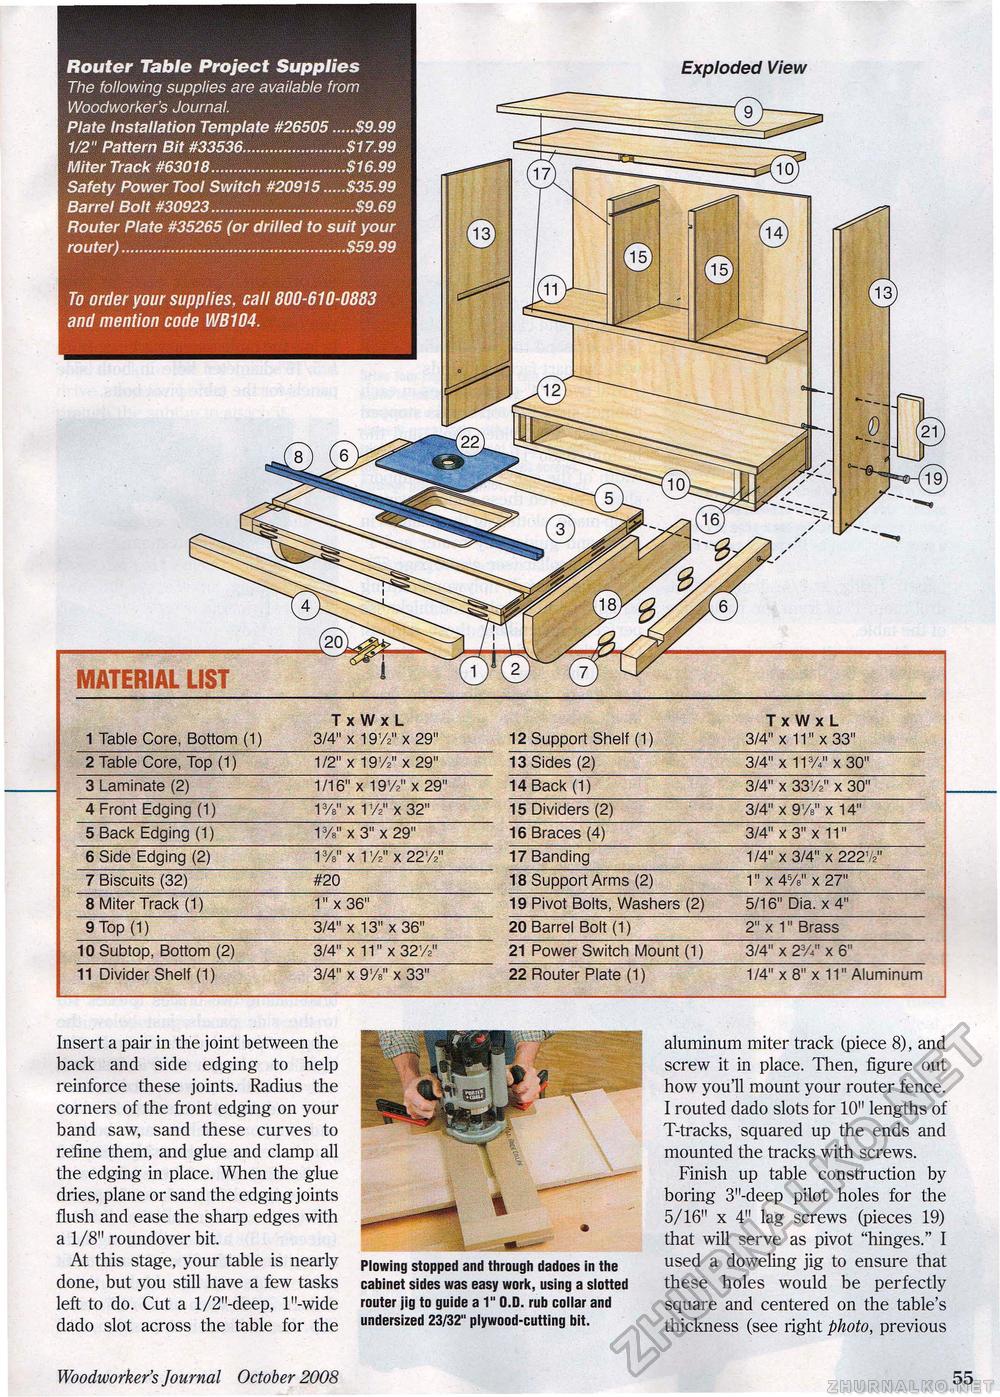
Router Table Project Supplies The following supplies are available from Woodworker's Journal. Plate Installation Template #26505.....S9.99 1/2" Pattern Bit #33536.......................$17.99 Miter Track #63018..............................S16.99 Safety Power Tool Switch #20915.....S35.99 Barrel Bolt #30923................................S9.69 Router Plate #35265 (or drilled to suit your router)..................................................$59.99 Exploded View To order your supplies, call 800-610-0883 and mention code WB104. TxWxL TxWxL 1 Table Core, Bottom (1) 3/4" x 191/2" x 29" 12 Support Shelf (1) 3/4" x 11" x 33" 2 Table Core, Top (1) 112" x 19'// x 29" 13 Sides (2) 3/4" x 11V" x 30" 3 Laminate (2) 1 /16" x 19'/?" x 29" 14 Back (1) 3/4" x 33'/?" x 30" 4 Front Edging (1) 1 %" x 1 %* x 32" 15 Dividers (2) 3/4" x 9W x 14" 5 Back Edging (1) VA" x 3" x 29" 16 Braces (4) 3/4" x 3" x 11" 6 Side Edging (2) 1%" x 11/?" x 22'/?" 17 Banding 1/4" x 3/4" x 222:1 7 Biscuits (32) #20 18 Support Arms (2) 1" x 4%" x 27" 8 Miter Track (1) 1"x36" 19 Pivot Bolts, Washers (2) 5/16" Dia. x 4" 9 Top (1) 3/4" x 13" x 36" 20 Barrel Bolt (1) 2" x 1" Brass 10 Subtop, Bottom (2) 3/4" x 11" x 32y2" 21 Power Switch Mount (1) 3/4" x 23/4n x 6" 11 Divider Shelf (1) 3/4" x 9%" x 33" 22 Router Plate (1) 1/4" x 8" x 11" Aluminum MATERIAL LIST Insert a pair in the joint between the back and side edging to help reinforce these joints. Radius the corners of the front edging on your band saw, sand these curves to refine them, and glue and clamp all the edging in place. When the glue dries, plane or sand the edging joints flush and ease the sharp edges with a 1/8" roundover bit. At this stage, your table is nearly done, but you still have a few tasks left to do. Cut a l/2"-deep, l"-wide dado slot across the table for the Plowing stopped and through dadoes in the cabinet sides was easy work, using a slotted router jig to guide a 1" O.D. rub collar and undersized 23/32" plywood-cutting bit. aluminum miter track (piece 8), and screw it in place. Then, figure out how you'll mount your router fence. I routed dado slots for 10" lengths of T-tracks, squared up the ends and mounted the tracks with screws. Finish up table construction by boring 3"-deep pilot holes for the 5/16" x 4" lag screws (pieces 19) that will serve as pivot "hinges." I used a doweling jig to ensure that these holes would be perfectly square and centered on the table's thickness (see right photo, previous Woodworker's Journal October 2008 55 |


