Woodworker's Journal 2010-34-2, страница 41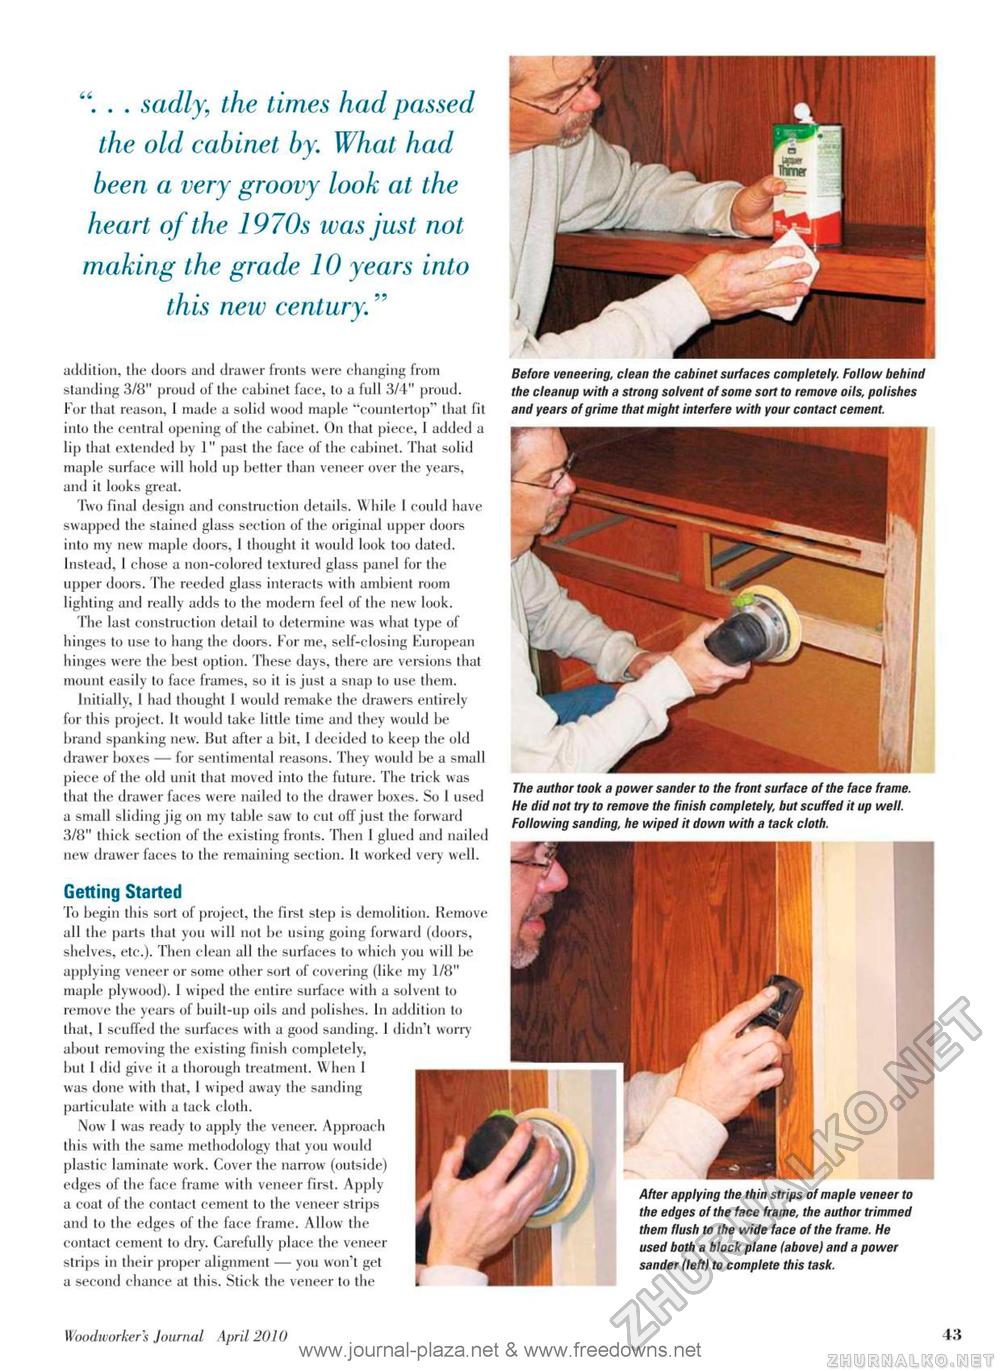
" . . sadly, the times had passed the old cabinet by. What had been a very groovy look at the heart of the 1970s was just not making the grade 10 years into this new century." addition, the doors and drawer fronts were changing from standing 3/8" proud of the cabinet face, to a full 3/4" proud. For that reason, 1 made a solid wood maple "eountertop" that fit into the central opening of the cabinet. On that piece, I added a lip that extended by 1" past the face of the cabinet. That solid maple surface will hold up better than veneer over the years, and it looks great. Two final design and construction details. While I could have swapped the stained glass section of the original upper doors into my new maple doors, I thought it would look loo dated. Instead, I chose a non-colored textured glass panel for the upper doors. The reeded glass interacts with ambient room lighting and really adds to the modern feel of the new look. The last construction detail to determine wras what type of hinges to use to hang the doors. For me, self-closing European hinges were the best option. These days, there are versions that mount easily to face frames, so it is just a snap to use them. Initially, 1 had thought 1 would remake the drawers entirely for this project. It would take little lime and they would be brand spanking new. But after a bit, 1 decided to keep the old drawer boxes — for sentimental reasons. They would be a small piece of the old unit that moved into the future. The trick was that the drawer faces were nailed to the drawer boxes. So 1 used a small sliding jig on my table saw to cut off just the forward 3/8" thick section of the existing fronts. Then I glued and nailed new drawer faces to the remaining section. It worked very well. Getting Started To begin this sort of project, the first step is demolition. Remove all the parts that you will not be using going forward (doors, shelves, etc.). Then clean all the surfaces to which you will be applying veneer or some other soil of covering (like my 1/8" maple plywood). 1 wiped the entire surface with a solvent to remove the years of built-up oils and polishes. In addition to that, 1 scuffed the surfaces with a good sanding. 1 didn't worry about removing the existing finish completely, but I did give it a thorough treatment. When 1 was done with that, I wiped away the sanding particulate with a tack cloth. Now I was ready to apply the veneer. Approach this with the same methodology that you would plastic laminate work. Cover the narrow (outside) edges of the face frame with veneer first. Apply a coat of the contact cement to the veneer strips and to the edges of the face frame. Allow the contact cement to dry. Carefully place the veneer strips in their proper alignment — you won't get a second chance at this. Stick the veneer to the Before veneering, clean the cabinet surfaces completely. Follow behind the cleanup with a strong solvent of some sort to remove oils, polishes and years of grime that might interfere with your contact cement. The author took a power sander to the front surface of the face frame. He did not try to remove the finish completely, but scuffed it up well. Following sanding, he wiped it down with a tack cloth. After applying the thin strips of maple veneer to the edges of the face frame, the author trimmed them flush to the wide face of the frame. He used both a block plane Iabove) and a power sander (left) to complete this task. Woodworker's Journal April 2010 www.journal-plaza.net & www.freedowns.net it |


