Woodworker's Journal fall-2008, страница 49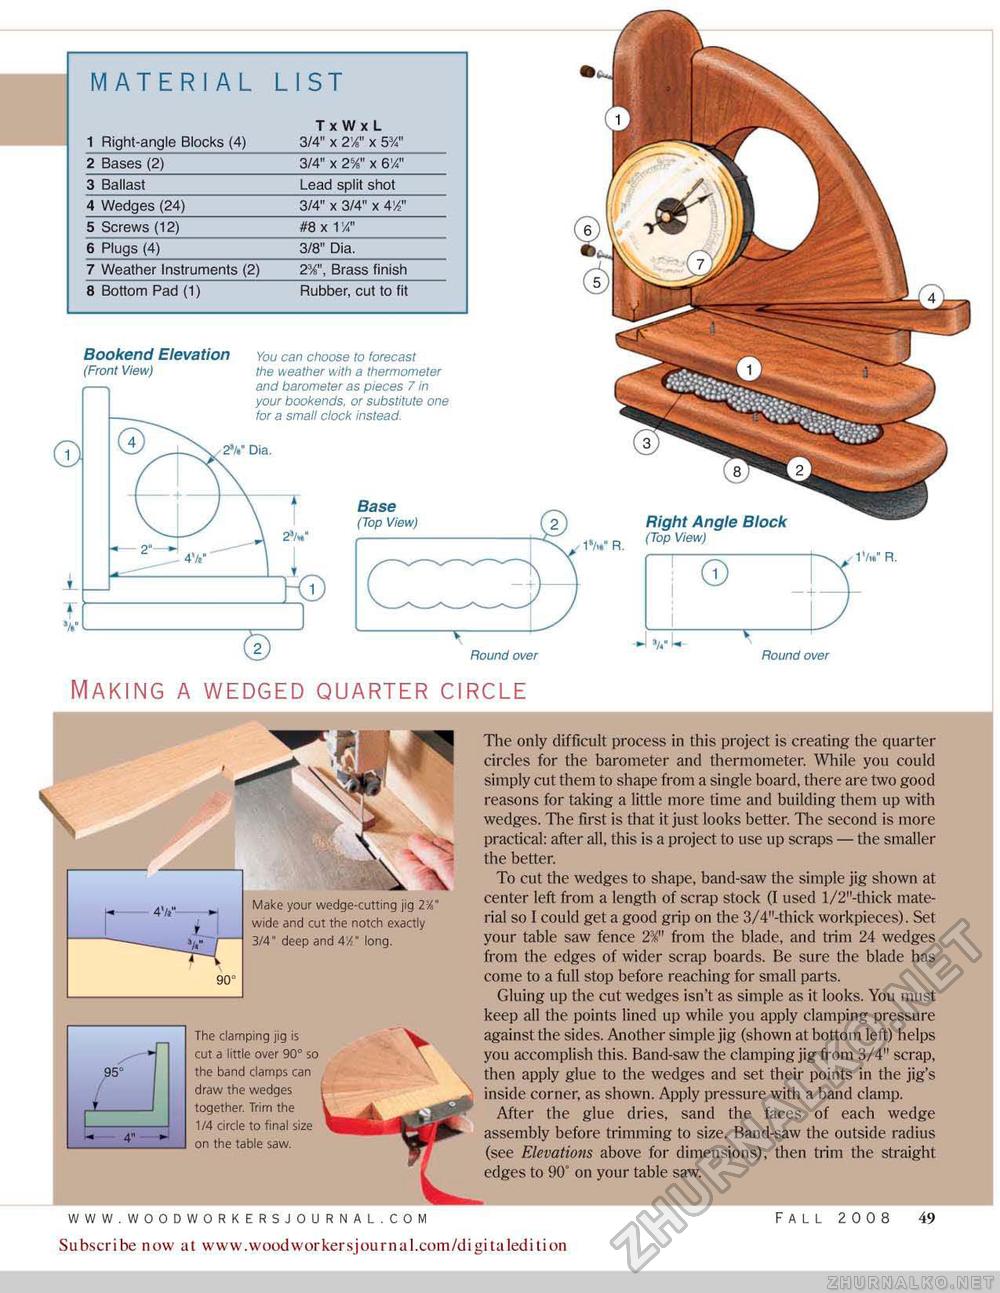
Bookend Elevation (Front View) You can choose to forecast the weather with a thermometer and barometer as pieces 7 in your bookends, or substitute one for a small clock instead. 2V Oia. Bookend Elevation (Front View) You can choose to forecast the weather with a thermometer and barometer as pieces 7 in your bookends, or substitute one for a small clock instead. T-' Round over Base (Top View) 1W R. Right Angle Block (Top View) Hound over Making a wedged quarter circle \ \ \ Make your wedge-cutting jig TA' wide and cut the notch exactly 3/4" deep and AA" long. 95° 4" ■ The clamping jig is cut a little over 90° so the band clamps can draw the wedges together. Trim the 1/4 circle to final size on the table saw. The only difficult process in this project is creating the quarter circles for the barometer and thermometer. While you could simply cut them to shape from a single board, there are two good reasons for taking a little more time and building them up with wedges. The first is that it just looks better. The second is more practical: after all, this is a project to use up scraps — the smaller the better. To cut the wedges to shape, band-saw the simple jig shown at center left from a length of scrap stock (I used l/2"-thick material so I could get a good grip on the 3/4"-thick workpieces). Set your table saw fence 2'i" from the blade, and trim 24 wedges from the edges of wider scrap boards. Be sure the blade has come to a full stop before reaching for small parts. Gluing up the cut wedges isn't as simple as it looks. You must keep all the points lined up while you apply clamping pressure against the sides. Another simple jig (shown at bottom left) helps you accomplish this. Band-saw the clamping jig from 3/4" scrap, then apply glue to the wedges and set their points in the jig's inside corner, as shown. Apply pressure with a band clamp. After the glue dries, sand the faces of each wedge assembly before trimming to size. Band-saw the outside radius (see Elevations above for dimensions), then trim the straight edges to 90° on your table saw. FALL 2008 49 Subscribe now at www.woodworkersjournal.com/digitaledition |


