Woodworker's Journal fall-2009, страница 45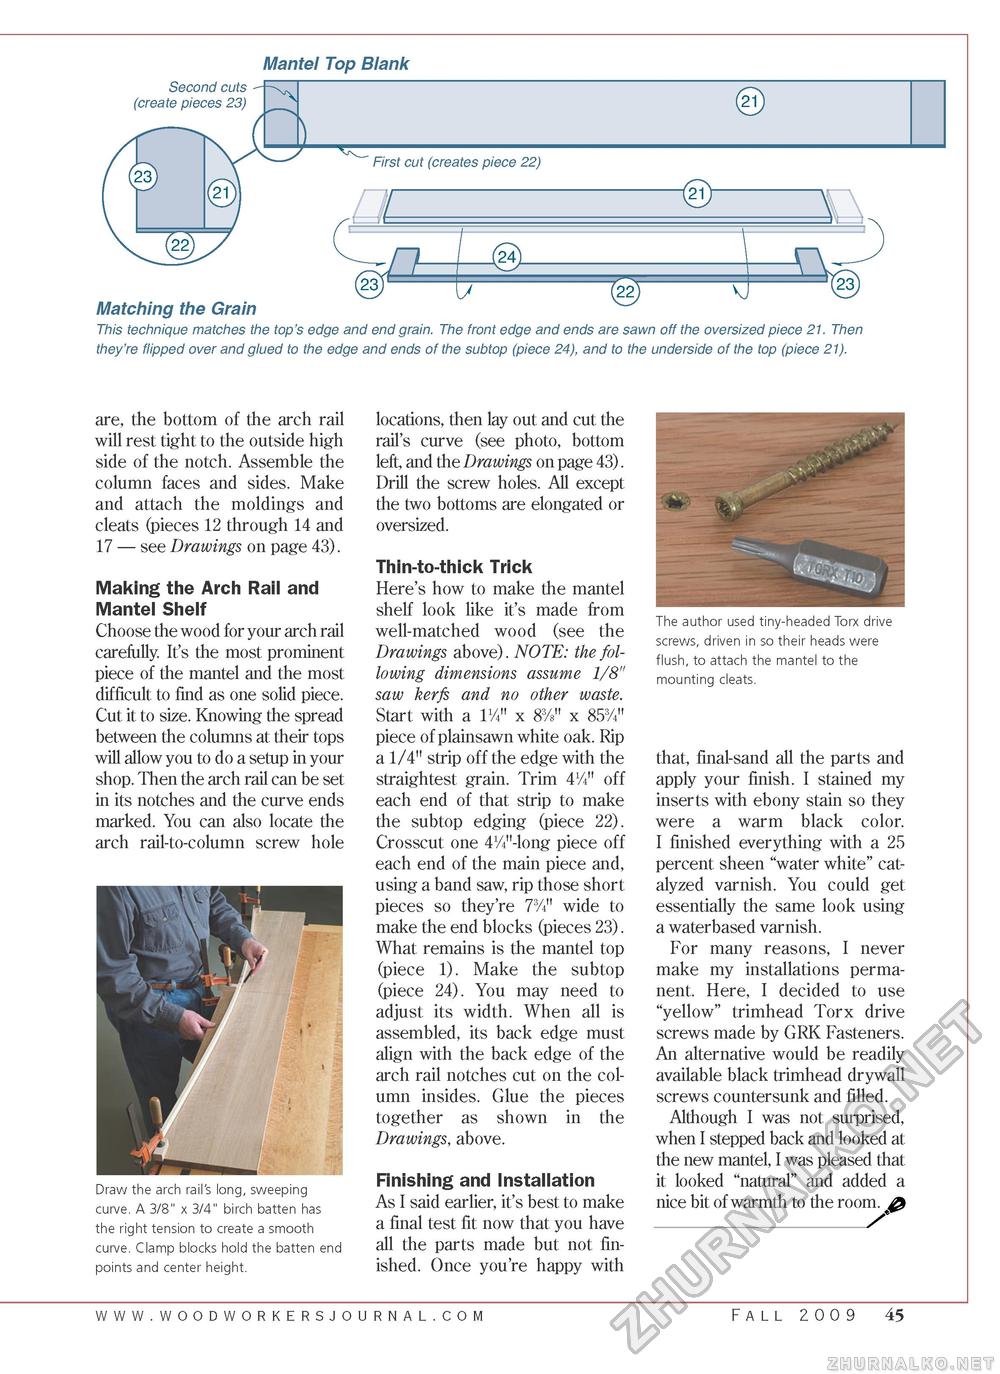
Mantel Top Blank they're flipped over and glued to the edge and ends of the subtop (piece 24), and to the underside of the top (piece 21). are, the bottom of the arch rail will rest tight to the outside high side of the notch. Assemble the column faces and sides. Make and attach the moldings and cleats (pieces 12 through 14 and 17 — see Drawings on page 43). Making the Arch Rail and Mantel Shelf Choose the wood for your arch rail carefully. It's the most prominent piece of the mantel and the most difficult to find as one solid piece. Cut it to size. Knowing the spread between the columns at their tops will allow you to do a setup in your shop. Then the arch rail can be set in its notches and the curve ends marked. You can also locate the arch rail-to-column screw hole Draw the arch rail's long, sweeping curve. A 3/8" x 3/4" birch batten has the right tension to create a smooth curve. Clamp blocks hold the batten end points and center height. locations, then lay out and cut the rail's curve (see photo, bottom left, and the Drawings on page 43). Drill the screw holes. All except the two bottoms are elongated or oversized. Thin-to-thick Trick Here's how to make the mantel shelf look like it's made from well-matched wood (see the Drawings above). NOTE: the following dimensions assume 1/8" saw kerfs and no other waste. Start with a 1/4" x 8%" x 853/4" piece of plainsawn white oak. Rip a 1/4" strip off the edge with the straightest grain. Trim 4V4" off each end of that strip to make the subtop edging (piece 22). Crosscut one 4%"-long piece off each end of the main piece and, using a band saw, rip those short pieces so they're 73/4" wide to make the end blocks (pieces 23). What remains is the mantel top (piece 1). Make the subtop (piece 24). You may need to adjust its width. When all is assembled, its back edge must align with the back edge of the arch rail notches cut on the column insides. Glue the pieces together as shown in the Drawings, above. Finishing and Installation As I said earlier, it's best to make a final test fit now that you have all the parts made but not finished. Once you're happy with The author used tiny-headed Torx drive screws, driven in so their heads were flush, to attach the mantel to the mounting cleats. that, final-sand all the parts and apply your finish. I stained my inserts with ebony stain so they were a warm black color. I finished everything with a 25 percent sheen "water white" catalyzed varnish. You could get essentially the same look using a waterbased varnish. For many reasons, I never make my installations permanent. Here, I decided to use "yellow" trimhead Torx drive screws made by GRK Fasteners. An alternative would be readily available black trimhead drywall screws countersunk and filled. Although I was not surprised, when I stepped back and looked at the new mantel, I was pleased that it looked "natural" and added a nice bit of warmth to the room. £ Fall 2009 45 |


