Woodworker's Journal Summer-2008, страница 52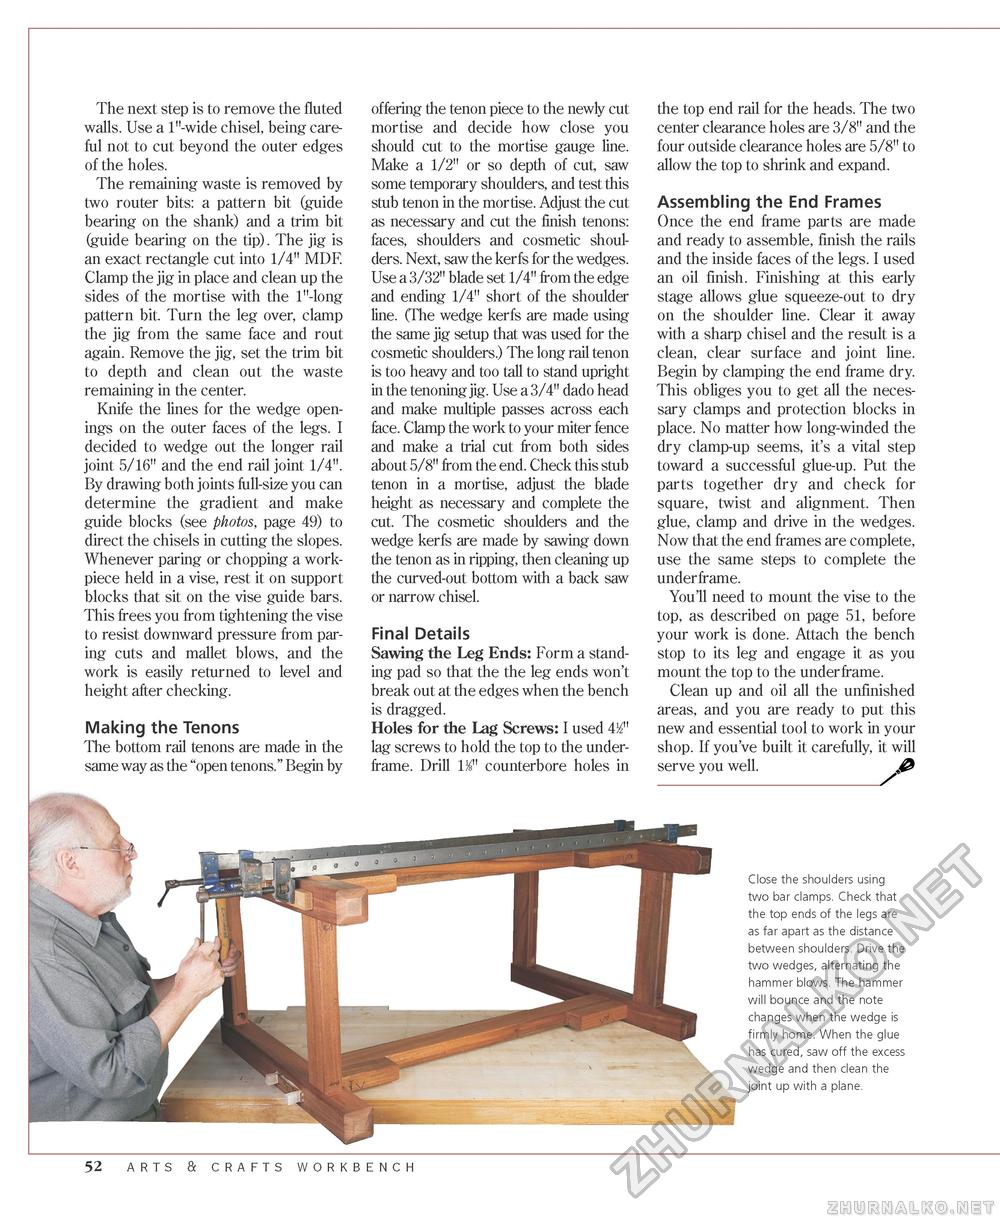
The next step is to remove the fluted walls. Use a 1"-wide chisel, being careful not to cut beyond the outer edges of the holes. The remaining waste is removed by two router bits: a pattern bit (guide bearing on the shank) and a trim bit (guide bearing on the tip). The jig is an exact rectangle cut into 1/4" MDF. Clamp the jig in place and clean up the sides of the mortise with the 1"-long pattern bit. Turn the leg over, clamp the jig from the same face and rout again. Remove the jig, set the trim bit to depth and clean out the waste remaining in the center. Knife the lines for the wedge openings on the outer faces of the legs. I decided to wedge out the longer rail joint 5/16" and the end rail joint 1/4". By drawing both joints full-size you can determine the gradient and make guide blocks (see photos, page 49) to direct the chisels in cutting the slopes. Whenever paring or chopping a work-piece held in a vise, rest it on support blocks that sit on the vise guide bars. This frees you from tightening the vise to resist downward pressure from paring cuts and mallet blows, and the work is easily returned to level and height after checking. Making the Tenons The bottom rail tenons are made in the same way as the "open tenons." Begin by offering the tenon piece to the newly cut mortise and decide how close you should cut to the mortise gauge line. Make a 1/2" or so depth of cut, saw some temporary shoulders, and test this stub tenon in the mortise. Adjust the cut as necessary and cut the finish tenons: faces, shoulders and cosmetic shoulders. Next, saw the kerfs for the wedges. Use a 3/32" blade set 1/4" from the edge and ending 1/4" short of the shoulder line. (The wedge kerfs are made using the same jig setup that was used for the cosmetic shoulders.) The long rail tenon is too heavy and too tall to stand upright in the tenoning jig. Use a 3/4" dado head and make multiple passes across each face. Clamp the work to your miter fence and make a trial cut from both sides about 5/8" from the end. Check this stub tenon in a mortise, adjust the blade height as necessary and complete the cut. The cosmetic shoulders and the wedge kerfs are made by sawing down the tenon as in ripping, then cleaning up the curved-out bottom with a back saw or narrow chisel. Final Details Sawing the Leg Ends: Form a standing pad so that the the leg ends won't break out at the edges when the bench is dragged. Holes for the Lag Screws: I used 432" lag screws to hold the top to the under-frame. Drill 1J8" counterbore holes in the top end rail for the heads. The two center clearance holes are 3/8" and the four outside clearance holes are 5/8" to allow the top to shrink and expand. Assembling the End Frames Once the end frame parts are made and ready to assemble, finish the rails and the inside faces of the legs. I used an oil finish. Finishing at this early stage allows glue squeeze-out to dry on the shoulder line. Clear it away with a sharp chisel and the result is a clean, clear surface and joint line. Begin by clamping the end frame dry. This obliges you to get all the necessary clamps and protection blocks in place. No matter how long-winded the dry clamp-up seems, it's a vital step toward a successful glue-up. Put the parts together dry and check for square, twist and alignment. Then glue, clamp and drive in the wedges. Now that the end frames are complete, use the same steps to complete the underframe. You'll need to mount the vise to the top, as described on page 51, before your work is done. Attach the bench stop to its leg and engage it as you mount the top to the underframe. Clean up and oil all the unfinished areas, and you are ready to put this new and essential tool to work in your shop. If you've built it carefully, it will serve you well._ Close the shoulders using two bar clamps. Check that the top ends of the legs are as far apart as the distance between shoulders. Drive the two wedges, alternating the hammer blows. The hammer will bounce and the note changes when the wedge is firmly home. When the glue has cured, saw off the excess wedge and then clean the joint up with a plane. 52 arts & crafts workbench |


