Woodworker's Journal Summer-2008, страница 51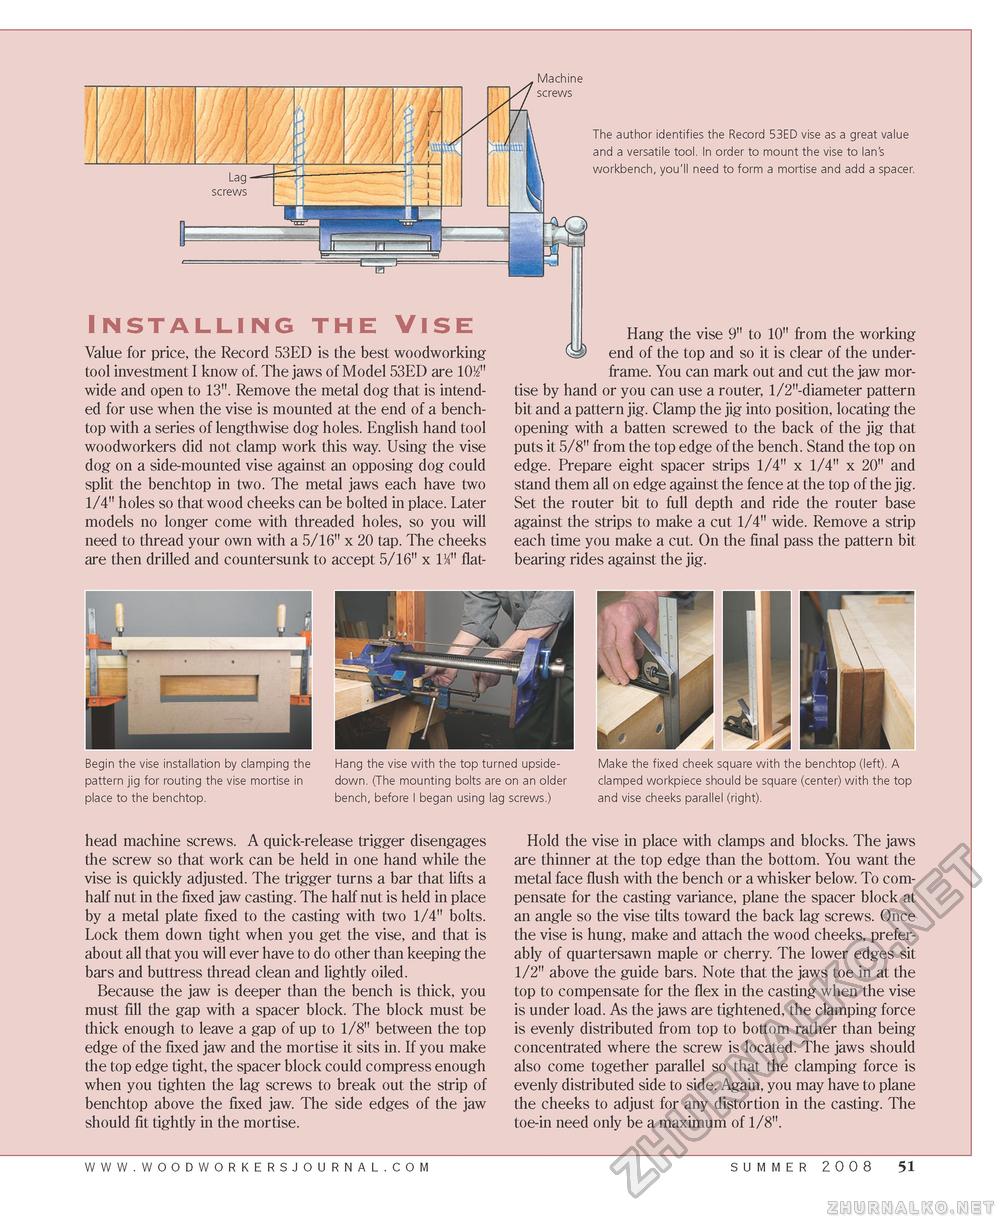
The author identifies the Record 53ED vise as a great value and a versatile tool. In order to mount the vise to Ian's workbench, you'll need to form a mortise and add a spacer. Installing the Vise Value for price, the Record 53ED is the best woodworking tool investment I know of. The jaws of Model 53ED are 1032" wide and open to 33". Remove the metal dog that is intended for use when the vise is mounted at the end of a bench-top with a series of lengthwise dog holes. English hand tool woodworkers did not clamp work this way. Using the vise dog on a side-mounted vise against an opposing dog could split the benchtop in two. The metal jaws each have two 3/4" holes so that wood cheeks can be bolted in place. Later models no longer come with threaded holes, so you will need to thread your own with a 5/36" x 20 tap. The cheeks are then drilled and countersunk to accept 5/36" x 334" flat- Hang the vise 9" to 30" from the working end of the top and so it is clear of the underframe. You can mark out and cut the jaw mortise by hand or you can use a router, 3/2"-diameter pattern bit and a pattern jig. Clamp the jig into position, locating the opening with a batten screwed to the back of the jig that puts it 5/8" from the top edge of the bench. Stand the top on edge. Prepare eight spacer strips 3/4" x 3/4" x 20" and stand them all on edge against the fence at the top of the jig. Set the router bit to full depth and ride the router base against the strips to make a cut 3/4" wide. Remove a strip each time you make a cut. On the final pass the pattern bit bearing rides against the jig. Begin the vise installation by clamping the pattern jig for routing the vise mortise in place to the benchtop. Hang the vise with the top turned upside-down. (The mounting bolts are on an older bench, before I began using lag screws.) Make the fixed cheek square with the benchtop (left). A clamped workpiece should be square (center) with the top and vise cheeks parallel (right). head machine screws. A quick-release trigger disengages the screw so that work can be held in one hand while the vise is quickly adjusted. The trigger turns a bar that lifts a half nut in the fixed jaw casting. The half nut is held in place by a metal plate fixed to the casting with two 3/4" bolts. Lock them down tight when you get the vise, and that is about all that you will ever have to do other than keeping the bars and buttress thread clean and lightly oiled. Because the jaw is deeper than the bench is thick, you must fill the gap with a spacer block. The block must be thick enough to leave a gap of up to 3/8" between the top edge of the fixed jaw and the mortise it sits in. If you make the top edge tight, the spacer block could compress enough when you tighten the lag screws to break out the strip of benchtop above the fixed jaw. The side edges of the jaw should fit tightly in the mortise. Hold the vise in place with clamps and blocks. The jaws are thinner at the top edge than the bottom. You want the metal face flush with the bench or a whisker below. To compensate for the casting variance, plane the spacer block at an angle so the vise tilts toward the back lag screws. Once the vise is hung, make and attach the wood cheeks, preferably of quartersawn maple or cherry. The lower edges sit 3/2" above the guide bars. Note that the jaws toe in at the top to compensate for the flex in the casting when the vise is under load. As the jaws are tightened, the clamping force is evenly distributed from top to bottom rather than being concentrated where the screw is located. The jaws should also come together parallel so that the clamping force is evenly distributed side to side. Again, you may have to plane the cheeks to adjust for any distortion in the casting. The toe-in need only be a maximum of 3/8". www.woodworkersjourna l . c o m summer 2008 51 |


