Woodworker's Journal Summer-2008, страница 87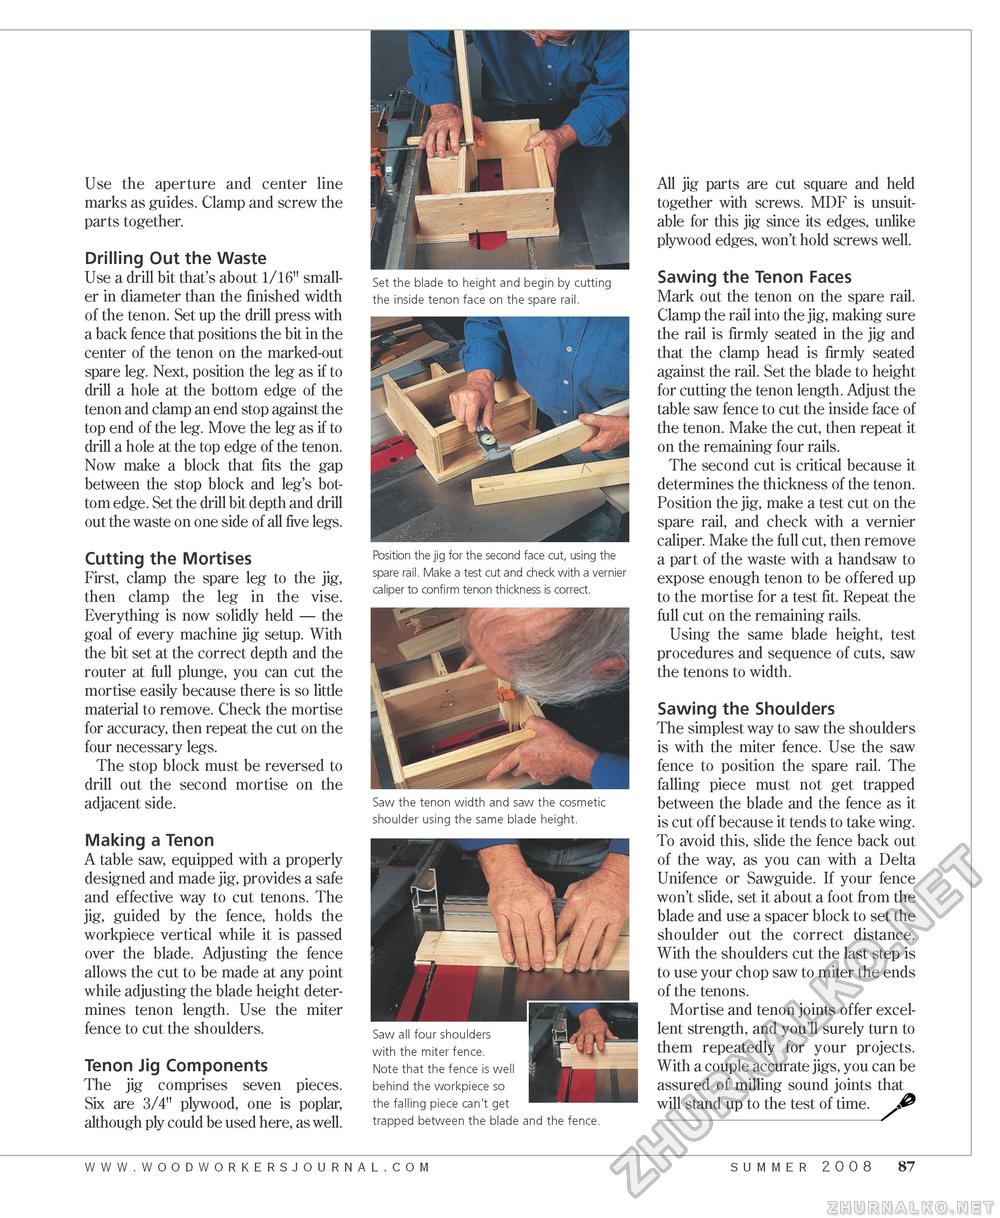
Use the aperture and center line marks as guides. Clamp and screw the parts together. Drilling Out the Waste Use a drill bit that's about 1/16" smaller in diameter than the finished width of the tenon. Set up the drill press with a back fence that positions the bit in the center of the tenon on the marked-out spare leg. Next, position the leg as if to drill a hole at the bottom edge of the tenon and clamp an end stop against the top end of the leg. Move the leg as if to drill a hole at the top edge of the tenon. Now make a block that fits the gap between the stop block and leg's bottom edge. Set the drill bit depth and drill out the waste on one side of all five legs. Cutting the Mortises First, clamp the spare leg to the jig, then clamp the leg in the vise. Everything is now solidly held — the goal of every machine jig setup. With the bit set at the correct depth and the router at full plunge, you can cut the mortise easily because there is so little material to remove. Check the mortise for accuracy, then repeat the cut on the four necessary legs. The stop block must be reversed to drill out the second mortise on the adjacent side. Making a Tenon A table saw, equipped with a properly designed and made jig, provides a safe and effective way to cut tenons. The jig, guided by the fence, holds the workpiece vertical while it is passed over the blade. Adjusting the fence allows the cut to be made at any point while adjusting the blade height determines tenon length. Use the miter fence to cut the shoulders. Tenon Jig Components The jig comprises seven pieces. Six are 3/4" plywood, one is poplar, although ply could be used here, as well. Set the blade to height and begin by cutting the inside tenon face on the spare rail. Position the jig for the second face cut, using the spare rail. Make a test cut and check with a vernier caliper to confirm tenon thickness is correct. Saw the tenon width and saw the cosmetic shoulder using the same blade height. Saw all four shoulders with the miter fence. Note that the fence is well behind the workpiece so the falling piece can't get trapped between the blade and the fence. All jig parts are cut square and held together with screws. MDF is unsuitable for this jig since its edges, unlike plywood edges, won't hold screws well. Sawing the Tenon Faces Mark out the tenon on the spare rail. Clamp the rail into the jig, making sure the rail is firmly seated in the jig and that the clamp head is firmly seated against the rail. Set the blade to height for cutting the tenon length. Adjust the table saw fence to cut the inside face of the tenon. Make the cut, then repeat it on the remaining four rails. The second cut is critical because it determines the thickness of the tenon. Position the jig, make a test cut on the spare rail, and check with a vernier caliper. Make the full cut, then remove a part of the waste with a handsaw to expose enough tenon to be offered up to the mortise for a test fit. Repeat the full cut on the remaining rails. Using the same blade height, test procedures and sequence of cuts, saw the tenons to width. Sawing the Shoulders The simplest way to saw the shoulders is with the miter fence. Use the saw fence to position the spare rail. The falling piece must not get trapped between the blade and the fence as it is cut off because it tends to take wing. To avoid this, slide the fence back out of the way, as you can with a Delta Unifence or Sawguide. If your fence won't slide, set it about a foot from the blade and use a spacer block to set the shoulder out the correct distance. With the shoulders cut the last step is to use your chop saw to miter the ends of the tenons. Mortise and tenon joints offer excellent strength, and you'll surely turn to them repeatedly for your projects. With a couple accurate jigs, you can be assured of milling sound joints that will stand up to the test of time. www.woodworkersjourna l . c o m summer 2008 87 |


