Woodworker's Journal Summer-2008, страница 84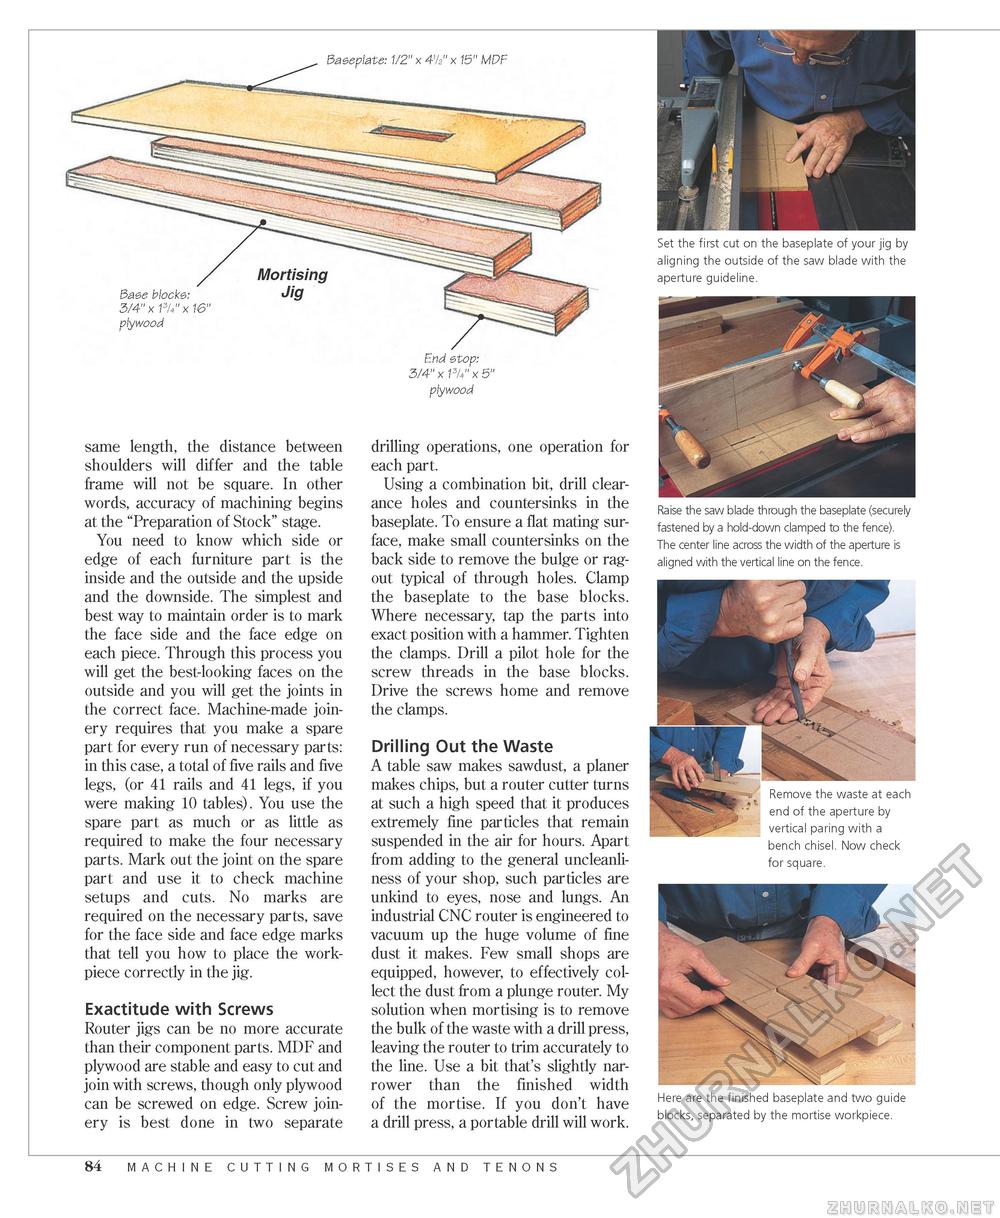
Baseplate: 1/2' x 4%" x 15" MDF Base blocks: 3/4" x 134" x 16 plywood same length, the distance between shoulders will differ and the table frame will not be square. In other words, accuracy of machining begins at the "Preparation of Stock" stage. You need to know which side or edge of each furniture part is the inside and the outside and the upside and the downside. The simplest and best way to maintain order is to mark the face side and the face edge on each piece. Through this process you will get the best-looking faces on the outside and you will get the joints in the correct face. Machine-made joinery requires that you make a spare part for every run of necessary parts: in this case, a total of five rails and five legs, (or 41 rails and 41 legs, if you were making 10 tables). You use the spare part as much or as little as required to make the four necessary parts. Mark out the joint on the spare part and use it to check machine setups and cuts. No marks are required on the necessary parts, save for the face side and face edge marks that tell you how to place the work-piece correctly in the jig. Exactitude with Screws Router jigs can be no more accurate than their component parts. MDF and plywood are stable and easy to cut and join with screws, though only plywood can be screwed on edge. Screw joinery is best done in two separate End stop: 3/4" x 13U" x 5" plywood drilling operations, one operation for each part. Using a combination bit, drill clearance holes and countersinks in the baseplate. To ensure a flat mating surface, make small countersinks on the back side to remove the bulge or ragout typical of through holes. Clamp the baseplate to the base blocks. Where necessary, tap the parts into exact position with a hammer. Tighten the clamps. Drill a pilot hole for the screw threads in the base blocks. Drive the screws home and remove the clamps. Drilling Out the Waste A table saw makes sawdust, a planer makes chips, but a router cutter turns at such a high speed that it produces extremely fine particles that remain suspended in the air for hours. Apart from adding to the general uncleanli-ness of your shop, such particles are unkind to eyes, nose and lungs. An industrial CNC router is engineered to vacuum up the huge volume of fine dust it makes. Few small shops are equipped, however, to effectively collect the dust from a plunge router. My solution when mortising is to remove the bulk of the waste with a drill press, leaving the router to trim accurately to the line. Use a bit that's slightly narrower than the finished width of the mortise. If you don't have a drill press, a portable drill will work. Set the first cut on the baseplate of your jig by aligning the outside of the saw blade with the aperture guideline. Raise the saw blade through the baseplate (securely fastened by a hold-down clamped to the fence). The center line across the width of the aperture is aligned with the vertical line on the fence. Remove the waste at each end of the aperture by vertical paring with a bench chisel. Now check for square. Here are the finished baseplate and two guide blocks, separated by the mortise workpiece. 84 machine cutting mortises and tenons |


