Woodworker's Journal Summer-2008, страница 85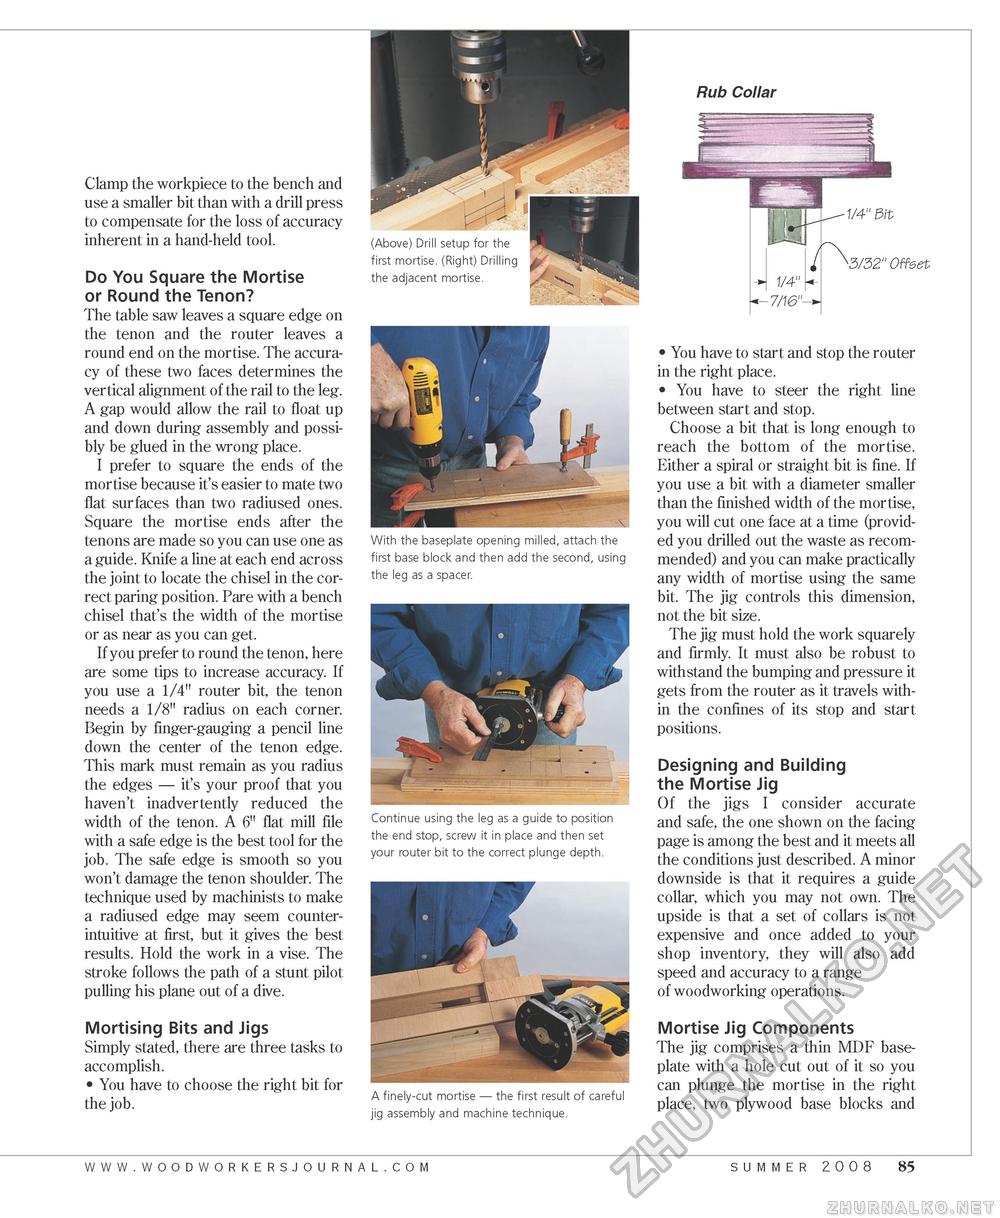
Clamp the workpiece to the bench and use a smaller bit than with a drill press to compensate for the loss of accuracy inherent in a hand-held tool. Do You Square the Mortise or Round the Tenon? The table saw leaves a square edge on the tenon and the router leaves a round end on the mortise. The accuracy of these two faces determines the vertical alignment of the rail to the leg. A gap would allow the rail to float up and down during assembly and possibly be glued in the wrong place. I prefer to square the ends of the mortise because it's easier to mate two flat surfaces than two radiused ones. Square the mortise ends after the tenons are made so you can use one as a guide. Knife a line at each end across the joint to locate the chisel in the correct paring position. Pare with a bench chisel that's the width of the mortise or as near as you can get. If you prefer to round the tenon, here are some tips to increase accuracy. If you use a 1/4" router bit, the tenon needs a 1/8" radius on each corner. Begin by finger-gauging a pencil line down the center of the tenon edge. This mark must remain as you radius the edges — it's your proof that you haven't inadvertently reduced the width of the tenon. A 6" flat mill file with a safe edge is the best tool for the job. The safe edge is smooth so you won't damage the tenon shoulder. The technique used by machinists to make a radiused edge may seem counterintuitive at first, but it gives the best results. Hold the work in a vise. The stroke follows the path of a stunt pilot pulling his plane out of a dive. Mortising Bits and Jigs Simply stated, there are three tasks to accomplish. • You have to choose the right bit for the job. (Above) Drill setup for the first mortise. (Right) Drilling the adjacent mortise. With the baseplate opening milled, attach the first base block and then add the second, using the leg as a spacer. Continue using the leg as a guide to position the end stop, screw it in place and then set your router bit to the correct plunge depth. Rub Collar 3/32" Offset 1/4" 7/16"- A finely-cut mortise — the first result of careful jig assembly and machine technique. • You have to start and stop the router in the right place. • You have to steer the right line between start and stop. Choose a bit that is long enough to reach the bottom of the mortise. Either a spiral or straight bit is fine. If you use a bit with a diameter smaller than the finished width of the mortise, you will cut one face at a time (provided you drilled out the waste as recommended) and you can make practically any width of mortise using the same bit. The jig controls this dimension, not the bit size. The jig must hold the work squarely and firmly. It must also be robust to withstand the bumping and pressure it gets from the router as it travels within the confines of its stop and start positions. Designing and Building the Mortise Jig Of the jigs I consider accurate and safe, the one shown on the facing page is among the best and it meets all the conditions just described. A minor downside is that it requires a guide collar, which you may not own. The upside is that a set of collars is not expensive and once added to your shop inventory, they will also add speed and accuracy to a range of woodworking operations. Mortise Jig Components The jig comprises a thin MDF baseplate with a hole cut out of it so you can plunge the mortise in the right place, two plywood base blocks and www.woodworkersjourna l . c o m summer 2008 85 |


