Woodworker's Journal winter-2010, страница 32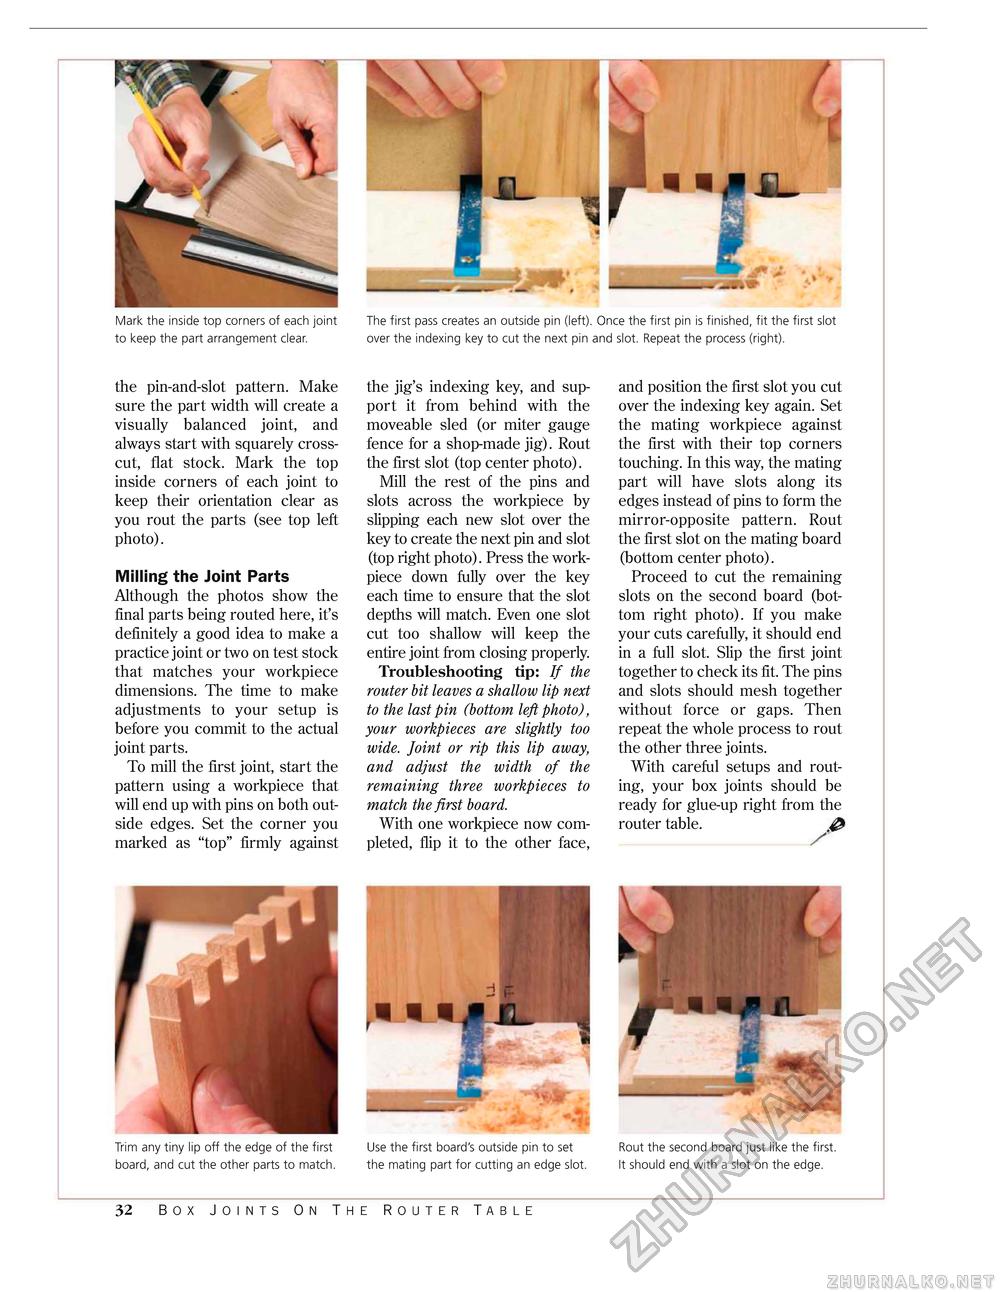
Mark the inside top corners of each joint to keep the part arrangement clear. The first pass creates an outside pin (left). Once the first pin is finished, fit the first slot over the indexing key to cut the next pin and slot. Repeat the process (right). the pin-and-slot pattern. Make sure the part width will create a visually balanced joint, and always start with squarely crosscut, flat stock. Mark the top inside corners of each joint to keep their orientation clear as you rout the parts (see top left photo). Milling the Joint Parts Although the photos show the final parts being routed here, it's definitely a good idea to make a practice joint or two on test stock that matches your workpiece dimensions. The time to make adjustments to your setup is before you commit to the actual joint parts. To mill the first joint, start the pattern using a workpiece that will end up with pins on both outside edges. Set the corner you marked as "top" firmly against the jig's indexing key, and support it from behind with the moveable sled (or miter gauge fence for a shop-made jig). Rout the first slot (top center photo). Mill the rest of the pins and slots across the workpiece by slipping each new slot over the key to create the next pin and slot (top right photo). Press the work-piece down fully over the key each time to ensure that the slot depths will match. Even one slot cut too shallow will keep the entire joint from closing properly. Troubleshooting tip: If the router bit leaves a shallow lip next to the last pin (bottom left photo), your workpieces are slightly too wide. Joint or rip this lip away, and adjust the width of the remaining three workpieces to match the first board. With one workpiece now completed, flip it to the other face, and position the first slot you cut over the indexing key again. Set the mating workpiece against the first with their top corners touching. In this way, the mating part will have slots along its edges instead of pins to form the mirror-opposite pattern. Rout the first slot on the mating board (bottom center photo). Proceed to cut the remaining slots on the second board (bottom right photo). If you make your cuts carefully, it should end in a full slot. Slip the first joint together to check its fit. The pins and slots should mesh together without force or gaps. Then repeat the whole process to rout the other three joints. With careful setups and routing, your box joints should be ready for glue-up right from the router table. # I 11 Trim any tiny lip off the edge of the first Use the first board's outside pin to set board, and cut the other parts to match. the mating part for cutting an edge slot. Rout the second board just like the first. It should end with a slot on the edge. 32 Box Joints On The Router Table |


