Creative Woodworks & crafts 1998-09, страница 59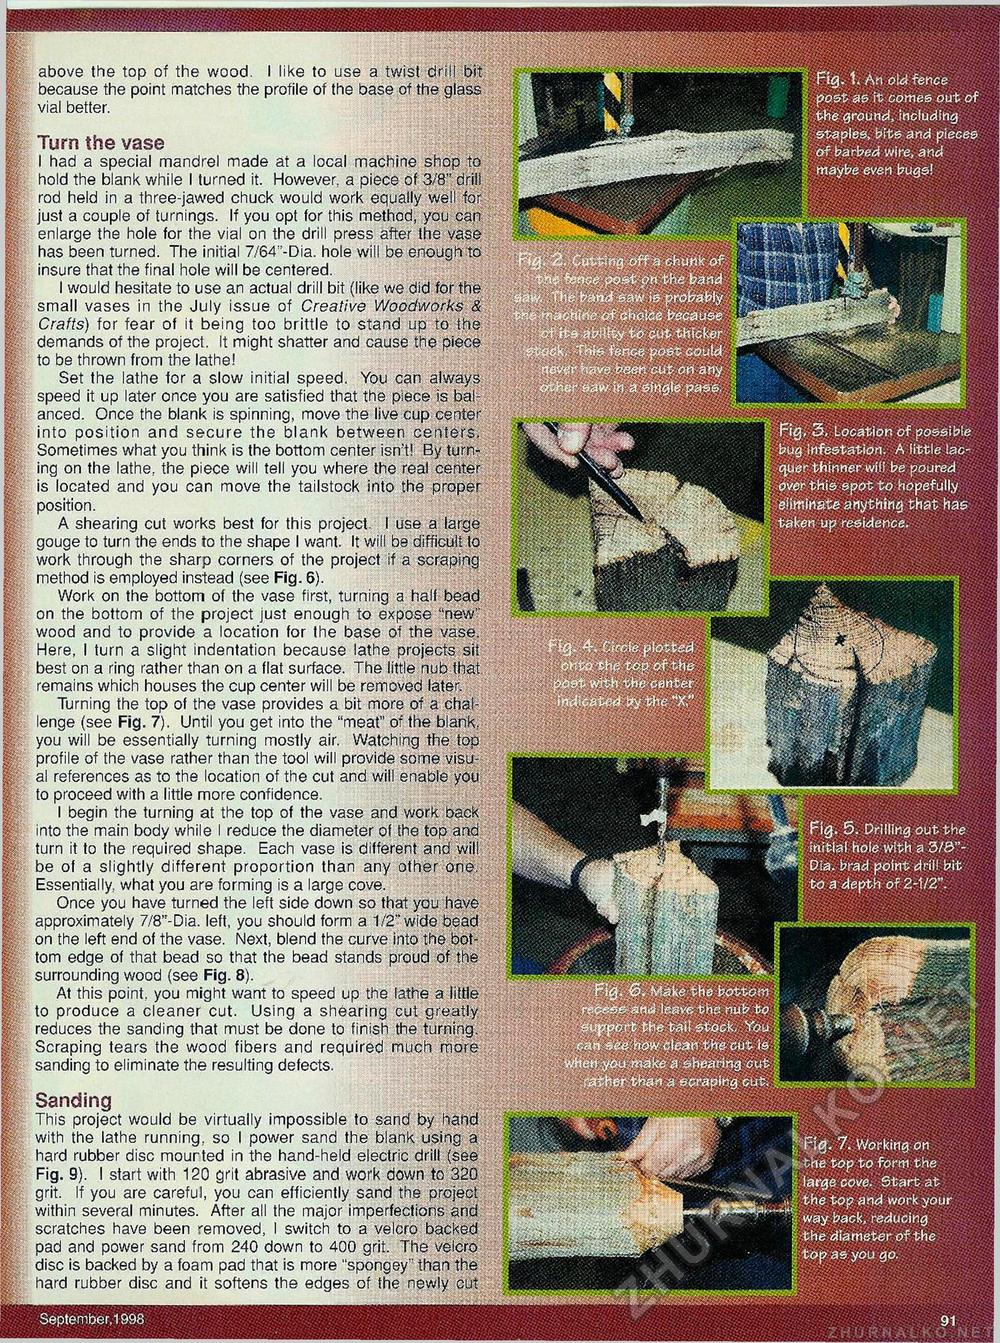
Fig. 1. An old fence post as it comes out of pbe ground, including staples, bits and pieces of barbed wire, and maybe even bugs! ;. Cutting off a chunk offence pofet on -the band :abi«iy to cut. thicker Fig, 3, Location Of possible bug infestation. A little lacquer thinner will be poured over this spot to hopefully eliminate anything that has taken up residence. Jj^l Fig. 5. Drilling out the ,-.'' initial hole with a 3/3"-|»^f:Dia. brad point drill bit to a depth of 2-1/2". Fig. 0. Make the bottom ' re^eseraftd leave the nub to \ . support th« tail stock, You J *f can see how clean the cut is •.< fen you make a shearing cut f§| rather than a scraping cut, ^vs-^w^ p Fig. 7. Working on the top to form the I- large cove. Start at •' »: the top and work your ;v way back, reducing g the diameter of the •J top as: you go. September, 1998 above the top of the wood. I like to use a twist drill bit because the point matches the profile of the base of the glass vial better. I Turn the vase f: I had a special mandrel made at a local machine shop to ft hold the blank while I turned it. However, a piece of 3/8" drill || rod held in a three-jawed chuck would work equally well for p just a couple of turnings. If you opt for this method, you can H enlarge the hole for the vial on the drill press after the vase | has been turned. The initial 7/64::-Dia. hole will be enough to P insure that the final hole will be centered. I would hesitate to use an actual drill bit (like we did for the small vases in the July issue of Creative Woodworks & W Crafts) for fear of it being too brittle to stand up to the I', demands of the project. It might shatter and cause the piece |: to be thrown from the lathe! If Set the lathe for a slow initial speed. You can always P speed it up later once you are satisfied that the piece is bal-|f anced. Once the blank is spinning, move the live cup center into position and secure the blank between centers. 0, Sometimes what you think is the bottom center isn't! By turn-ing on the lathe, the piece will tell you where the real center !' is located and you can move the tailstock into the proper: position. A shearing cut works best for this project. I use a large I gouge to turn the ends to the shape I want. It will be difficult to ' work through the sharp corners of the project if a scraping I method is employed instead (see Fig. 6). Work on the bottom of the vase first, turning a half bead p on the bottom of the project just enough to expose "new" |! wood and to provide a location for the base of the vase. Here, I turn a slight indentation because lathe projects sit: f:: best on a ring rather than on a flat surface. The little nub that. |f remains which houses the cup center will be removed later. Turning the top of the vase provides a bit more of a chal-P lenge (see Fig. 7). Until you get into the "meat" of the blank, It you will be essentially turning mostly air. Watching the top profile of the vase rather than the tool will provide some visu-|§ al references as to the location of the cut and will enable you I-: to proceed with a little more confidence. I begin the turning at the top of the vase and work back p into the main body while I reduce the diameter of the top and jfe turn it to the required shape. Each vase is different and will: be of a slightly different proportion than any other one. | Essentially, what you are forming is a large cove. Once you have turned the left side down so that you have H approximately 7/8"-Dia. left, you should form a 1/2" wide bead on the left end of the vase. Next, blend the curve into the bot-torn edge of that bead so that the bead stands proud of the || surrounding wood (see Fig. 8). fe At this point, you might want to speed up the lathe a little p to produce a cleaner cut. Using a shearing cut greatly |: reduces the sanding that must be done to finish the turning. Scraping tears the wood fibers and required much more sanding to eliminate the resulting defects. H Sanding p This project would be virtually impossible to sand by liahd p. with the lathe running, so I power sand the blank using a |p hard rubber disc mourted in the hand-held electric drill (see p Fig. 9). I start with 120 grit abrasive and work down to 320 I grit. If you are careful, you can efficiently sand the project k within several minutes. After all the major imperfections and I; scratches have been removed, I switch to a velcro backed. $. pad and power sand from 240 down to 400 grit. The velcro disc is backed by a foam pad that is more "spongey" than the llf: hard rubber disc and it softens the edges of the newly cut |


