Creative Woodworks & crafts 2002-06, страница 59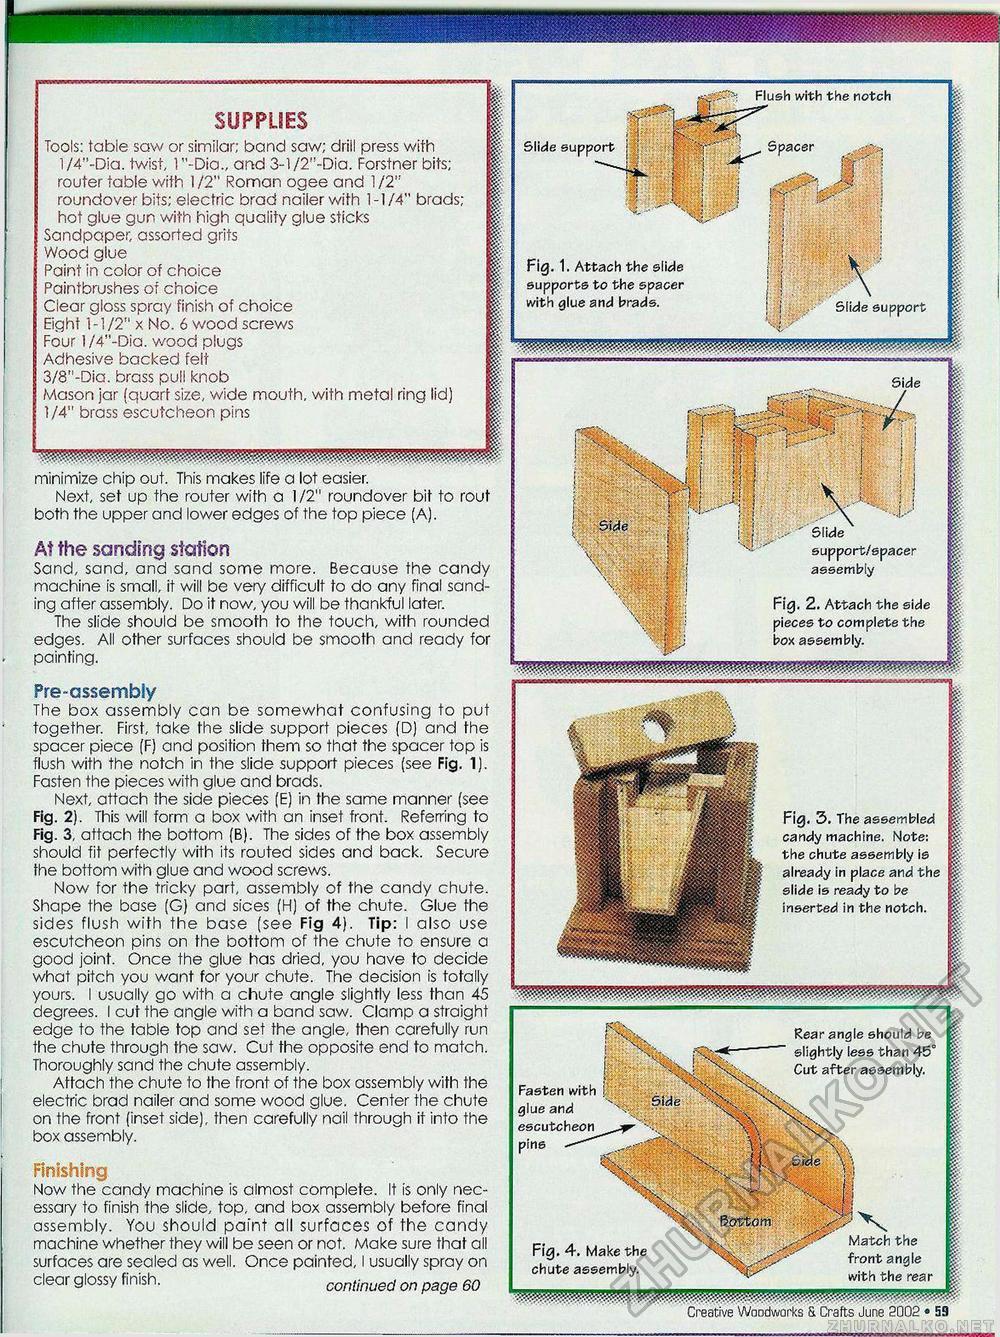
Flush with the notch Slide sui Fig. 1. Attach the slide supports to the spacer with glue and brads. Slide support/spacer assembly | Fig. 2. Attach the side J v j pieces to complete the | ; box assembly. Fig. 3. The assembled candy machine. Note: the chute assembly is already in place and the slide is ready to be inserted in the notch. Rear angle should be slightly less than 45' Cut after assembly. Fasten with glue and escutcheon pins --— •■'■lWwfi* bottom SUPPLIES Tools: table saw or similar; band saw; drill press with l/4"-Dia. twist, 1"-Dia„ arid 3-l/2"-Dia. Forstner bits; router table with 1/2" Roman ogee and 1/2" roundover bits; electric brad nailer with 1-1/4" brads; hot glue gun with high quality glue sticks Sandpaper, assorted grits Wood glue Paint in color of choice Paintbrushes of choice Clear gloss spray finish of choice Eight 1-1/2" x No. 6 wood screws Four l/4"~Dia. wood plugs Adhesive backed felt 3/8"-Dia. brass pull knob Mason jar (quart size, wide mouth, with metal ring lid) 1/4" brass escutcheon pins minimize chip out. This makes life a lot easier. Next, set up the router with a 1/2" roundover bit to rout both the upper and lower edges of the top piece (A). At the sanding station Sand, sand, and sand some more. Because the candy machine is small, it will be very difficult to do any final sanding after assembly. Do it now, you will be thankful later. The slide should be smooth to the touch, with rounded edges. All other surfaces should be smooth and ready for painting. Pre-assembiy The box assembly can be somewhat confusing to put together. First, take the slide support pieces (D) and the spacer piece (F) and position them so that the spacer top is flush with the notch in the slide support pieces (see Fig. 1). Fasten the pieces with glue and brads. Next, attach the side pieces (E) in the same manner (see Fig. 2). This will form a box with an inset front. Referring to Fig. 3, attach the bottom (B). The sides of the box assembly should fit perfectly with its routed sides and back. Secure the bottom with glue and wood screws. Now for the tricky part, assembly of the candy chute. Shape the base (G) and sices (H) of the chute. Glue the sides flush with the base (see Fig 4). Tip: I also use escutcheon pins on the bottom of the chute to ensure a good joint. Once the glue has dried, you have to decide what pitch you want for your chute. The decision is totally yours. I usually go with a chute angle slightly less than 45 degrees. I cut the angle with a band saw. Clamp a straight edge to the table top and set the angle, then carefully run the chute through the saw. Cut the opposite end to match. Thoroughly sand the chute assembly. Attach the chute to the front of the box assembly with the electric brad nailer and some wood glue. Center the chute on the front (inset side), then carefully nail through it into the box assembly. Finishing Now the candy machine is almost complete. It is only necessary to finish the slide, top, and box assembly before final assembly. You should paint all surfaces of the candy machine whether they will be seen or not. Make sure that all surfaces are sealed as well. Once painted, I usually spray on clear glossy finish. continued on page 60 |


