Creative Woodworks & crafts 2003-04, страница 59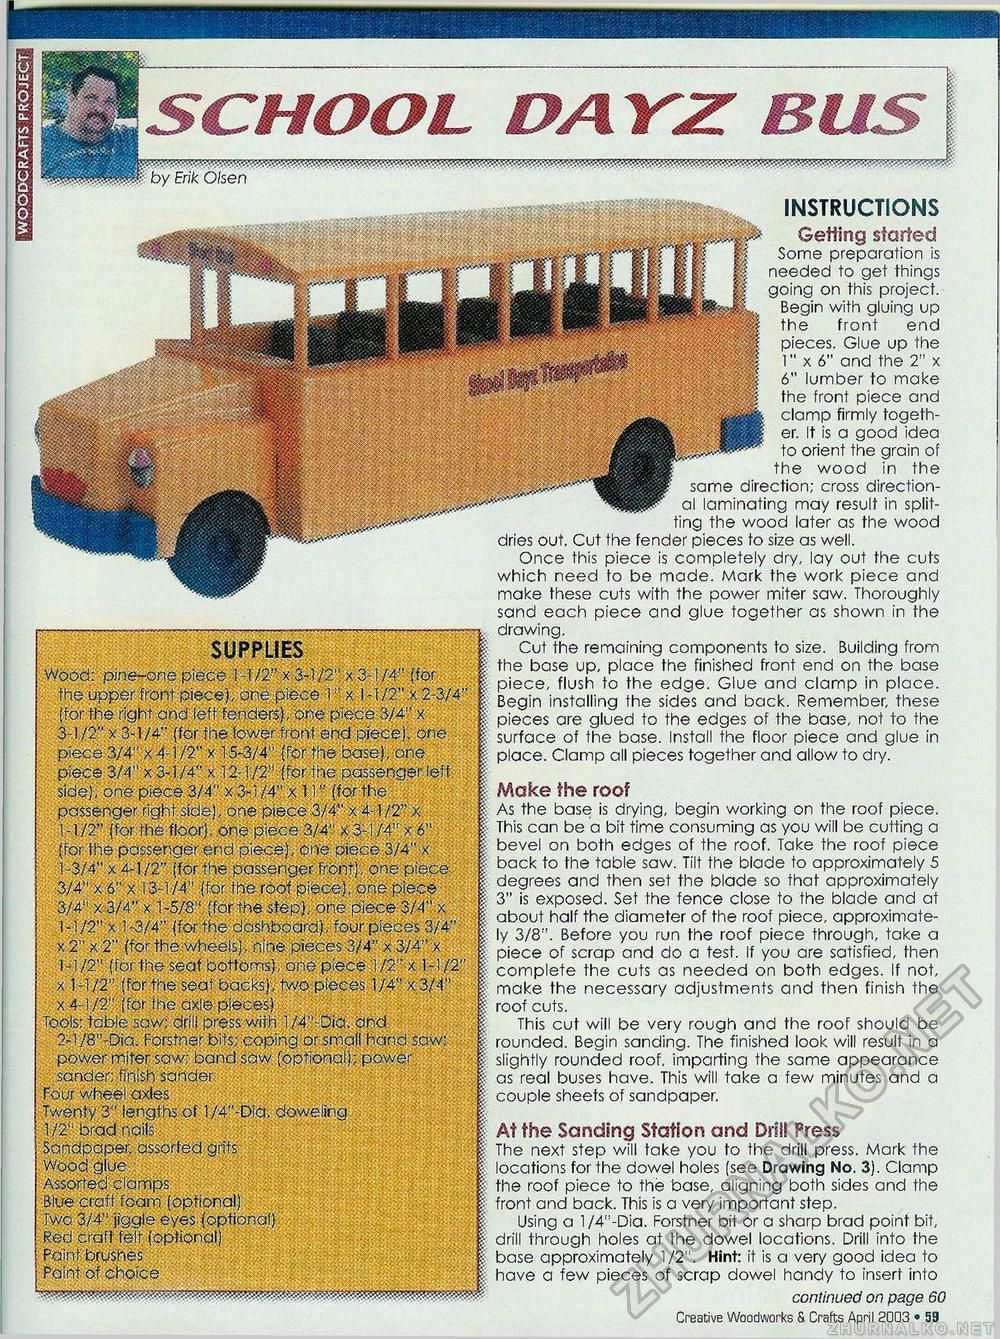
SUPPLIES Wood: pine-one piece 1-1/2" x 3-1/2" x 3-1/4" (for the upper front piece), one piece 1 •" x 1-1/2" x 2-3/4" : (for the right and let! fenders!, one piece 3/4" x 3-1/2" x 3-1/4" (for the lower front end piece), one piece 3/4" x4-1/2" x 15-3/4" (for the base), one piece 3/4" x 3-3/4" x 12-1/2" (for the passenger left side), one piece 3/4" x 3-1I A" x 11 *' (for the passenger right side), one piece 3/4" x 4-1 /2" x 1 -1/2" (for the floor). one piece 3/4" x 3-1/4" x 6" (for the passenger end piece), one piece 3/4" x . 1 -3/4" x 4-1/2" (for the passenger front), one piece 3/4" x 6" x 13-1/4" (for the roof oiece!. one piece 3/4" x 3/4" x 1-5/8" (for the step), one piece 3/4" x 1-1/2" x 1-3/4" (for the dashboard), four pieces 3/4" x 2" x 2" (for the-wheels), nine pieces 3/4" x 3/4" x 1-1/2" (for the seat bottoms), one piece .1/2" x 1-1/2" x 1-1/2" (for the seci backs), two pieces 1/4" x 3/4" x 4-1 /2" (for the axle pieces) Tools: table saw; drill press with 1 /4"-Dia. and 2-l/8"-Dia. Forstner bits; coping or small hand saw; power miter saw; band saw (optional); power sander; finish sander Four wheel axles Twenty 3" lengths of 1/4"-Dla. doweling 1 /2" brad nails Sandpaper, assorted grits Wood glue Assorted clomps Blue craft foam (optional) fwc 3/4" jiggle eyes (optional) Red craft felt (optional) Faint brushes ■ Paint of choice : Getting started Some preparation is needed to get things going on this project. Begin with gluing up the front end pieces. Glue up the 1" x 6" and the 2" x 6" lumber to make the front piece and clamp firmly together. It is a good idea to orient the grain of the wood in the same direction; cross directional laminating may result in splitting the wood later as the wood dries out. Cut the fender pieces to size as well. Once this piece is completely dry, lay out the cuts which need to be made. Mark the work piece and make these cuts with the power miter saw. Thoroughly sand each piece and glue together as shown in the drawing. Cut the remaining components to size. Building from the base up, place the finished front end on the base piece, flush to the edge. Glue and clamp in place. Begin installing the sides and back. Remember, these pieces are glued to the edges of the base, not to the surface of the base. Install the floor piece and glue in place. Clamp all pieces together and allow to dry. Make the roof As the base is drying, begin working on the roof piece. This can be a bit time consuming as you will be cutting a bevel on both edges of the roof. Take the roof piece back to the table saw. Tilt the blade to approximately 5 degrees and then set the blade so that approximately 3" is exposed. Set the fence close to the blade and at about half the diameter of the roof piece, approximately 3/8". Before you run the roof piece through, take a piece of scrap and do a test. If you are satisfied, then complete the cuts as needed on both edges. If not, make the necessary adjustments and then finish the roof cuts. This cut will be very rough and the roof should be rounded. Begin sanding. The finished look will result in a slightly rounded roof, imparting the same appearance as real buses have. This will take a few minutes and a couple sheets of sandpaper. At the Sanding Station and Drill Press The next step will take you to the drill press. Mark the locations for the dowel holes (see Drawing No. 3). Clamp the roof piece to the base, aligning both sides and the front and back. This is a very important step. Using a 1 /4"-Dia. Forstner bit or a sharp brad point bit, drill through holes at the dowel locations. Drill into the base approximately 1/2". Hint: it is a very good idea to have a few pieces of scrap dowel handy to insert into continued on page 60 Creative Woodworks & Crafts April 2DD3 • 59 SCHOOL DA rZ BUS INSTRUCTIONS |


