Creative Woodworks & crafts 2003-09, страница 48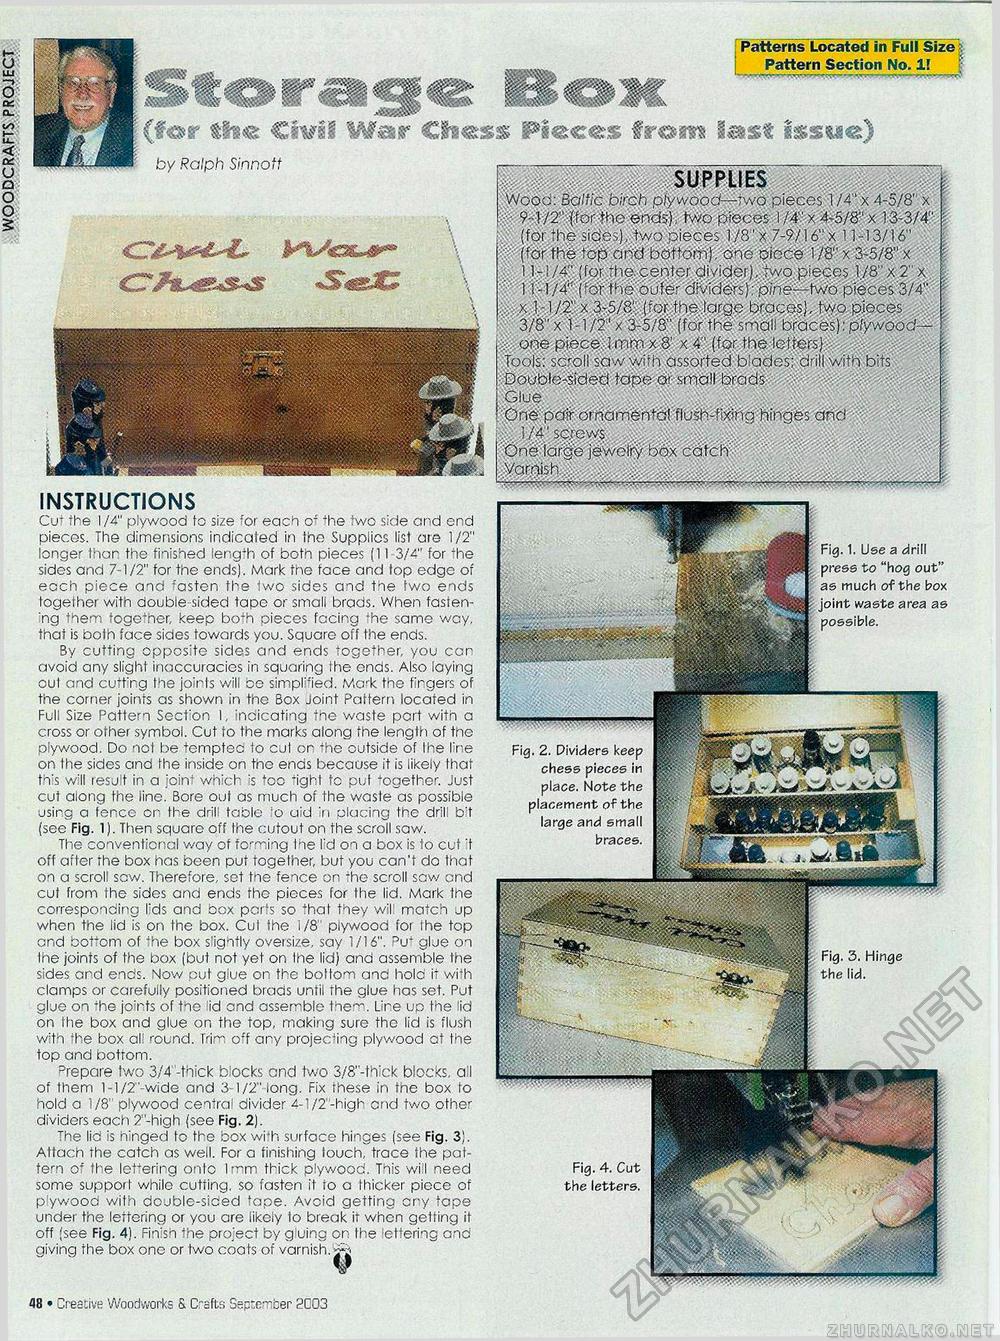
18 • Creative Woodworks & Crafts September 2003 the bottom supports. shelf supports. by Ralph Sinnotf INSTRUCTIONS Cut the 1/4" plywood to size tor each of 4he two side and end piecos. The dimensions indicated in the Supplies list are 1/2" longer than the finished leng-h of both pieces (11 3/4" for 4he sides and 7-1/2" for the ends). Mark the face and lop edge of each piece and fasten the two sides and the two ends together with double sided tape or small brads. When fasien-'ng them toge+her, keep both pieces facing 'he same way. that is both face sides towards you. Square off the ends. By cutting opposite sides and ends together, you car avoid any slight inaccuracics in squaring the ends. Also laying out and cutting the joirts will bo simpfied. Mark the fingers of the corner joints as shown in the Box joint Pattern located in Full Size Pattern Section 1, indicating the waste pert with a cross or other symbol. Cut to the marks along the lenglh of the plywood. Do not be tempted to cul or ine outside of Ihe line on the sides and the inside on the ends because it is likely that this will result in a join" which is too tight tc put together. Just cut along the line. Bore out as much of the waste as possible using a fence or the drill table io u;d in placing the drill b't (see Fig. 1). Then square off the cutout on the scroll saw. The conventional way of forming he lid on a box is 1o cut't off after the box has been put together, but you can't do that on a scroll sow. Therefore, set the fence on -he scroll sow end cut from the sides and ends the picces for the lid. Mark the corresponding lids and box parts so *hat they wit match jp when the lid is on the box. Cul the 1/8" plywood for Ihe top and bottom of the box slightly oversize, say 1/16". ^u4 glje on Ihe joints of the box (but not yet on Ihe lid) and assemble the sides and ends. Now put giue on the bottom and hold it wfh clamps or carefully positioned brads until the glue has set. Put glue on the joints of the id and assemble them. Lire up the lid on the box and glue on the top, making sure the lid is flush with 'he box all round. Trim off any projecting plywood at the top and bottom. Prepare two 3/4 -thick bocks end two 3/8"-thick blocks, ail of them l-l/2"-wide and 3-1/2" long. Fix these in the box to hold a 1/8" plywood centra1 divider 4-l/2"-high ond two other dividers each 2"-high (see Fig. 2). The lid is hinged to the box with surface hinges (see Fig. 3). Attach the catch as well. For a finishing touch, trace ihe pattern of the lettering onto I mm thick plywood. This will need some support whilo cutting, so fasten it to a ihicker piece of plywood with double-sided tape. Avoid getting cry tape under the lettering or you are likely to break it when getting it off (see Fig. 4). Finish the project by gluing on the 'ettering and giving the box one or two coats of varnish, w ¥ Fig. 4. Cut the letters. Fig. 2. Dividers keep chess pieces in place. Note the placement of the large and small braces. SUPPLIES Wood: 8altic birch olywooa—two pieces 1/4'x 4-5/8' x ■ 9-1/2" (for the ends), two pieces l/4"x4-5/8"x 13-3/4' ' (for the sides),.two pieces 1/8 " x 7-9/16" x 11-13/16" ■ (tor the top and bottom). One oioce 1 /8" x 3-5/8" x i l-;/4" (for. the:.center, divider), two pieces 1/8" x 2" x " 11-1/4* (fortheoufer dividers): pine—two pieces 3/4" ' i:. x 1-1/2". x 3:5/8; (forthe.large braces), two. pieces • 3/8" x 1-1 if x 3-5/8" (for the small braces): plywood -:>■ om piece,i mm x .8' x 4 (for the letters;. j Tools: scoi! saw with assorted blades; drill with bits Double-Sided tape d> small brads Glue 'One pair otnamen'a! flush-f>x>ng hinges and • i./4' sc/evys. .... .: ... , : 'One large jewelry box catch • Varnish .. •■i—■—ir—-----------------—r--------------—---------- - ■-.—------ 1. Use a drill to "hog out" as much of the box waste area as possible. |


