Creative Woodworks & crafts 2003-09, страница 51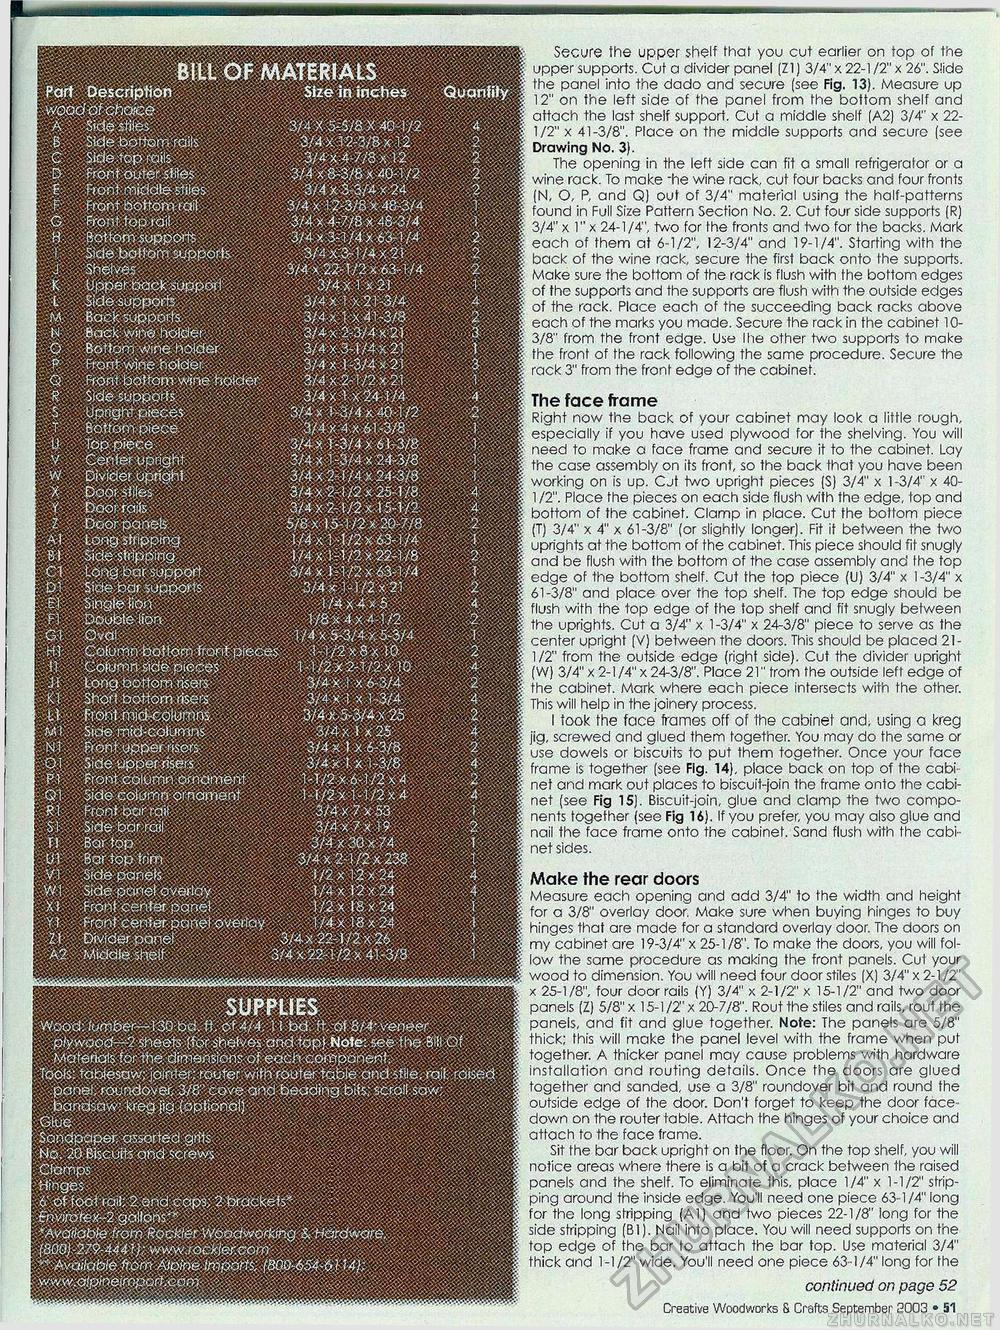
mmm Wm P^a^t Descripti € front rtfddte-stiles | I A §M ^ F fiant bottom «*{ | v >3/4 x g^Hppii x t|g > <5 Front top toil , u Bottom supports ||g.| / 3/4x?n/4x£$-1 /4 ftlllit flillli^^ K Upper pacfc support 1 / 21 * ' y J Bad jppc 3/ 4 K413A ; N MMi P | 3/^x2^4x21 teH O Botro.-i holder 3/4.3-1 i - ?) t : <2 FrontM -3/4x2-1/2*21 & 1 §1 R' Side.supports .. 3/4 x 1 x24;i74 ' -'.4. ■ S' UOI,gn+pieces 3/4* '-3<4x4C I/2 2 - ' Rvtymi.tf.r : .. SI 3/e ! U Top .piece : , . ' : 3/4 X 1-3/4 >61-3/8 1 w §11 •x poorst)le> |£ I 11 3/4X24/2/25 f/8 4 Y Daorrafe .. 3/4x2-1/2x15-1/2 . 4 3/4 x T-3/4 x 61-3/8 : .7 1 mWm^tWMmB^mmm. y Daoircfc .. 3/4 2-1/2 1-1/" . 4 | m Deerpanssfe-*I 1111 7/8 §g| 1 |§1 si Mest^pmg mm mmm^mSmm mm Cf LoftgpqrsuppQtf I mfil 31 0-'Ol ,'4 «. h-3/4 x, 5-3 1 fjg§ 11 Cofumn side piece? & sfH1-V2X2-T/2 x to 4- |§ if "lo^^ptfofn^m ||§|iI pip x £3/4, ||||i v<2, §m mmmmm & Wm Wmmm ttl ^Cofurrjn bottom jror it Column side pieced Kl... Short bottom rise; s - ■ 2,*. ixl 3,4 .. 4 m m^M^^W^^m^mM^Mmm I mm Kit s •> L wi VI i ll vm 1 :<-t! .:••' '.i» ^ »•>' * «< . . .. ii'ifeliliilliiil f 30x74 p I ; Vi s^e^nete; , . .4 Wf Wl, Stdgportetovertpy ^ /?/4xi2x24 | ' » Xt- f i/2x f8x2*||I §| ipi SUPPLIES -Wood^ym^er—m^d %-614-fa »'fed ^.Aj . p/yw30< i-ie©t; (f^t es an .1 tool Note: see the fe'il Ot Tools tabtesav)/, ja/rd^f, rotifer vy#> fputet tabie mmstUe ^Off rais^ panel, royndovec 3/6 cov^on^ feeadiyg felt? sapll Sow, g | ^MwfflPMW I m i Y^ front ceplefcpgftetov^-toy f/^xtfx^ pWll y ■ Zl Divider oonel 3/4x22-1/2x26 .. 1 1 Available from Afpfntz Ijn^m, Uh ^- V^ m -1 Secure the upper shelf that you cut earlier on top of the upper supports. Cut a divider panel (21) 3/4" x 22-1 /2" x 26". Slide the panel into the dado and secure (see Fig. 13). Measure up 12" on the left side of the panel from the bottom shelf and attach the last shelf support. Cut a middle shelf (A2) 3/4" x 22-1/2" x 41-3/8". Place on the middle supports and securc (see Drawing No. 3). The opening in the left side can fit a small refrigerator or a wine rack. To make "he wine rack, cut four backs and four fronts (N, O, P, and Q) out of 3/4" material using the half-patterns found in Full Size Pattern Section No. 2. Cut four side supports (R) 3/4" x 1" x 24-1/4", two for the fronts and two for the backs. Mark each of them at 6-1/2", 12-3/4" and 19-1/4". Starting with the back of the wine rack, secure the first back onto the supports. Make sure the bottom of the rack is flush with the bottom edges of the supports and the supports are flush with the outside edges of the rack. Place each of the succeeding back racks above each of the marks you made. Secure the rack in the cabinet 10-3/8" from the front edge. Use Ihe other two supports to make the front of the rack following the same procedure. Secure the rack 3" from the front edge of the cabinet. The face frame Right now the back of your cabinet may look a little rough, especially if you have used plywood for the shelving. You will need to make a face frame and secure it to the cabinet. Lay the case assembly on its front, so the back that you have been working on is up. Cjt two upright pieces (S) 3/4" x 1-3/4" x 40-1 /2". Place the pieces on each side flush with the edge, lop and bottom of the cabinet. Clamp in place. Cut the bottom piece (T) 3/4" x 4" x 61-3/8" (or slightly longer). Fit it between the two uprights at the bottom of the cabinet. This piece should fit snugly and be flush with the bottom of the case assembly and the fop edge of the bottom shelf. Cut the top piece (U) 3/4" x 1-3/4" x 61-3/8" and place over the top shelf. The top edge should be flush with the top edge of fhe top shelf and fit snugly between the uprights. Cut a 3/4" x 1-3/4" x 24-3/8" piece to serve as the center upright (V) between the doors. This should be placed 21-1/2" from the outside edge (right side). Cut the divider upright (W) 3/4" x 2-1/4" x 24-3/8". Place 21" from fhe outside left edge of the cabinet. Mark where each piece intersects with the other. This will help in the joinery process. I took fhe face frames off of the cabinet and, using a kreg jig, screwed and glued them together. You may do the same or use dowels or biscuits to put them together. Once your face frame is together (see Fig. 14), place back on top of the cabi net and mark out places to biscuii-join the frame onto the cabinet (see Fig IS). Biscuit-join, glue and clamp the two components together (see Fig 16). If you prefer, you may also glue and nail the face frame onto the cabinet. Sand flush with the cabinet sides. Make the rear doors Measure each opening and add 3/4" to the width and height for a 3/8" overlay door, Make sure when buying hinges to buy hinges that are made for a standard overlay door. The doors on my cabinet are 19-3/4" x 25-1/8". To make the doors, you will follow the same procedure as making the front panels. Cut your wood to dimension. You will need four door stiles (X) 3/4" x 2-1/2" x 25-1/8", four door rails (Y) 3/4" x 2-1/2" x 15-1/2" and two door panels (Z) 5/8" x 15-1/2"x 20-7/8". Rout the stiles and rails, rout the panels, and fit and glue together. Note: The panels are 5/8" thick; this will make the panel level with the frame when put together. A thicker panel may cause problems with hardware installation and routing details. Once fhe doors are glued together and sanded, use a 3/8" roundover bit and round the outside edge of the door. Don't forget to keep the door face down on the router table. Attach the hinges of your choice and attach to the face frame. Sit the bar back upright on the floor. On the top shelf, you will notice areas where there is a bit of a crack between the raised panels and the shelf. To eliminate this, place 1/4" x 1-1/2" stripping around the inside edge. You'll need one piece 63-1/4" long for the long stripping (Al) and two pieces 22-1/8" long for the side stripping (B1). Nail into place. You will need supports on the top edge of the bar to attach the bar top. Use material 3/4" thick and 1-1/2" wide. You'll need one piece 63-1/4" long for Ihe continued on page 52 Creative Woodworks & Crafts September 8003 • 51 |


