Creative Woodworks & crafts 2003-09, страница 52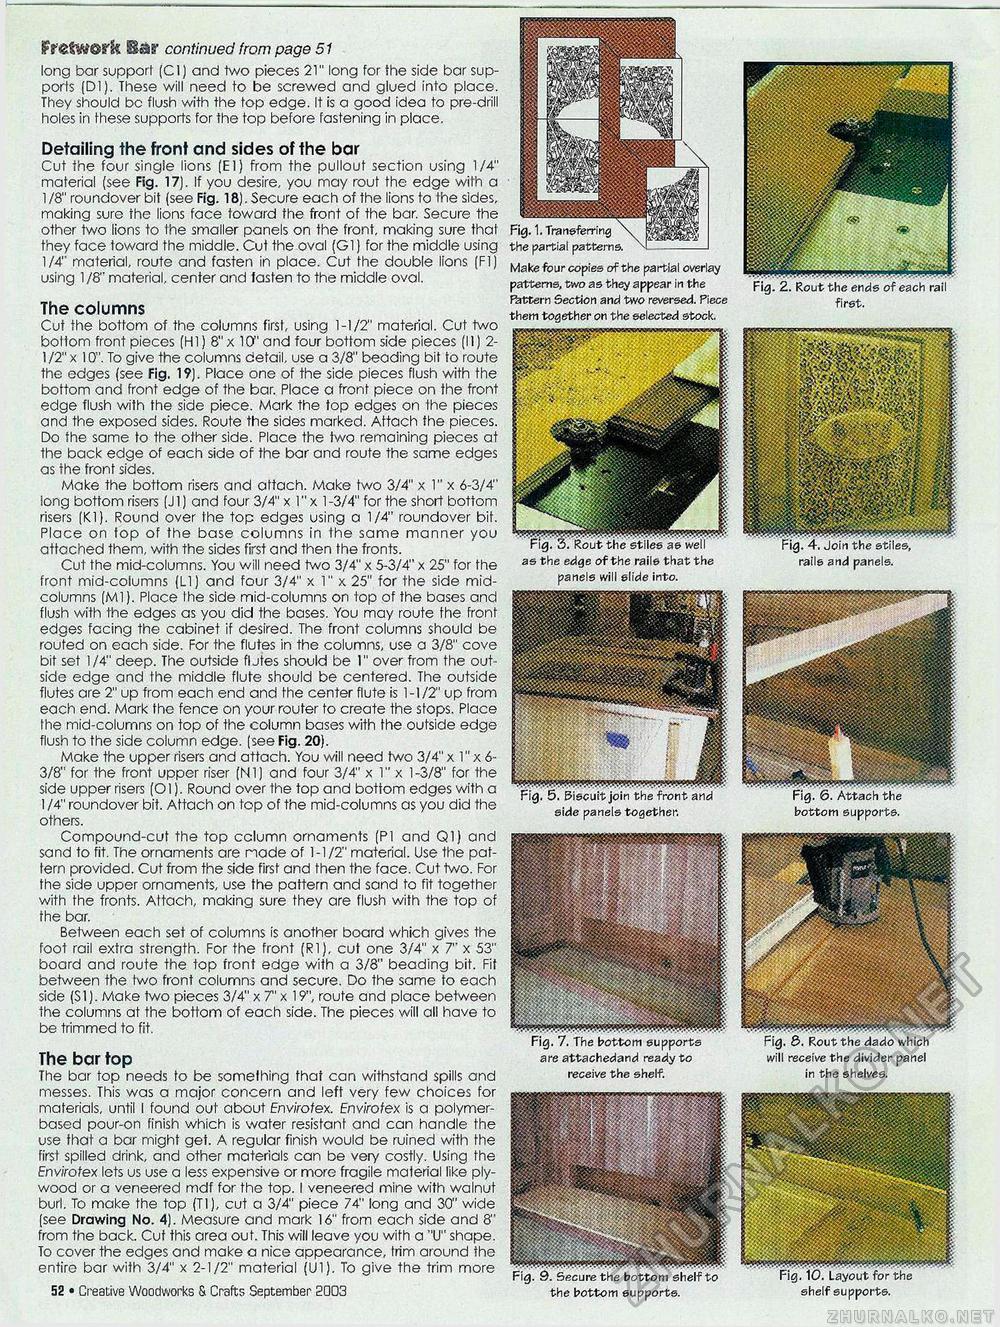
Detailing ihe front and sides of the bar Cut the four single lions (El) from the pullout section using 1/4" material (see Fig. 17). If you desire, you may rout the edge with a 1 /8" roundover bit (see Fig. 18). Secure each of the lions to the sides, making sure the lions face toward the front of the bar. Secure the other two lions to Ihe smaller panels on the front, making sure thai they face toward the middle. Cut the oval (G1) for the middle using 1/4" material, route and fasten in place. Cut the double lions (Fl) using 1 /8" material, center and fasten to the middle oval. The columns Cut the bottom of the columns first, using 1-1/2" material. Cut two boltom front pieces (HI) 8"x 10" and four bottom side pieces (II) 2-1 /2" x 10". To give the columns detail, use a 3/8" beading bit to route the edges (see Fig. 19). Place one of the side pieces flush with the bottom and front edge of the bar. Place a front piece on the front edge flush with the side piece. Mark the top edges on the pieces and the exposed sides. Route the sides marked. Attach the pieces. Do the same to the other side. Place the two remaining pieces at the back edge of each side of the bar and route the same edges as ihe front sides. Make the bottom risers and attach. Make two 3/4" x 1" x 6-3/4" long bottom risers (J 1) and four 3/4" x 1" x 1 -3/4" for the short bottom risers (Kl). Round over the top edges using a 1/4" roundover bit. Place on top of the base columns in the same manner you attached them, with the sides first and then the fronts. Cut the mid-columns. You will need two 3/4" x 5-3/4" x 25" for the front mid-columns (LI) and four 3/4" x 1" x 25" for the side mid-columns (Ml). Place the side mid-columns on lop of the bases and flush with the edges as you did the bases. You may route the front edges facing the cabinet if desired. The front columns should be routed on each side. For the flutes in the columns, use a 3/8" cove bit set 1/4" deep. The outside fljtes should be 1" over from the outside edge and the middle flute should be centered. The outside flutes are 2" up from each end and the center flute is 1-1/2" up from each end. Mark the fence on your router to create the stops. Place Ihe mid-columns on top of the column bases with the outside edge flush to the side column edge, (see Fig. 20). Make the upper risers and attach. You will need two 3/4" x 1" x 6-3/8" for the front upper riser (Nl) and four 3/4" x 1" x 1-3/8" for the side upper risers (01). Round over the top and bottom edges with a I /4" roundover bit. Attach on top of the mid-columns as you did the others. Compound-cut the top column ornaments (PI and Ql) and sand to fit. The ornaments are made of 1-1/2" material. Use the pattern provided. Cut from the side first and then the face. Cut two. For the side upper ornaments, use the pattern and sand to fit together with the fronts. Attach, making sure they are flush with the top of the bar. Between each set of columns is another board which gives the foot rail extra strength. For the front (Rl), cut one 3/4" x 7" x 53" board and route the top front edge with a 3/8" beading bit. Fit between the two front columns and secure. Do the same to each side (SI). Make two pieces 3/4" x T x 19", route and place between the columns at the bottom of each side. The pieces will all have to be trimmed to fit. The bar top The bar top needs to be something that can withstand spills and messes. This was a major concern and left very few choices for materials, until I found out about Envirotex. Envirotex is a polymer-based pour-on finish which is water resistant and can handle the use that a bar might get. A regular finish would be ruined with the first spilled drink, and other materials can be very costly. Using the Envirotex lets us use a less expensive or more fragile material like plywood or a veneered mdf for the top. I veneered mine with walnut burl. To make the top (TI), cut a 3/4" piece 74" long and 30" wide (see Drawing No. 4). Measure and mark 16" from each side and 8" from the back. Cut this area out. This will leave you with a "U" shape. To cover the edges and make a nice appearance, trim around the entire bar with 3/4" x 2-1/2" material (Ul). To give the trim more Fig. 1. Transferring the partial patterns. Make four copies of the partial overlay patterns, two as they appear in the Pattern Section and two reversed. Piece them together on the selected stock. as the of the rail© that the will elide into. side panels together. Fig. 7. The bottom supports are attaehedand ready to receive the shelf. fmfw&rk Bar continued from page 51 long bar support (CI) and two pieces 21" long for the side bar supports (Dl). These will need to be screwed and glued into place. They should bo flush with the top edge. It is a good idea to pre-drill holes in these supports for the top before fastening in place. 52 • Creative Woodworks & Crafts September 2003 the bottom supports. first. rails and panels. bottom supports. _______________which will receive the divider panel in the shelves. shelf supports. |


