Creative Woodworks & crafts 2004-09, страница 42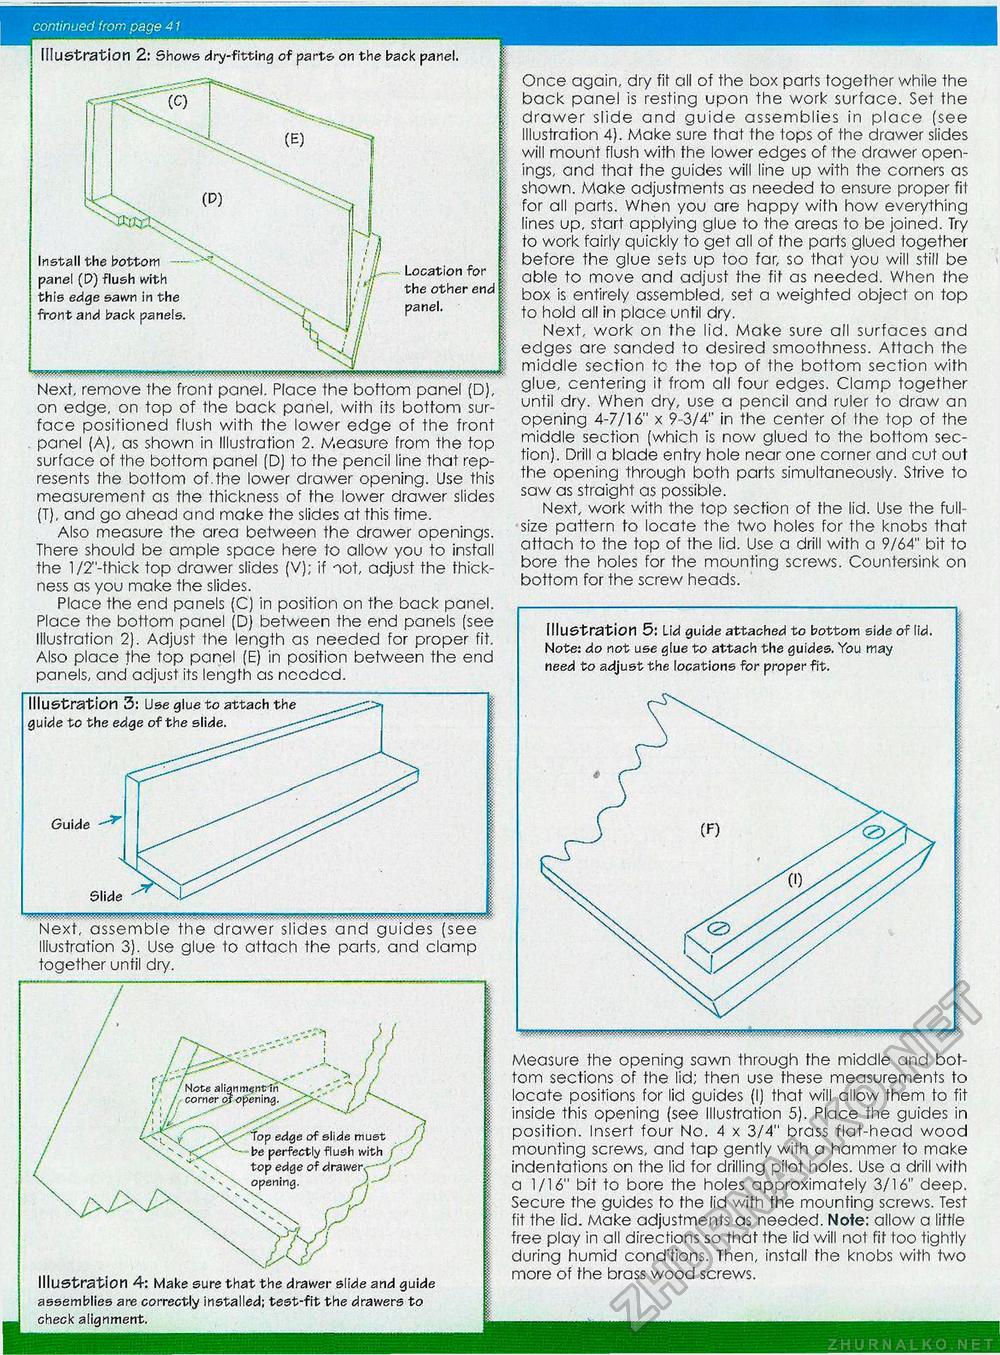
continued from page 41 Illustration 2: Shows dry-fitting of parts on the back panel. Install the bottom panel (D) flush with this edge sawn in the front and back panels. Location for the other end panel. Guide Slide Next, assemble the drawer slides and guides (see Illustration 3). Use glue to attach the parts, and clamp together until dry. Illustration 4: Make sure that the drawer slide and guide assemblies are correctly installed; test-fit the drawers to check alignment. Next, remove the front panel. Place the bottom panel (D), on edge, on top of the back panel, with its bottom surface positioned flush with the lower edge of the front panel (A), as shown in Illustration 2. Measure from the top surface of the bottom panel (D) to the pencil line that represents the bottom of.the lower drawer opening. Use this measurement as the thickness of the lower drawer slides (T), and go ahead and make the slides at this time. Also measure the area between the drawer openings. There should be ample space here to allow you to install the l/2"-thick top drawer slides (V); if not, adjust the thickness as you make the slides. Place the end panels (C) in position on the back panel. Place the bottom panel (D) between the end panels (see Illustration 2). Adjust the length as needed for proper fit. Also place the top panel (E) in position between the end panels, and adjust its length as needed. Illustration 3: Use glue to attach the guide to the edge of the slide. Once again, dry fit all of the box parts together while the back panel is resting upon the work surface. Set the drawer slide and guide assemblies in place (see illustration 4). Make sure that the tops of the drawer slides will mount flush with the lower edges of the drawer openings, and that the guides will line up with the corners as shown. Make adjustments as needed to ensure proper fit for all parts. When you are happy with how everything lines up, start applying glue to the areas to be joined. Try to work fairly quickly to get all of the parts glued together before the glue sets up too far, so that you will still be able to move and adjust the fit as needed. When the box is entirely assembled, set a weighted object on top to hold all in place until dry. Next, work on the lid. Make sure all surfaces and edges are sanded to desired smoothness. Attach the middle section to the top of the bottom section with glue, centering if from all four edges. Clamp together until dry. When dry, use a pencil and ruler to draw an opening 4-7/16" x 9-3/4" in the center of the top of the middle section (which is now glued to the bottom section). Drill a blade entry hole near one corner and cut out the opening through both parts simultaneously. Strive to saw as straight as possible. Next, work with the top section of the lid. Use the full-size pattern to locate the two holes for the knobs that attach to the top of the lid. Use a drill with a 9/64" bit to bore the holes for the mounting screws. Countersink on bottom for the screw heads. Illustration 5: Lid guide attached to bottom side of lid. Note: do not use glue to attach the guides. You may need to adjust the locations for proper fit. Measure the opening sawn through the middle and bottom sections of the lid; then use these measurements to locate positions for lid guides (I) that will allow them to fit inside this opening (see Illustration 5). Place the guides in position. Insert four No. 4 x 3/4" brass flat-head wood mounting screws, and tap gently with a hammer to make indentations on the lid for drilling pilot holes. Use a drill with a 1/16" bit to bore the holes approximately 3/16" deep. Secure the guides fo the lid with the mounting screws. Test fit the lid. Make adjustments as needed. Note: allow a little free play in all directions so that the lid will not fit too tightly during humid conditions. Then, install the knobs with two more of the brass wood screws. |


