Creative Woodworks & crafts 2005-04, страница 66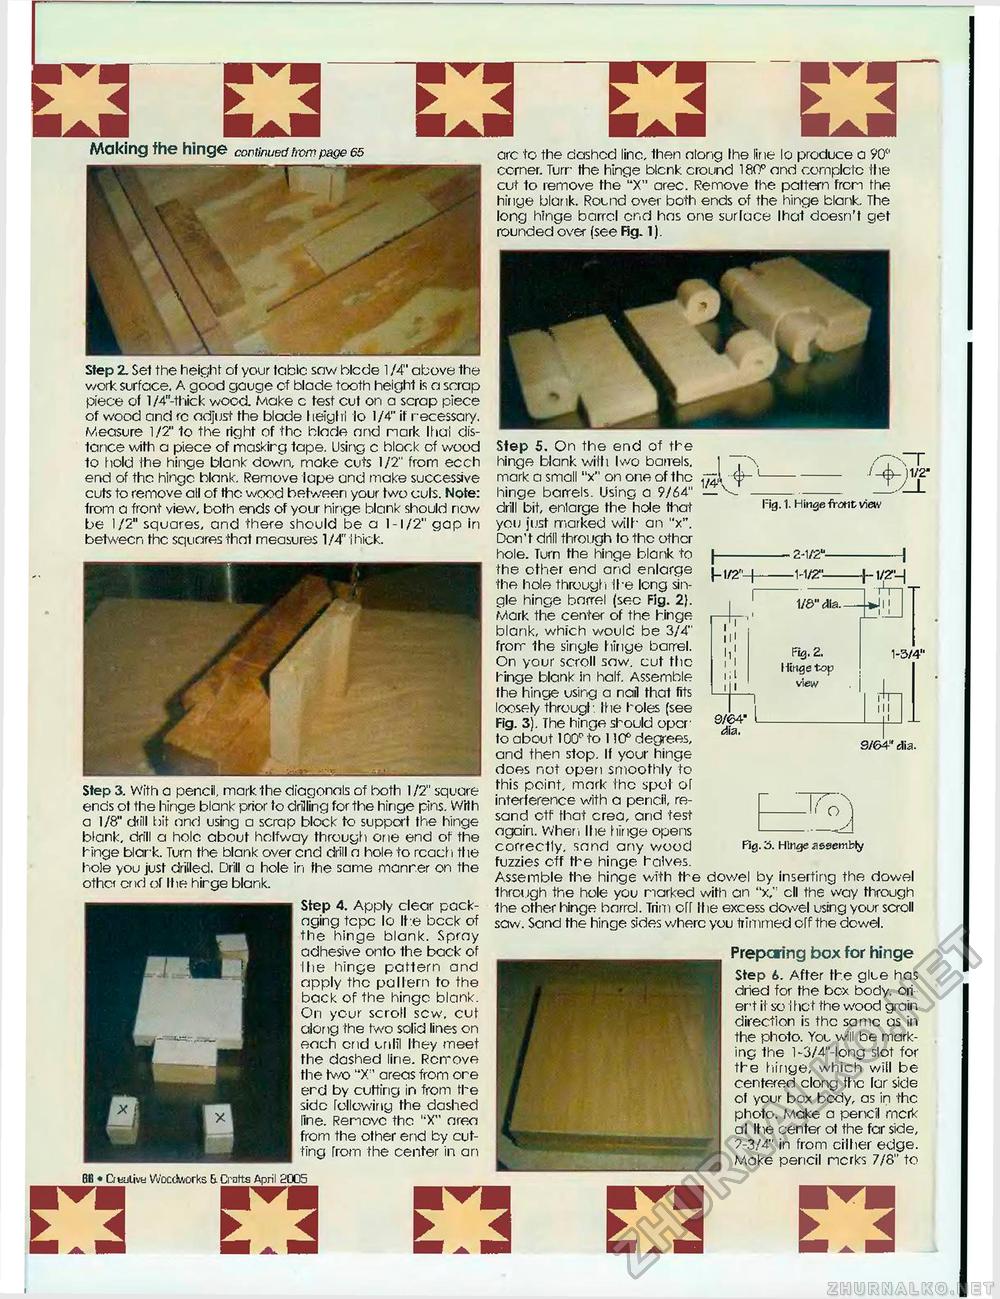
Making fhe hinge continued from page 65 Step 3. With a pencil, mark Ihe diagonals of both 1/2" square ends ot the hinge blank prior to drilling for the hinge pins. W'rth a 1/8" dtill bit and using a scrap block to support the hinge blank, drill a hole about halfway through one end of the hinge blark. Turn the blank over end drill a hole to rcach the hole you just drilled. Drill a hole in fhe same manner on the other end of Ihe hirge blank. Step 4. Apply clear packaging tepe lo Ihe bcck of the hinge blank. Spray adhesive onto the back of the hinge pattern and apply the pallern to the back of the hinge blank. On your scroll sew. cut along the two solid lines on each end until they meet the dashed line. Remove fhe tv/o "X" areas from ore erd by cutting in from the side following the dashed line. Remove the "X" area from the other end by cutting from the center in an 86 ♦ Cuativa Woodworks & Crafts April &CC5 arc to the dashed line, then along Ihe line lo produce a 90" corner. Turn fhe hinge blcnk cround 180° and cornplctc the cut to remove the "X" arec. Remove the paltern from fhe hinge blank. Round over both ends of the hinge blank. The long hinge barrel cr.d has one surlace Ihat doesn't get rounded over (see Fig. 1). Step 2. Set the height of your table sow blcde 1 /4" above the work surface. A good gauge of blade tooth height is a scrap piece of l/4"-thick wood. Make c test cut on a scrap piece of wood and rc adjust the blade Iteiglrl lo 1/4" if recessary. Measure 1/2' to the right of the blade and mark lhai distance with a piece of maskirg tape. Using c block of wood to hold the hinge blank down, make cuts 1/2" from ecch end of the hinge blank. Remove tape and make successive cuts to remove all of the wood between your two cuts. Note: from a front view, both ends of your hinge blank should now be 1/2" squares, and there should be a 1-1/2" gap in between the squares that measures 1/4" I hick. -1A 1/4'\ Y -1A 1/4'\ Y ./_4mv 2- 1-1/2"- Fig. 1. Hinge front view - 2-1/2"--1-1/2"- 1/0" dia.- Fig. 2. Hinge top vi ew ■ 1/2"—| 1-3/4" 9/64-dia. ,4th hi 9/64" dia. Step 5. On the end of the hinge blank with I wo bairels, mark a small "x" on one of the hinge barrels. Using a 9/64" drill bit, enlarge the hole Ihat you just marked wilh an "x". Don't drill through to the other hole. Turn the hinge blank to the other end and enlarge the hole through Ihe long single hinge barrel (sec Fig. 2(. Mark the center of the hinge blank, which would be 3/4" frorr the single hinge barrel. On your scroll saw. cut the hinge blank in half. Assemble the hinge using a nail that fits loosely through Ihe holes (see Fig. 3). The hinge should oporto about 100° to 110° degrees, and then stop. If your hinge does not open smoothly to this point, mark the spot of interference with a pencil, re-sand otf that crea, and test again. When Ihe hinge opens correctly, sand any wood fuzzies off the hinge halves. Assemble the hinge with the dowel by inserting the dowel through the hole you narked with an "x," ell the way through the other hinge barrel. Trim off Ihe excess dowel using your scroll saw. Sand the hinge sides where you Itimrried off the dowel. Prepcn'ng box for hinge Step i. After the glue has dned for the box body, ori er't it so I hat the wood grain direction is the same as in the photo. You will be marking the l-3/4"-long slot for the hinge, which will be centered clong the lar side of your box bedy, as in the photo. Make a pencil rncik al Ihe center ot the far side, 9-3/4" in from cither edge. Make pencil ncrks 7/8" to | O Fig. 3. Htrge assembly |


