Creative Woodworks & crafts 2005-04, страница 68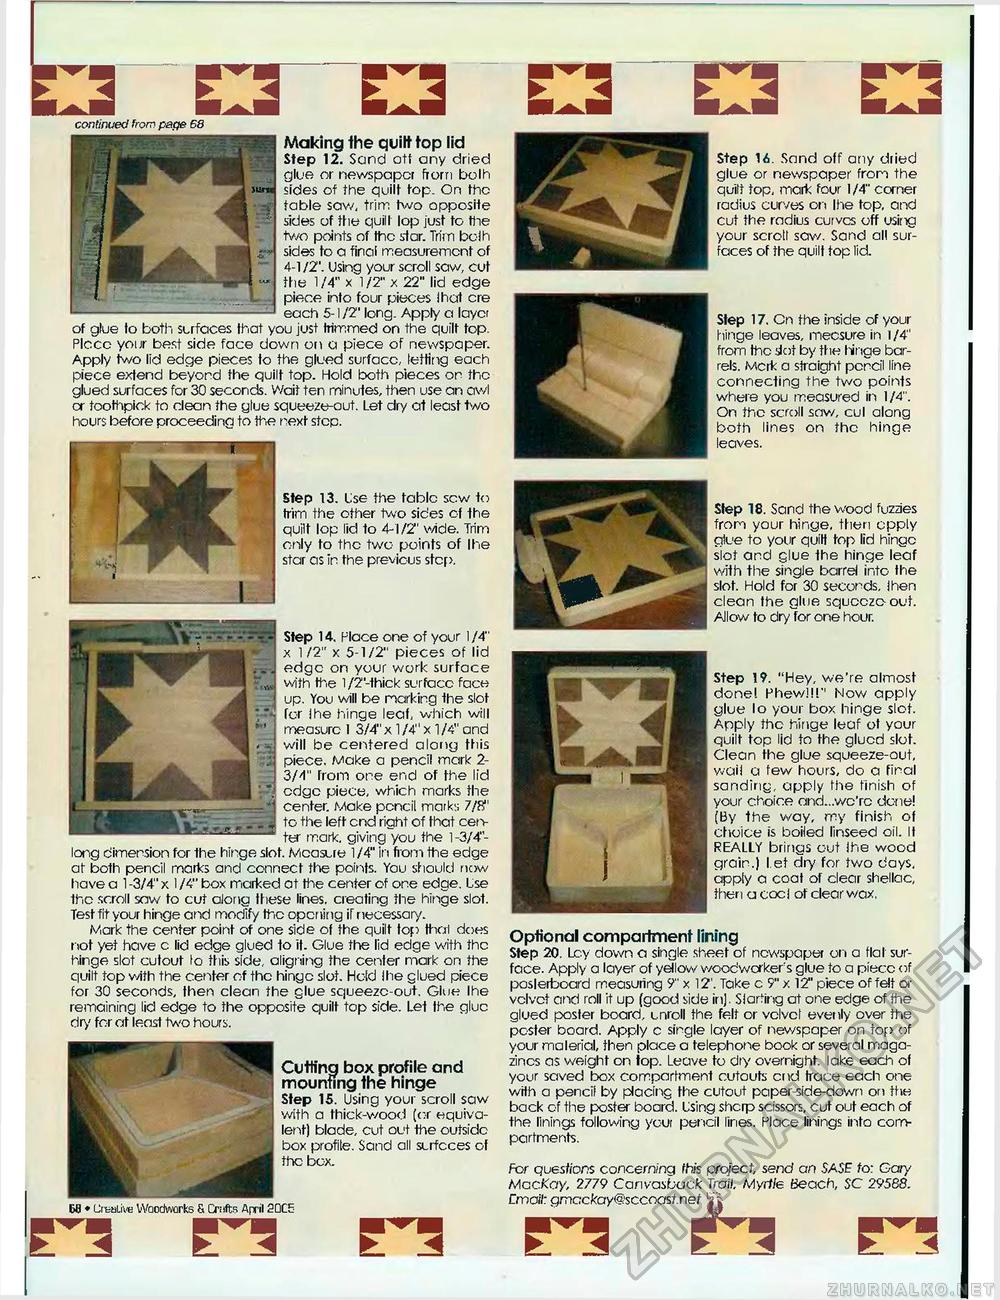
□Making ihe quilt top lid Step 12. Sand off any dried glue or newspaper from bolh sides of the quilt fop. On the table saw, trim two opposite sides of ihe quill lop just to the two points of the star. Trim bolh sides to a final measurement of 4-1/2'. Using your scroll saw, cut the 1/4" x 1/2" x 22" lid edge piece into four pieces lhat ere each 5-1 IT long. Apply a layct of glue to both, surfaces lhat you just ftimmed on the quilt top. PIccc your best side face down on a piece of newspaper. Apply two lid edge pieces to the glued surfacc, letting each piece extend beyond the quilt top. Hold both pieces on the glued surfaces for 30 seconds. Wait ten minutes, then use an awl cr toothpick to clean the glue squeeze-out. Let dry at least two hours before proceeding to the next step. * Step 13. Use the table sew to trim the other two sides of the quilt lop lid to 4-1/2' wide. Trim only to the two points of Ihe star as in the previous step. Step 14, Place one of your 1/4" x 1/2" x 5-1/2" pieces of lid edge on your work surface with the l /2'-1hick surfacc face up. You will be narking the slot for Ihe hinge leaf, which will measure I 3/4" x 1/4" x 1/4" and will be centered along this piece. Wake a pencil mark 2-3/4" from one end of the lid edge piece, which marks the center. Make pencil mark:; 7/FS" to the left end right of that cerv ter mark, giving you the 1 -3/4"-long dimension for the hinge slot. Measure 1/4" in from the edge at both pencil marks and connect the points. You should now have a l-3/4"x 1 /4" box marked at the center of one edge. Use the scroll saw to cut along these lines, creating the hinge slot. Test fit your hinge and modify the opening if necessary. Mark the center point of one side of the quilt top thai does not yet have c lid edge glued to it. Glue the lid edge with the hinge slot cutout lo this side, aligning the center mark on the quilt top with the center of the hinge slot. Held Ihe glued piece for 30 seconds, then clean the glue squeeze-out. Glue Ihe remaining lid edge to the opposite quilt top side. Let the glue dry for at least two hours. Cutting box profile and mounting the hinge Step 15. Using your scroll saw with a thick-v/ood [or equivalent) blade, cut out the outside box profile. Sand all surfcces of the box. Step 14. Sand off any dried glue or newspaper from the quilt fop, mark four I /4" corner radius curves on Ihe top, and cut the radius curves off using your scroll saw. Sand all surfaces of the quilt top lid. Slep 17. Cn the inside of your hinge leaves, mecsure in 1/4" from the slot by the tinge barrels. Mcrk a straight pencil line connecting the two points where you measured in 1/4". On the scroll saw, cul along both lines on the hinge leaves. Slep 18. Sand the wood fuzzies from your hinge, then apply glue to your quilt top lid hinge slot and glue the hinge leaf with the single barrel into the slot. Hold for 30 seconds, jhen clean the gltie squeeze out. Allow to dry for one hour. Step 19. "Hey, we're almost done! Phew!!!" Now apply glue lo your box hinge slot. Apply the hinge leaf ot your quilt top lid to the glued slot. Clean the glue squeeze-out, waii a few hours, do a final sanding, apply the finish of your choice and...we're dene! (By the way, my finish of choice is boiled linseed oil. It REALLY brings out Ihe wood grain.) let dry for two days, apply a coat of clear shellac, then a cocl of clear wax. Optional compartment lining Step 20. lay down a single sheet of newspaper on a flat surface. Apply a layer of yellow woodworker's glue to a piecc of poslerboard measuring 9" x 12'. Take c 9" x 12' piece of felt or velvet and roll it up (good side in]. Slaving at one edge of the glued poster board, unroll the felt or velvet evenly over the pester board. Apply c single layer of newspaper on top of your malerial, then place a telephone book or several magazines as weight on top. Leave to dry overnight, lake each of your saved box compartment cutouts end trace each one with a pencil by placing the cutout paper-side-down on ttie back of the poster board. Using shcrp scissors, cut out each of the linings following your pencil lines. Place linings into compartments. For questions concern/nq fh/s project, send an SASE to: Gary MccKay, 2779 Canvasbacfc Trail. Myrtle Beach, SC 29588. Cmail: gmackay@sccoast.net1 tg |


