Creative Woodworks & crafts 2005-04, страница 67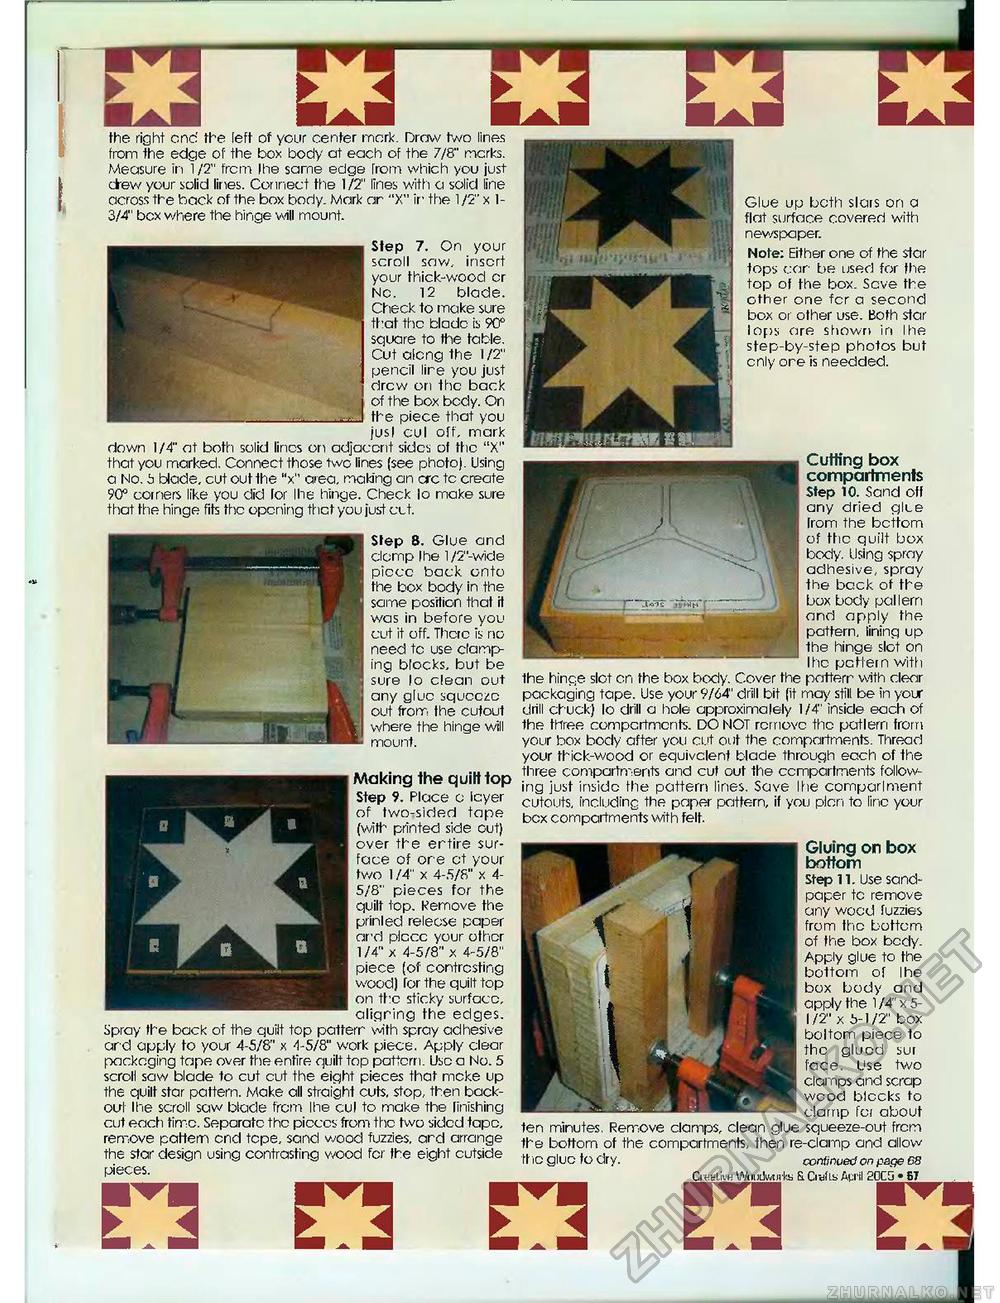
the right one' the left of your center mark. Draw two lines from the edge of the box body at each of the 7/8" mcrks. Measure In 1 /2" frcm Ihe same edge from which you just dew your solid lines. Connect the 1/2" lines with a solid line across the back of the box body. Mark ar "X" ir' the 1 /2" x 1-3/4" box where the hinge will mount. Cutting box compartments Step 10. Sand off any dried glue Irom the bottom of the quilt box body. Using spray adhesive, spray the back of the box body pallern and apply the pattern, lining up the hinge slot on I he pattern with the hinge slot on the box body. Cover the pattern with clear packaging tape. Use your 9/64" drill bit (it may still be in your drill chuck) lo drill a hole approximately 1/4" inside each of the tHree compcrtmcnts. DO NOT remove the patlerri Irorrt your box body after you cut out the compartments. Thread your thick-wood or equivalent blade through each of the three compartments and cut out the compartments following just inside the pattern lines. Save I tie comparlment cutouts, including the paper pattern, il you plan to line your box compartments with felt. wmmstm H Glue up both slars on a flat surface covered with newspaper. Note: Either one of the star tops ear be used for the top of the box. Save the other one fcr a second box or other use. Both star lops are shown in Ihe step-by-step photos but enly ore is needded. Step 7. On your scroll sow, insert your thick-wood cr No. 12 blade. Check to make sure that the blade is 90° square to the fable. Cut along the 1/2" pencil lire you just drew on the back of the box body. On the piece that you jusl cul off, mark down 1/4" at both solid lines on adjacent sides of the "X" that you marked. Connect those two lines (see photo). Using a No. 5 blade, cut out the "x" ar ea, making an crc tc create 90° coiners like you did lor Ihe hinge. Check lo make sure that the hinge fits the opening thef you just cut. Step 8. Glue and clamp Ihe l/2"-wide piece back onto the box body in the same position that it was in before you cut it off. There is no need tc use clamping blocks, but be sure lo clean out any glue squeeze out from the cutout where the hinge will mount. -Making the quilt top Step 9. Place a layer of two-sided tape {with printed side out) over the ertire surface of ore ct your two 1 /4" x 4-5/8" x 4-5/8" pieces for the quilt top. Remove the printed release paper ard plcce your other 1/4" x 4-5/8" x 4-5/8" piece (of contrasting wood) for the quilt fop on the sticky surface, " aligring the edges. Spray the back of the quilt top patterr with spray adhesive ard apply to your 4-5/8" x 4-5/8" work piece. Apply clear packaging tape over the entire quilt top pattern. Use a No. 5 scroll saw blade to cut cut the eight pieces that rncke up the quilt star pattern. Make all straight cuts, stop, then back-out Ihe scroll saw blade frcm Ihe cul to make the linishing cut each time. Separate the pieces from the two sided tape, remove pattern end tcpe, sand wood fuzzies, ard arrange the star design using contrasting wood fcr the eight cutside pieces. Gluing on box bottom Step 11. Use sandpaper tc remove any wood fuzzies from the bottom of the box body. Apply glue to the bottom of Ihe box body and apply the 1/4"x5-1/2" x 5-1/2" box boltom piece to the glued sut face. Use two clamps and scrap wood blocks to clamp foi about fen minutes. Remove clamps, clean glue squeeze-out frcm the bottom of the compartments, then re-clamp and allow the glue fo dry. continued on page 68 CrticlivH Wumlwjifa &QsflsApil 20rn |


