Creative Woodworks & crafts-103-2004-Holiday, страница 15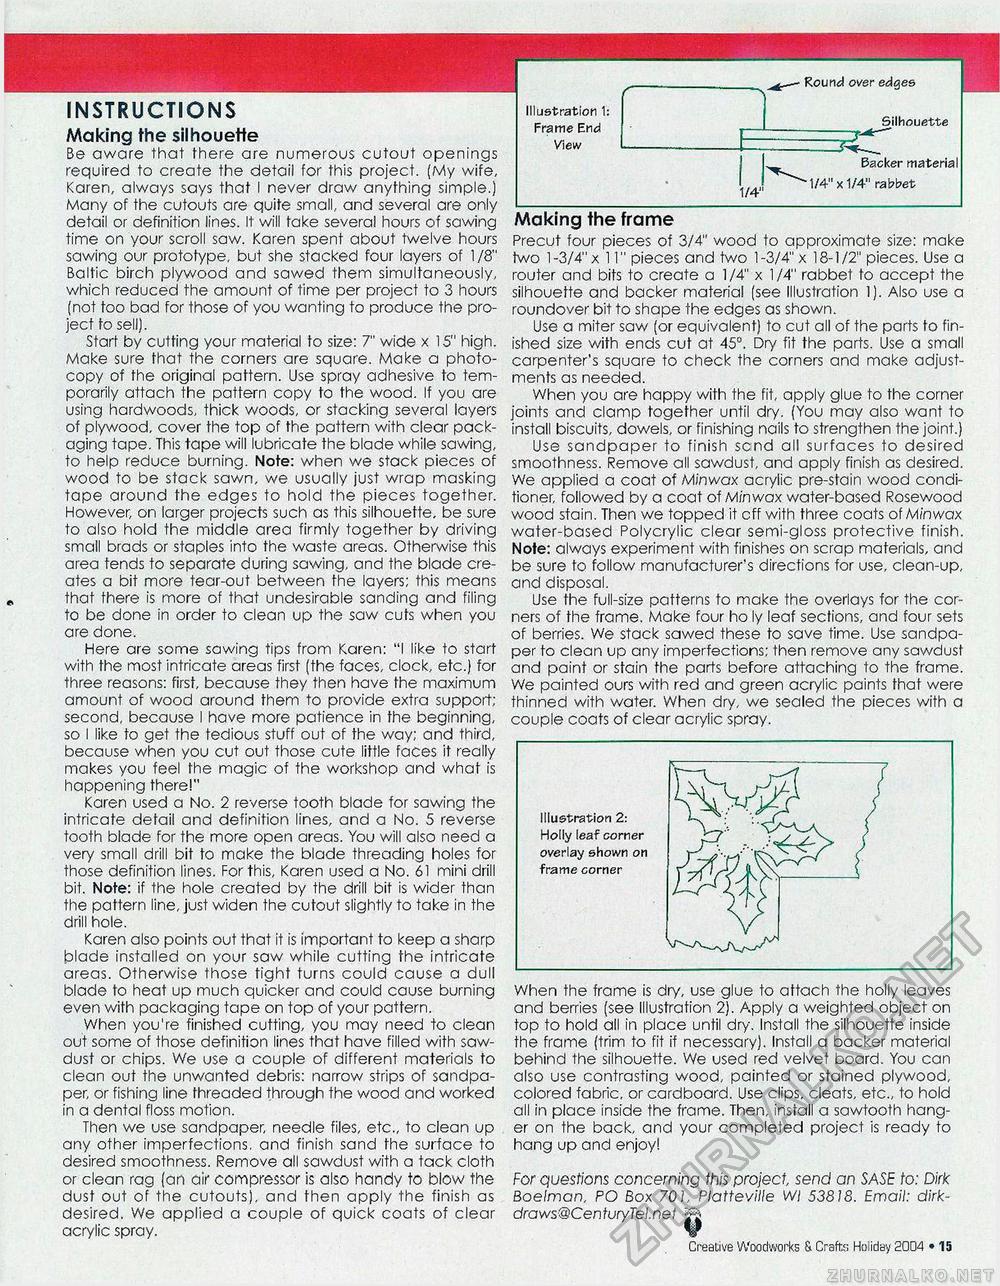
INSTRUCTIONS Making the silhouette Be aware that there are numerous cutout openings required to create the detail for this project. (My wife, Karen, always says that I never draw anything simple.) Many of the cutouts are quite small, and several are only detail or definition lines. It will take several hours of sawing time on your scroll saw. Karen spent about twelve hours sawing our prototype, but she stacked four layers of 1 /8" Baltic birch plywood and sawed them simultaneously, which reduced the amount of time per project to 3 hours (not too bad for those of you wanting to produce the project to sell). Start by cutting your material to size: 7" wide x 15" high. Make sure that the corners are square. Make a photocopy of the original pattern. Use spray adhesive to temporarily attach the pattern copy to the wood. If you are using hardwoods, thick woods, or stacking several layers of plywood, cover the top of the pattern with clear packaging tape. This tape will lubricate the blade while sawing, to help reduce burning. Note: when we stack pieces of wood to be stack sawn, we usually just wrap masking tape around the edges to hold the pieces together. However, on larger projects such as this silhouette, be sure to also hold the middle area firmly together by driving small brads or staples into the waste areas. Otherwise this area tends to separate during sawing, and the blade creates a bit more tear-out between the layers; this means that there is more of that undesirable sanding and filing to be done in order to clean up the saw cuts when you are done. Here are some sawing tips from Karen: "I like to start with the most intricate areas first (the faces, clock, etc.) for three reasons: first, because they then have the maximum amount of wood around them to provide extra support; second, because I have more patience in the beginning, so I like to get the tedious stuff out of the way; and third, because when you cut out those cute little faces it really makes you feel the magic of the workshop and what is happening there!" Karen used a No. 2 reverse tooth blade for sawing the intricate detail and definition lines, and a No. 5 reverse tooth blade for the more open areas. You will also need a very small drill bit to make the blade threading holes for those definition lines. For this, Karen used a No. 61 mini drill bit. Note: if the hole created by the drill bit is wider than the pattern line, just widen the cutout slightly to take in the drill hole. Karen also points out that it is important to keep a sharp blade installed on your saw while cutting the intricate areas. Otherwise those tight turns could cause a dull blade to heat up much quicker and could cause burning even with packaging tape on top of your pattern. When you're finished cutting, you may need to clean out some of those definition lines that have filled with sawdust or chips. We use a couple of different materials to clean out the unwanted debris: narrow strips of sandpaper, or fishing line threaded through the wood and worked in a dental floss motion. Then we use sandpaper, needle files, etc., to clean up any other imperfections, and finish sand the surface to desired smoothness. Remove all sawdust with a tack cloth or clean rag (an air compressor is also handy to blow the dust out of the cutouts), and then apply the finish as desired. We applied a couple of quick coats of clear acrylic spray. _________— over edges Illustration 1: Frame End View 1/4" Making the frame Precut four pieces of 3/4" wood to approximate size: make two 1-3/4" x 11" pieces and two 1-3/4" x 18-1/2" pieces. Use a router and bits to create a 1/4" x 1/4" rabbet to accept the silhouette and backer material (see Illustration 1). Also use a roundover bit to shape the edges as shown. Use a miter saw (or equivalent) to cut all of the parts to finished size with ends cut at 45°. Dry fit the parts. Use a small carpenter's square to check the corners and make adjustments as needed. When you are happy with the fit, apply glue to the corner joints and clamp together until dry. (You may also want to install biscuits, dowels, or finishing nails to strengthen the joint.) Use sandpaper to finish send all surfaces to desired smoothness. Remove all sawdust, and apply finish as desired. We applied a coat of Minwax acrylic pre-stain wood conditioner, followed by a coat of Minwax water-based Rosewood wood stain. Then we topped it eff with three coats of Minwax water-based Polycrylic clear semi-gloss protective finish. Note: always experiment with finishes on scrap materials, and be sure to follow manufacturer's directions for use, clean-up, and disposal. Use the full-size patterns to make the overlays for the corners of the frame. Make four ho ly leaf sections, and four sets of berries. We stack sawed these to save time. Use sandpaper fo clean up any imperfections; then remove any sawdust and paint or stain the parts before attaching to the frame. We painted ours with red and green acrylic paints that were thinned with water. When dry, we sealed the pieces with a couple coats of clear acrylic spray. Illustration 2: Holly leaf corner overlay shown on frame corner When the frame is dry, use glue to attach the holly leaves and berries (see Illustration 2). Apply a weighted object on top to hold all in place until dry. Install the silhouette inside the frame (trim to fit if necessary). Install a backer material behind the silhouette. We used red velvet board. You can also use contrasting wood, painted or stained plywood, colored fabric, or cardboard. Use clips, cleats, etc., to hold all in place inside the frame. Then, install a sawtooth hanger on the back, and your completed project is ready to hang up and enjoy! For questions concerning this project, send an SASE to: Dirk Boelman, PO Box 701, Platteville Wl 53818. Email: dirk-draws@CenturyTel.net gjj ¥ Creative Woodworks & Craft:; Holiday 2004 • 15 Silhouette Backer material ■ 1/4" x 1/4" rabbet |


