Popular Woodworking 2002-12 № 131, страница 75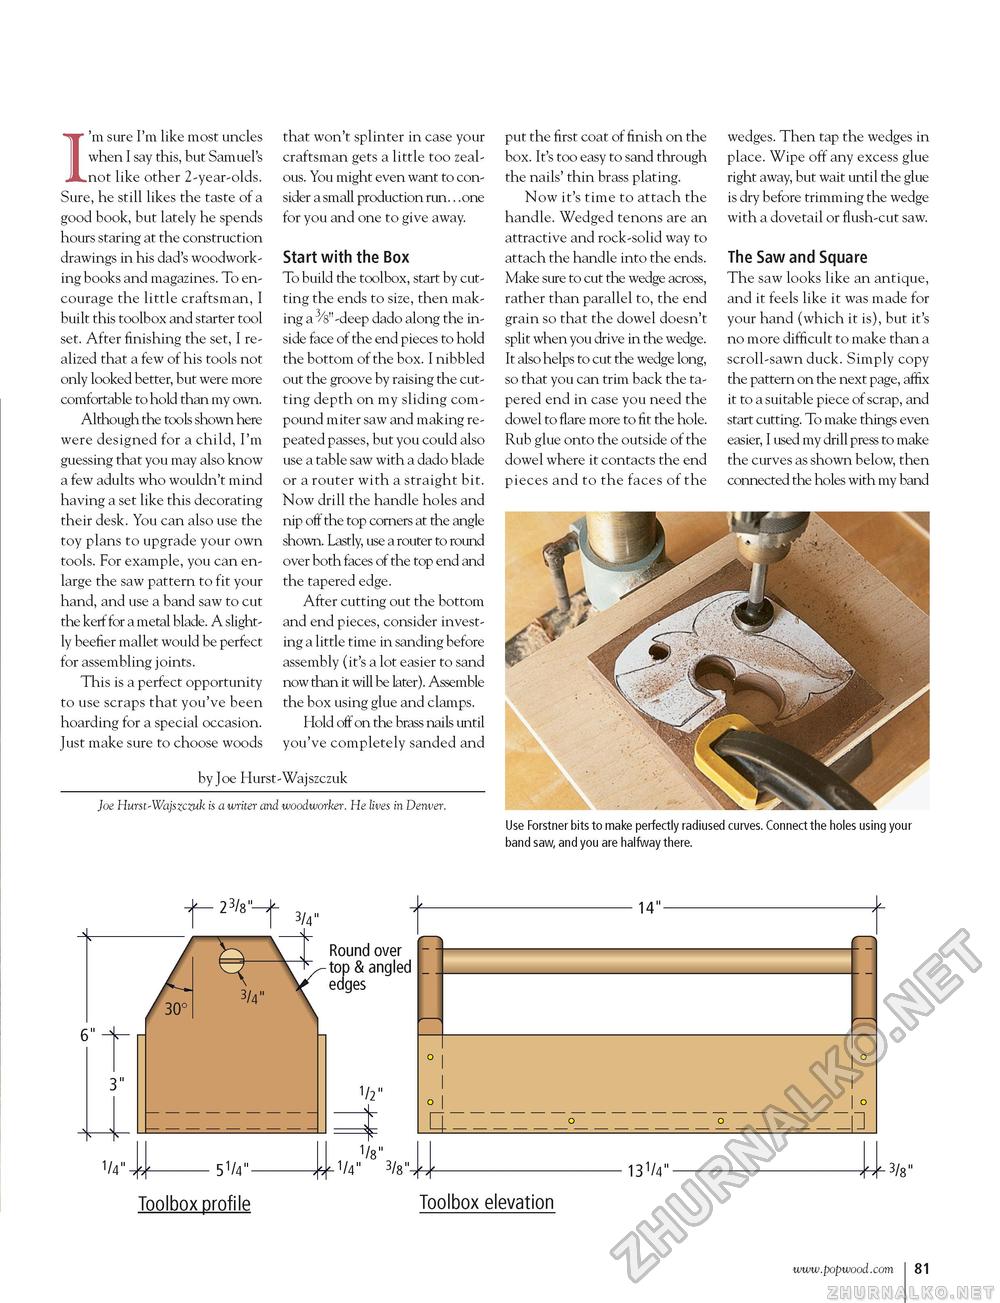
I'm sure I'm like most uncles when I say this, but Samuel's not like other 2-year-olds. Sure, he still likes the taste of a good book, but lately he spends hours staring at the construction drawings in his dad's woodworking books and magazines. To encourage the little craftsman, I built this toolbox and starter tool set. After finishing the set, I realized that a few of his tools not only looked better, but were more comfortable to hold than my own. Although the tools shown here were designed for a child, I'm guessing that you may also know a few adults who wouldn't mind having a set like this decorating their desk. You can also use the toy plans to upgrade your own tools. For example, you can enlarge the saw pattern to fit your hand, and use a band saw to cut the kerf for a metal blade. A slightly beefier mallet would be perfect for assembling joints. This is a perfect opportunity to use scraps that you've been hoarding for a special occasion. Just make sure to choose woods that won't splinter in case your craftsman gets a little too zealous. You might even want to consider a small production run.. .one for you and one to give away. Start with the Box To build the toolbox, start by cutting the ends to size, then making a 3/8"-deep dado along the inside face of the end pieces to hold the bottom of the box. I nibbled out the groove by raising the cutting depth on my sliding compound miter saw and making repeated passes, but you could also use a table saw with a dado blade or a router with a straight bit. Now drill the handle holes and nip off the top corners at the angle shown. Lastly, use a router to round over both faces of the top end and the tapered edge. After cutting out the bottom and end pieces, consider investing a little time in sanding before assembly (it's a lot easier to sand now than it will be later). Assemble the box using glue and clamps. Hold off on the brass nails until you've completely sanded and put the first coat of finish on the box. It's too easy to sand through the nails' thin brass plating. Now it's time to attach the handle. Wedged tenons are an attractive and rock-solid way to attach the handle into the ends. Make sure to cut the wedge across, rather than parallel to, the end grain so that the dowel doesn't split when you drive in the wedge. It also helps to cut the wedge long, so that you can trim back the tapered end in case you need the dowel to flare more to fit the hole. Rub glue onto the outside of the dowel where it contacts the end pieces and to the faces of the wedges. Then tap the wedges in place. Wipe off any excess glue right away, but wait until the glue is dry before trimming the wedge with a dovetail or flush-cut saw. The Saw and Square The saw looks like an antique, and it feels like it was made for your hand (which it is), but it's no more difficult to make than a scroll-sawn duck. Simply copy the pattern on the next page, affix it to a suitable piece of scrap, and start cutting. To make things even easier, I used my drill press to make the curves as shown below, then connected the holes with my band by Joe Hurst-Wajszczuk Joe Hurst-Wajszczuk is a writer and woodworker. He lives in Denver. Use Forstner bits to make perfectly radiused curves. Connect the holes using your band saw, and you are halfway there. 6" 3" /I / 30° 3/4" Round over top & angled edges 1/2" 1/8" 1/4" 3/8" 14"
Toolbox profile Toolbox elevation |


