Popular Woodworking 2004-02 № 139, страница 49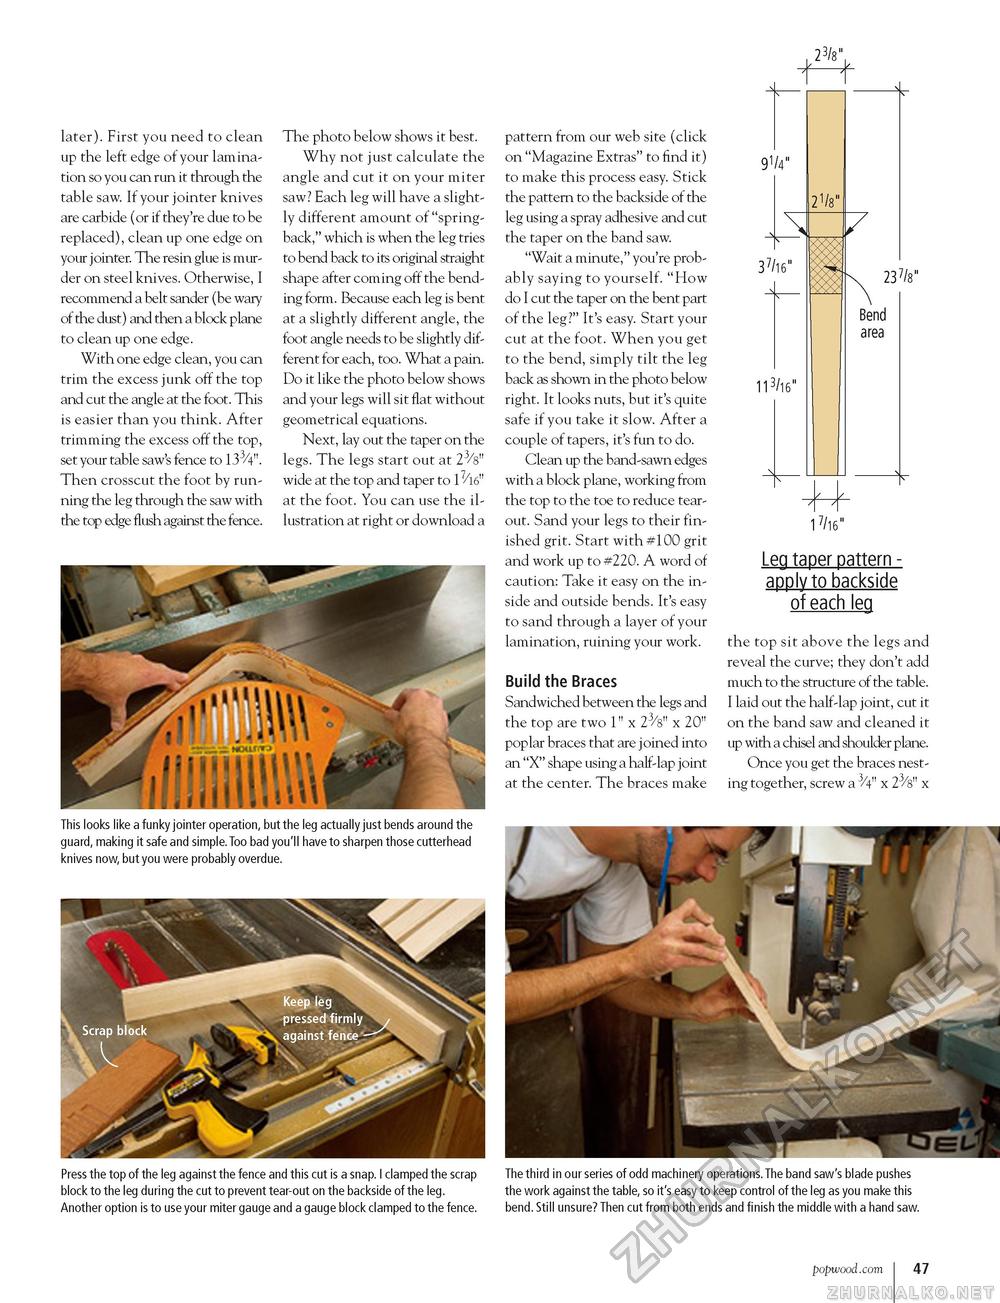
later). First you need to clean up the left edge of your lamination so you can run it through the table saw. If your jointer knives are carbide (or if they're due to be replaced), clean up one edge on your jointer. The resin glue is murder on steel knives. Otherwise, I recommend a belt sander (be wary of the dust) and then a block plane to clean up one edge. With one edge clean, you can trim the excess junk off the top and cut the angle at the foot. This is easier than you think. After trimming the excess off the top, set your table saw's fence to 133/4". Then crosscut the foot by running the leg through the saw with the top edge flush against the fence. The photo below shows it best. Why not just calculate the angle and cut it on your miter saw? Each leg will have a slightly different amount of "spring-back," which is when the leg tries to bend back to its original straight shape after coming off the bending form. Because each leg is bent at a slightly different angle, the foot angle needs to be slightly different for each, too. What a pain. Do it like the photo below shows and your legs will sit flat without geometrical equations. Next, lay out the taper on the legs. The legs start out at 23/8" wide at the top and taper to 17/16n at the foot. You can use the illustration at right or download a pattern from our web site (click on "Magazine Extras" to find it) to make this process easy. Stick the pattern to the backside of the leg using a spray adhesive and cut the taper on the band saw. "Wait a minute," you're probably saying to yourself. "How do I cut the taper on the bent part of the leg?" It's easy. Start your cut at the foot. When you get to the bend, simply tilt the leg back as shown in the photo below right. It looks nuts, but it's quite safe if you take it slow. After a couple of tapers, it's fun to do. Clean up the band-sawn edges with a block plane, working from the top to the toe to reduce tear-out. Sand your legs to their finished grit. Start with #100 grit and work up to #220. A word of caution: Take it easy on the inside and outside bends. It's easy to sand through a layer of your lamination, ruining your work. Build the Braces Sandwiched between the legs and the top are two 1" x 23/s" x 20" poplar braces that are joined into an "X" shape using a half-lap joint at the center. The braces make 23/8" 91/4" 37/16" 113/16" 21/8" 237/8" Bend area
17/16" 17/16" Leg taper pattern -apply to backside of each leg the top sit above the legs and reveal the curve; they don't add much to the structure of the table. I laid out the half-lap joint, cut it on the band saw and cleaned it up with a chisel and shoulder plane. Once you get the braces nesting together, screw a /4" x 23/8" x This looks like a funky jointer operation, but the leg actually just bends around the guard, making it safe and simple.Too bad you'll have to sharpen those cutterhead knives now, but you were probably overdue. Press the top of the leg against the fence and this cut is a snap. I clamped the scrap block to the leg during the cut to prevent tear-out on the backside of the leg. Another option is to use your miter gauge and a gauge block clamped to the fence. The third in our series of odd machinery operations.The band saw's blade pushes the work against the table, so it's easy to keep control of the leg as you make this bend. Still unsure? Then cut from both ends and finish the middle with a hand saw. popwood.com 47 |


