Popular Woodworking 2004-10 № 143, страница 98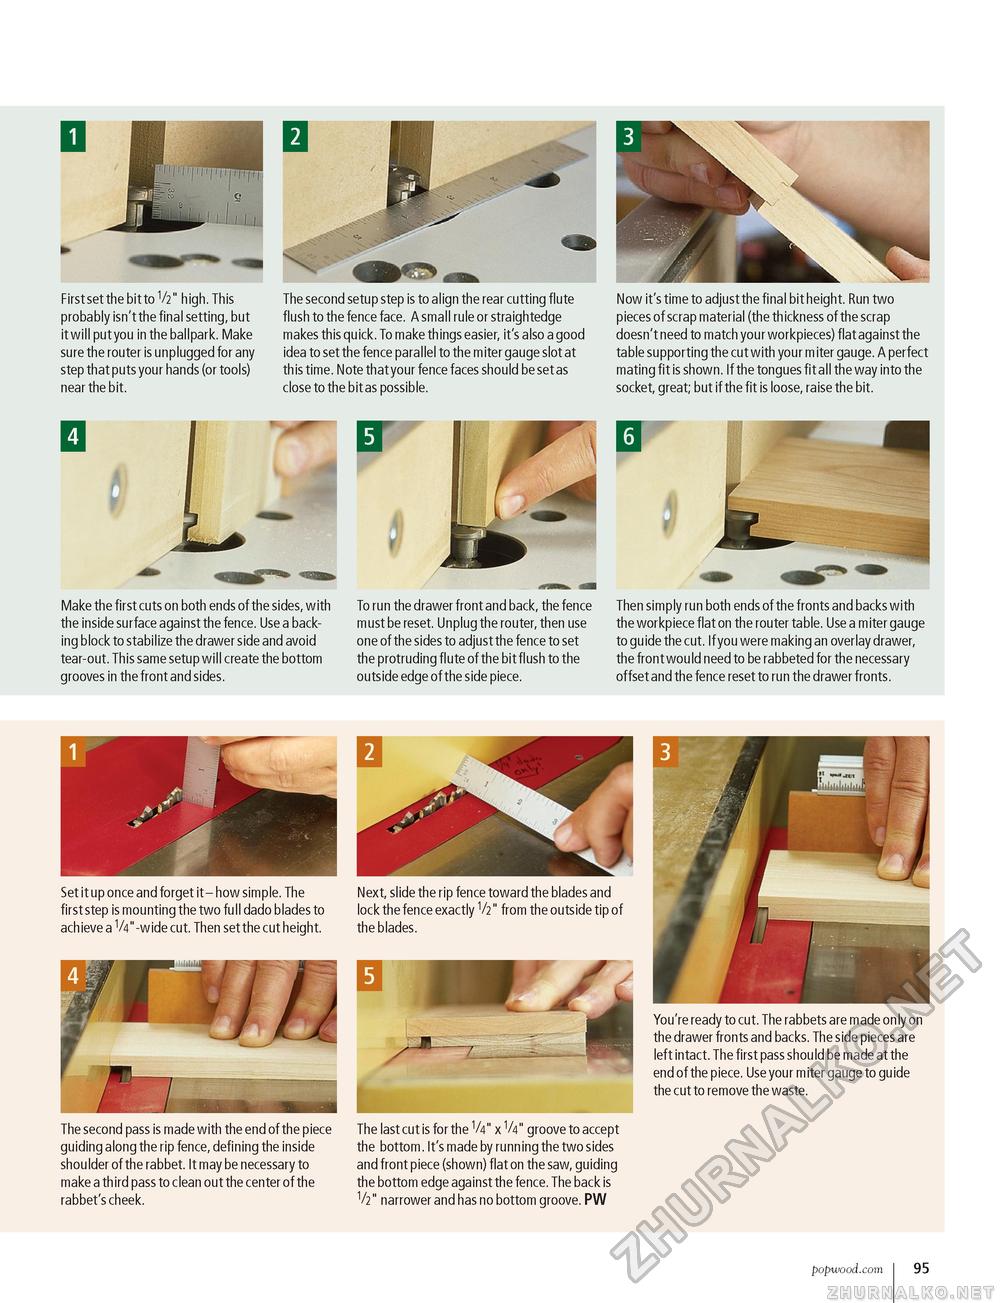
First set the bit to V2" high. This probably isn't the final setting, but it will put you in the ballpark. Make sure the router is unplugged for any step that puts your hands (or tools) near the bit. The second setup step is to align the rear cutting flute flush to the fence face. A small rule or straightedge makes this quick. To make things easier, it's also a good idea to set the fence parallel to the miter gauge slot at this time. Note that your fence faces should be set as close to the bit as possible. 4| Make the first cuts on both ends of the sides, with the inside surface against the fence. Use a backing block to stabilize the drawer side and avoid tear-out. This same setup will create the bottom grooves in the front and sides. Hi To run the drawer front and back, the fence must be reset. Unplug the router, then use one of the sides to adjust the fence to set the protruding flute of the bit flush to the outside edge of the side piece. Now it's time to adjust the final bit height. Run two pieces of scrap material (the th ickness of the scrap doesn't need to match your workpieces) flat against the table supporting the cut with your miter gauge. A perfect mating fit is shown. If the tongues fit all the way into the socket, great; but if the fit is loose, raise the bit. Then simply run both ends of the fronts and backs with the workpiece flat on the router table. Use a miter gauge to guide the cut. If you were making an overlay drawer, the front would need to be rabbeted for the necessary offset and the fence reset to run the drawer fronts. Set it up once and forget it - how simple. The first step is mounting the two full dado blades to achieve a 1/4"-wide cut. Then set the cut height. / The second pass is made with the end of the piece guiding along the rip fence, defining the inside shoulder of the rabbet. It may be necessary to make a third pass to clean out the center of the rabbet's cheek. Next, slide the rip fence toward the blades and lock the fence exactly V2" from the outside tip of the blades. The last cut is for the V4" x V4" groove to accept the bottom. It's made by running the two sides and front piece (shown) flat on the saw, guiding the bottom edge against the fence. The back is V2" narrower and has no bottom groove. PW You're ready to cut. The rabbets are made only on the drawer fronts and backs. The side pieces are left intact. The first pass should be made at the end of the piece. Use your miter gauge to guide the cut to remove the waste. popwood.com 95 |


