Popular Woodworking 2005-06 № 148, страница 51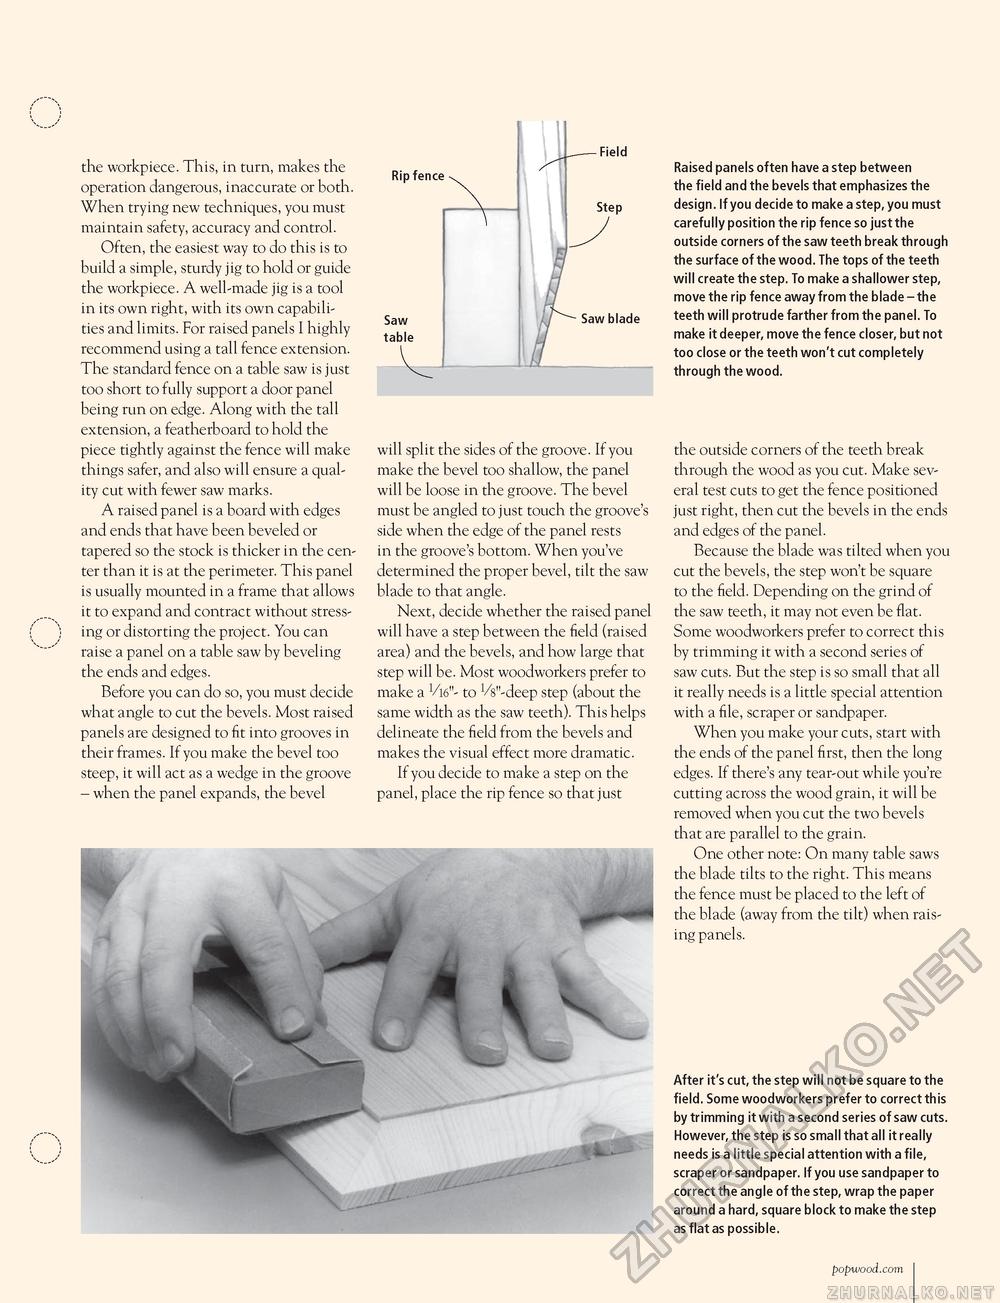
the workpiece. This, in turn, makes the operation dangerous, inaccurate or both. When trying new techniques, you must maintain safety, accuracy and control. Often, the easiest way to do this is to build a simple, sturdy jig to hold or guide the workpiece. A well-made jig is a tool in its own right, with its own capabilities and limits. For raised panels I highly recommend using a tall fence extension. The standard fence on a table saw is just too short to fully support a door panel being run on edge. Along with the tall extension, a featherboard to hold the piece tightly against the fence will make things safer, and also will ensure a quality cut with fewer saw marks. A raised panel is a board with edges and ends that have been beveled or tapered so the stock is thicker in the center than it is at the perimeter. This panel is usually mounted in a frame that allows it to expand and contract without stressing or distorting the project. You can raise a panel on a table saw by beveling the ends and edges. Before you can do so, you must decide what angle to cut the bevels. Most raised panels are designed to fit into grooves in their frames. If you make the bevel too steep, it will act as a wedge in the groove - when the panel expands, the bevel Rip fence will split the sides of the groove. If you make the bevel too shallow, the panel will be loose in the groove. The bevel must be angled to just touch the groove's side when the edge of the panel rests in the groove's bottom. When you've determined the proper bevel, tilt the saw blade to that angle. Next, decide whether the raised panel will have a step between the field (raised area) and the bevels, and how large that step will be. Most woodworkers prefer to make a L6m- to L/s"-deep step (about the same width as the saw teeth). This helps delineate the field from the bevels and makes the visual effect more dramatic. If you decide to make a step on the panel, place the rip fence so that just Raised panels often have a step between the field and the bevels that emphasizes the design. If you decide to make a step, you must carefully position the rip fence so just the outside corners of the saw teeth break through the surface of the wood. The tops of the teeth will create the step. To make a shallower step, move the rip fence away from the blade - the teeth will protrude farther from the panel. To make it deeper, move the fence closer, but not too close or the teeth won't cut completely through the wood. the outside corners of the teeth break through the wood as you cut. Make several test cuts to get the fence positioned just right, then cut the bevels in the ends and edges of the panel. Because the blade was tilted when you cut the bevels, the step won't be square to the field. Depending on the grind of the saw teeth, it may not even be flat. Some woodworkers prefer to correct this by trimming it with a second series of saw cuts. But the step is so small that all it really needs is a little special attention with a file, scraper or sandpaper. When you make your cuts, start with the ends of the panel first, then the long edges. If there's any tear-out while you're cutting across the wood grain, it will be removed when you cut the two bevels that are parallel to the grain. One other note: On many table saws the blade tilts to the right. This means the fence must be placed to the left of the blade (away from the tilt) when raising panels. After it's cut, the step will not be square to the field. Some woodworkers prefer to correct this by trimming it with a second series of saw cuts. However, the step is so small that all it really needs is a little special attention with a file, scraper or sandpaper. If you use sandpaper to correct the angle of the step, wrap the paper around a hard, square block to make the step as flat as possible. popwood.com 51 |


