Popular Woodworking 2005-06 № 148, страница 50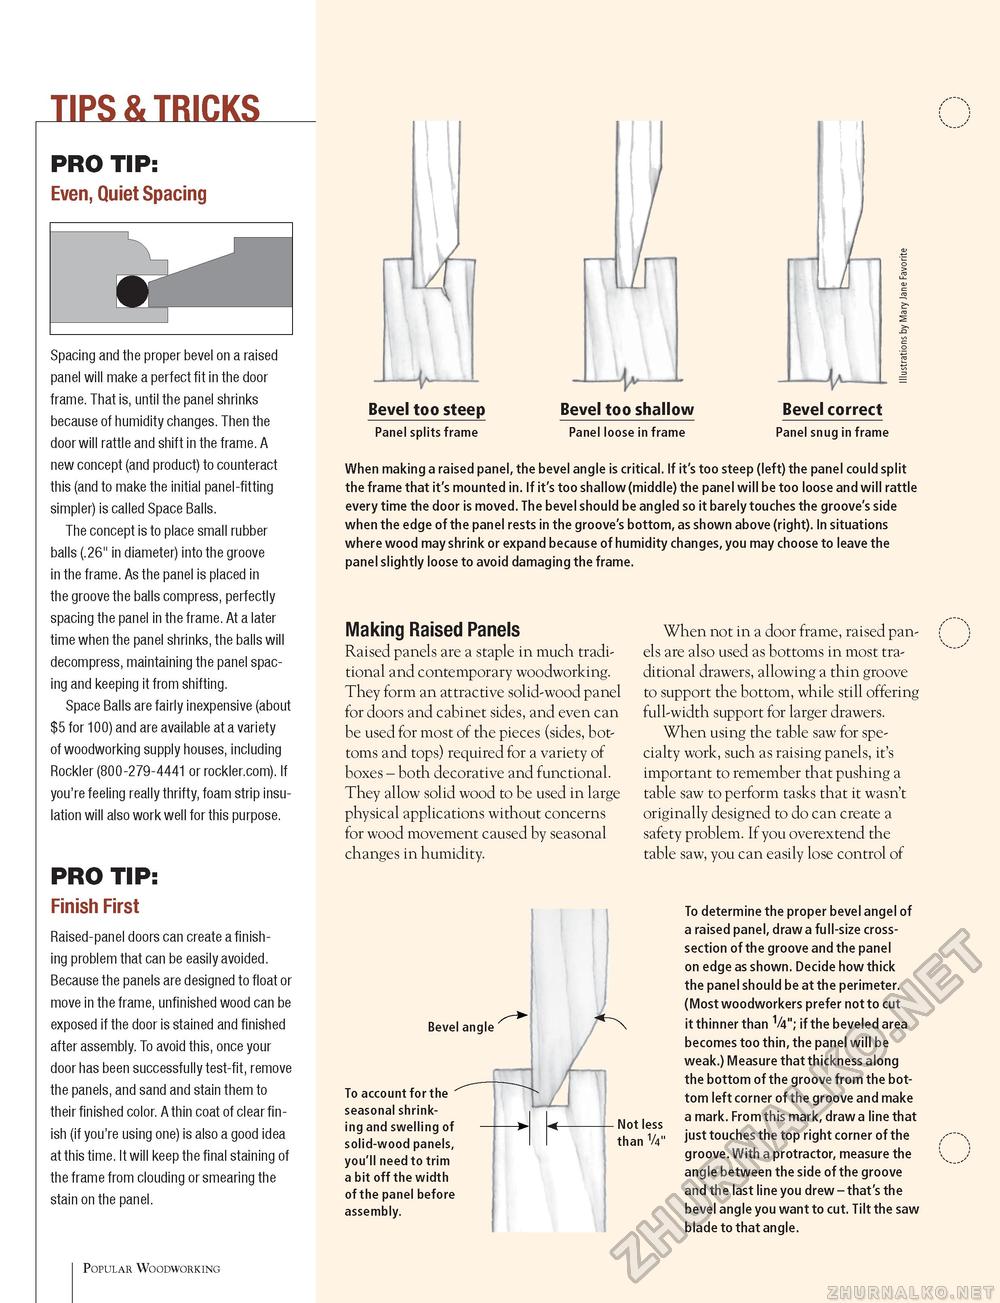
TIPS & TRICKS PRO TIP: Even, Quiet Spacing GiT- Spacing and the proper bevel on a raised panel will make a perfect fit in the door frame. That is, until the panel shrinks because of humidity changes. Then the door will rattle and shift in the frame. A new concept (and product) to counteract this (and to make the initial panel-fitting simpler) is called Space Balls. The concept is to place small rubber balls (.26" in diameter) into the groove in the frame. As the panel is placed in the groove the balls compress, perfectly spacing the panel in the frame. At a later time when the panel shrinks, the balls will decompress, maintaining the panel spacing and keeping it from shifting. Space Balls are fairly inexpensive (about $5 for 100) and are available at a variety of woodworking supply houses, including Rockler (800-279-4441 or rockler.com). If you're feeling really thrifty, foam strip insulation will also work well for this purpose. PRO TIP: Finish First Raised-panel doors can create a finishing problem that can be easily avoided. Because the panels are designed to float or move in the frame, unfinished wood can be exposed if the door is stained and finished after assembly. To avoid this, once your door has been successfully test-fit, remove the panels, and sand and stain them to their finished color. A thin coat of clear finish (if you're using one) is also a good idea at this time. It will keep the final staining of the frame from clouding or smearing the stain on the panel. Bevel too steep Panel splits frame Bevel too shallow Panel loose in frame Bevel correct Panel snug in frame When making a raised panel, the bevel angle is critical. If it's too steep (left) the panel could split the frame that it's mounted in. If it's too shallow (middle) the panel will be too loose and will rattle every time the door is moved. The bevel should be angled so it barely touches the groove's side when the edge of the panel rests in the groove's bottom, as shown above (right). In situations where wood may shrink or expand because of humidity changes, you may choose to leave the panel slightly loose to avoid damaging the frame. Making Raised Panels Raised panels are a staple in much traditional and contemporary woodworking. They form an attractive solid-wood panel for doors and cabinet sides, and even can be used for most of the pieces (sides, bottoms and tops) required for a variety of boxes - both decorative and functional. They allow solid wood to be used in large physical applications without concerns for wood movement caused by seasonal changes in humidity. When not in a door frame, raised panels are also used as bottoms in most traditional drawers, allowing a thin groove to support the bottom, while still offering full-width support for larger drawers. When using the table saw for specialty work, such as raising panels, it's important to remember that pushing a table saw to perform tasks that it wasn't originally designed to do can create a safety problem. If you overextend the table saw, you can easily lose control of To account for the seasonal shrinking and swelling of solid-wood panels, you'll need to trim a bit off the width of the panel before assembly. Bevel angle Not less than 1/4" To determine the proper bevel angel of a raised panel, draw a full-size cross-section of the groove and the panel on edge as shown. Decide how thick the panel should be at the perimeter. (Most woodworkers prefer not to cut it thinner than V4"; if the beveled area becomes too thin, the panel will be weak.) Measure that thickness along the bottom of the groove from the bottom left corner of the groove and make a mark. From this mark, draw a line that just touches the top right corner of the groove. With a protractor, measure the angle between the side of the groove and the last line you drew - that's the bevel angle you want to cut. Tilt the saw blade to that angle. Popular Woodworking |


