Popular Woodworking 2006-02 № 153, страница 54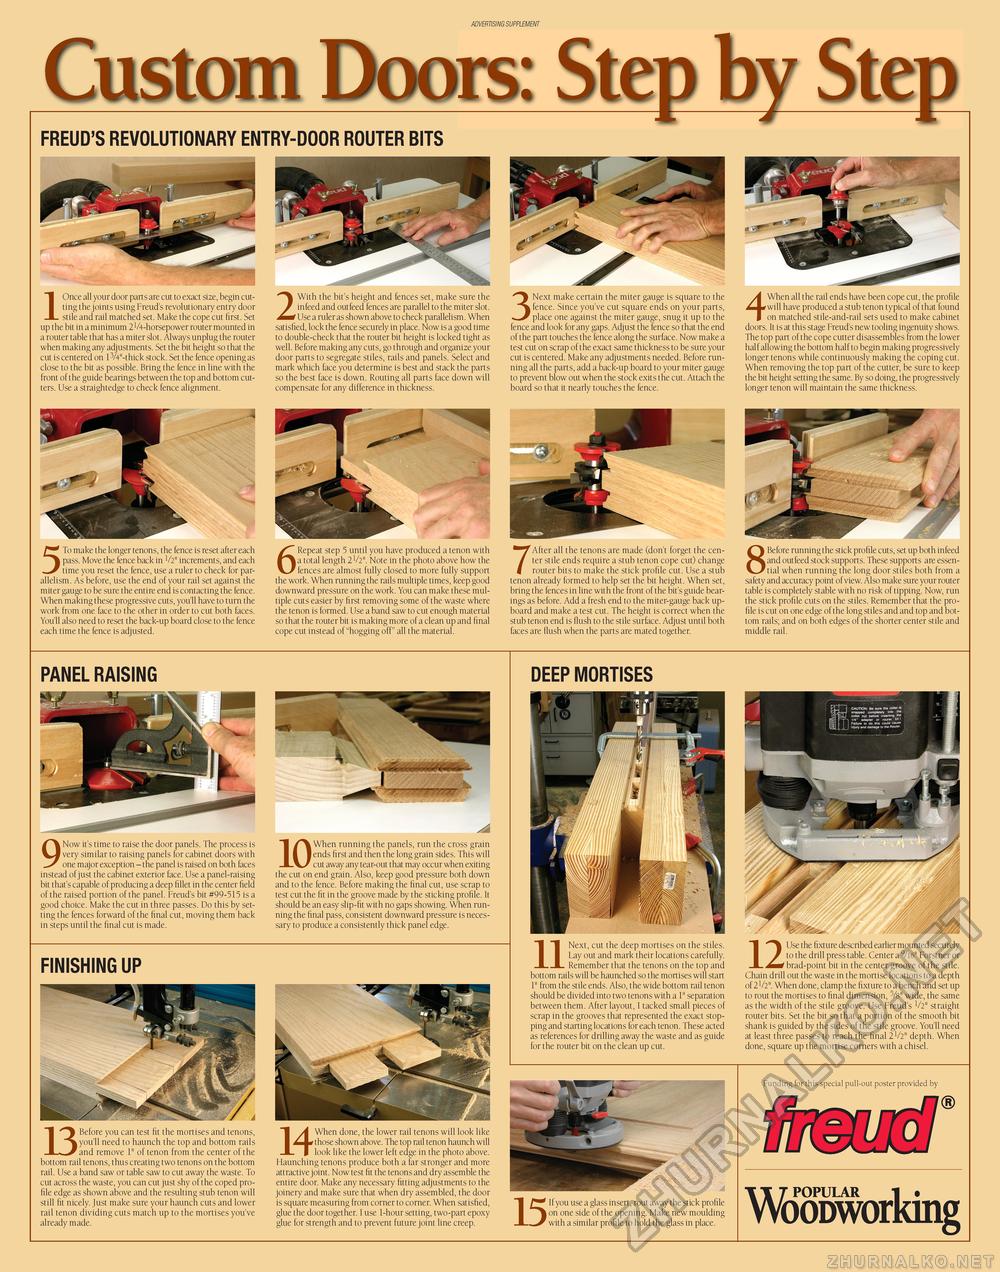
ADVERTISING SUPPLEMENT Custom Doors: Step by StepFREUD'S REVOLUTIONARY ENTRY-DOOR ROUTER BITS IOnce all your door parts are cut to exact size, begin cutting the joints using Freud's revolutionary entry door stile and rail matched set. Make the cope cut first. Set up the bit in a minimum 2V4-horsepower router mounted in a router table that has a miter slot. Always unplug the router when making any adjustments. Set the bit height so that the cut is centered on 13/4"-thick stock. Set the fence opening as close to the bit as possible. Bring the fence in line with the front of the guide bearings between the top and bottom cutters. Use a straightedge to check fence alignment. 2 With the bit's height and fences set, make sure the infeed and outfeed fences are parallel to the miter slot. Use a ruler as shown above to check parallelism. When satisfied, lock the fence securely in place. Now is a good time to double-check that the router bit height is locked tight as well. Before making any cuts, go through and organize your door parts to segregate stiles, rails and panels. Select and mark which face you determine is best and stack the parts so the best face is down. Routing all parts face down will compensate for any difference in thickness. 3 Next make certain the miter gauge is square to the fence. Since you've cut square ends on your parts, place one against the miter gauge, snug it up to the fence and look for any gaps. Adjust the fence so that the end of the part touches the fence along the surface. Now make a test cut on scrap of the exact same thickness to be sure your cut is centered. Make any adjustments needed. Before running all the parts, add a back-up board to your miter gauge to prevent blow out when the stock exits the cut. Attach the board so that it nearly touches the fence. 4 When all the rail ends have been cope cut, the profile will have produced a stub tenon typical of that found on matched stile-and-rail sets used to make cabinet doors. It is at this stage Freud's new tooling ingenuity shows. The top part of the cope cutter disassembles from the lower half allowing the bottom half to begin making progressively longer tenons while continuously making the coping cut. When removing the top part of the cutter, be sure to keep the bit height setting the same. By so doing, the progressively longer tenon will maintain the same thickness. •. < A 5 To make the longer tenons, the fence is reset after each pass. Move the fence back in V2" increments, and each time you reset the fence, use a ruler to check for parallelism. As before, use the end of your rail set against the miter gauge to be sure the entire end is contacting the fence. When making these progressive cuts, you'll have to turn the work from one face to the other in order to cut both faces. You'll also need to reset the back-up board close to the fence each time the fence is adjusted. 5 Repeat step 5 until you have produced a tenon with a total length 2V2". Note in the photo above how the fences are almost fully closed to more fully support the work. When running the rails multiple times, keep good downward pressure on the work. You can make these multiple cuts easier by first removing some of the waste where the tenon is formed. Use a band saw to cut enough material so that the router bit is making more of a clean up and final cope cut instead of "hogging off" all the material. 7 After all the tenons are made (don't forget the center stile ends require a stub tenon cope cut) change router bits to make the stick profile cut. Use a stub tenon already formed to help set the bit height. When set, bring the fences in line with the front of the bit's guide bearings as before. Add a fresh end to the miter-gauge back up-board and make a test cut. The height is correct when the stub tenon end is flush to the stile surface. Adjust until both faces are flush when the parts are mated together. 8 Before running the stick profile cuts, set up both infeed and outfeed stock supports. These supports are essential when running the long door stiles both from a safety and accuracy point of view. Also make sure your router table is completely stable with no risk of tipping. Now, run the stick profile cuts on the stiles. Remember that the profile is cut on one edge of the long stiles and and top and bottom rails; and on both edges of the shorter center stile and middle rail. PANEL RAISING 9 Now it's time to raise the door panels. The process is very similar to raising panels for cabinet doors with one major exception - the panel is raised on both faces instead of just the cabinet exterior face. Use a panel-raising bit that's capable of producing a deep fillet in the center field of the raised portion of the panel. Freud's bit #99-515 is a good choice. Make the cut in three passes. Do this by setting the fences forward of the final cut, moving them back in steps until the final cut is made. When running the panels, run the cross grain ends first and then the long grain sides. This will cut away any tear-out that may occur when exiting the cut on end grain. Also, keep good pressure both down and to the fence. Before making the final cut, use scrap to test cut the fit in the groove made by the sticking profile. It should be an easy slip-fit with no gaps showing. When running the final pass, consistent downward pressure is necessary to produce a consistently thick panel edge. FINISHING UP DEEP MORTISES UNext, cut the deep mortises on the stiles. Lay out and mark their locations carefully. Remember that the tenons on the top and bottom rails will be haunched so the mortises will start 1" from the stile ends. Also, the wide bottom rail tenon should be divided into two tenons with a 1" separation between them. After layout, I tacked small pieces of scrap in the grooves that represented the exact stopping and starting locations for each tenon. These acted as references for drilling away the waste and as guide for the router bit on the clean up cut. Use the fixture described earlier mounted securely to the drill press table. Center a 9/i6" Forstner or brad-point bit in the center groove of the stile. Chain drill out the waste in the mortise locations to a depth of 2V2". When done, clamp the fixture to a bench and set up to rout the mortises to final dimension, 5/s" wide, the same as the width of the stile groove. Use Freud's V2" straight router bits. Set the bit so that a portion of the smooth bit shank is guided by the sides of the stile groove. You'll need at least three passes to reach the final 2V2" depth. When done, square up the mortise corners with a chisel. B Before you can test fit the mortises and tenons, you'll need to haunch the top and bottom rails and remove 1" of tenon from the center of the bottom rail tenons, thus creating two tenons on the bottom rail. Use a band saw or table saw to cut away the waste. To cut across the waste, you can cut just shy of the coped profile edge as shown above and the resulting stub tenon will still fit nicely. Just make sure your haunch cuts and lower rail tenon dividing cuts match up to the mortises you've already made. HWhen done, the lower rail tenons will look like those shown above. The top rail tenon haunch will look like the lower left edge in the photo above. Haunching tenons produce both a far stronger and more attractive joint. Now test fit the tenons and dry assemble the entire door. Make any necessary fitting adjustments to the joinery and make sure that when dry assembled, the door is square measuring from corner to corner. When satisfied, glue the door together. I use 1-hour setting, two-part epoxy glue for strength and to prevent future joint line creep. If you use a glass insert, rout away the stick profile on one side of the opening. Make new moulding with a similar profile to hold the glass in place. |


