Popular Woodworking 2006-02 № 153, страница 58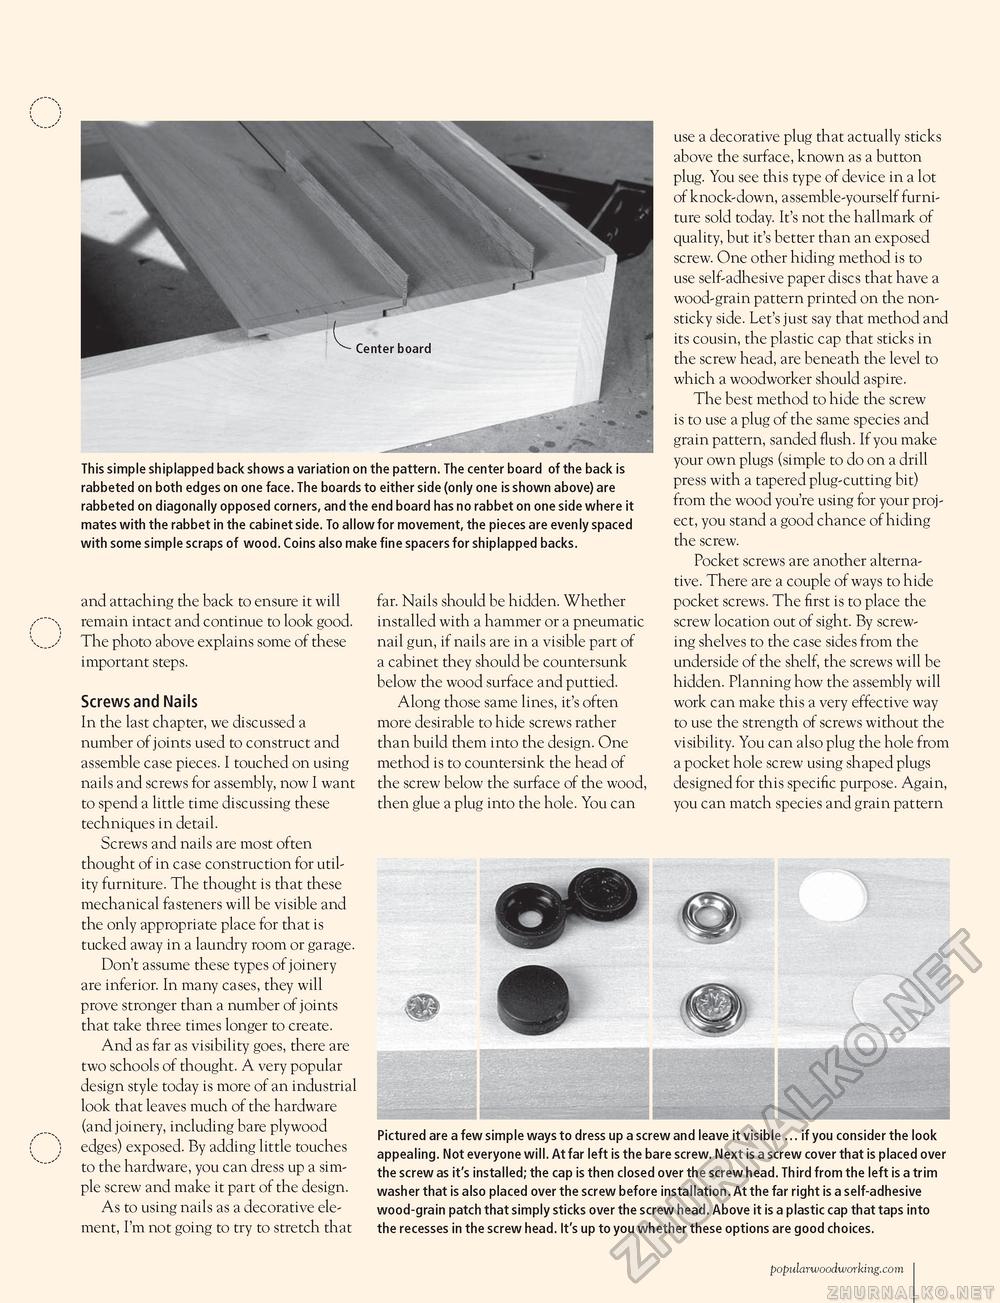
This simple shiplapped back shows a variation on the pattern. The center board of the back is rabbeted on both edges on one face. The boards to either side (only one is shown above) are rabbeted on diagonally opposed corners, and the end board has no rabbet on one side where it mates with the rabbet in the cabinet side. To allow for movement, the pieces are evenly spaced with some simple scraps of wood. Coins also make fine spacers for shiplapped backs. and attaching the back to ensure it will remain intact and continue to look good. The photo above explains some of these important steps. Screws and Nails In the last chapter, we discussed a number of joints used to construct and assemble case pieces. I touched on using nails and screws for assembly, now I want to spend a little time discussing these techniques in detail. Screws and nails are most often thought of in case construction for utility furniture. The thought is that these mechanical fasteners will be visible and the only appropriate place for that is tucked away in a laundry room or garage. Don't assume these types of joinery are inferior. In many cases, they will prove stronger than a number of joints that take three times longer to create. And as far as visibility goes, there are two schools of thought. A very popular design style today is more of an industrial look that leaves much of the hardware (and joinery, including bare plywood edges) exposed. By adding little touches to the hardware, you can dress up a simple screw and make it part of the design. As to using nails as a decorative element, I'm not going to try to stretch that far. Nails should be hidden. Whether installed with a hammer or a pneumatic nail gun, if nails are in a visible part of a cabinet they should be countersunk below the wood surface and puttied. Along those same lines, it's often more desirable to hide screws rather than build them into the design. One method is to countersink the head of the screw below the surface of the wood, then glue a plug into the hole. You can use a decorative plug that actually sticks above the surface, known as a button plug. You see this type of device in a lot of knock-down, assemble-yourself furniture sold today. It's not the hallmark of quality, but it's better than an exposed screw. One other hiding method is to use self-adhesive paper discs that have a wood-grain pattern printed on the non-sticky side. Let's just say that method and its cousin, the plastic cap that sticks in the screw head, are beneath the level to which a woodworker should aspire. The best method to hide the screw is to use a plug of the same species and grain pattern, sanded flush. If you make your own plugs (simple to do on a drill press with a tapered plug-cutting bit) from the wood you're using for your project, you stand a good chance of hiding the screw. Pocket screws are another alternative. There are a couple of ways to hide pocket screws. The first is to place the screw location out of sight. By screwing shelves to the case sides from the underside of the shelf, the screws will be hidden. Planning how the assembly will work can make this a very effective way to use the strength of screws without the visibility. You can also plug the hole from a pocket hole screw using shaped plugs designed for this specific purpose. Again, you can match species and grain pattern Pictured are a few simple ways to dress up a screw and leave it visible ... if you consider the look appealing. Not everyone will. At far left is the bare screw. Next is a screw cover that is placed over the screw as it's installed; the cap is then closed over the screw head. Third from the left is a trim washer that is also placed over the screw before installation. At the far right is a self-adhesive wood-grain patch that simply sticks over the screw head. Above it is a plastic cap that taps into the recesses in the screw head. It's up to you whether these options are good choices. popularwoodworking.com I 103 |


